Category: Ansible
How to call a json rest API using Ansible
So a very useful thing to understand is rest api’s and how to call them as a lot of organisations have these and want to integrate them into automation, a popular method is the http method
They are very simple calls { GET, POST, PUT, DELETE, PATCH }
For the sake of this post. Im going to use commvault public api’s https://api.commvault.com/
You will need to two things.
- The api endpoint which is usually an http url
Example:
- The raw json body of the of the api
Example:
{

    "csFailoverConfigInfo": {

        "configStatus": 0,

        "isAutomaticFailoverEnabled": false

    }

}
Now keep in mind if you are using an api that requires a login. In order for it to work, you will need to store the auth token to pass later to the last task later for the api call to work as intended. You can look at one of my other posts under vmware, where i used a http login to handle the tasks later, as a reference.
You can call these preliminary task as includes to store the token.
It will look something like this before it gets to the api task. You can also just do it all one on book if you wanted to. But for the purposes of this post. Im just giving ya highlevel.
- name: Login task

  include_role:

    name: commvault_login

    tasks_from: login.yml

- name: Setfact for authtoke

  set_fact:

    authtoken: "{{ login_authtoken }}"

  delegate_to: localhost
Now in order for you to pass json api to ansible. You will need to convert the json raw body into yaml format. You can use visual studio code plugins or a site like https://json2yaml.com/
So if we are to use the above raw json example it would look like this
csFailoverConfigInfo:
configStatus: 0
isAutomaticFailoverEnabled: false
So now we want to pass this information to the task in the form of a variable. A really cool thing with ansible and this type of action. Is you can create a variable name and simply pass the new yaml converted body right below the varible. You can pass this as extra-vars or create a group variable with the same name and use that.
For those you who use tower passing them as extra-vars to test something can be a pain, since it doesn’t allow you to change the passed vars and rerun the previous run just used, you have to start all over. So I prefer the command line way as its easier to be agile
disable_api_body:
csFailoverConfigInfo:
configStatus: 0
isAutomaticFailoverEnabled: false
So now we ansible to use the rest api with ansible. You create a task that after the login is run and the token is stored inside as a fact. It run the following task, in our case this call will be a POST. It will post the headers to the url which will disabled commvault live_sync which is essentially commvault failover redundancy for the backup server itself.
- name: Disable Commvault livesync

  uri:

    url: http://{{ commvault_primary }}/webconsole/api/v2/CommServ/Failover

    method: POST

    body_format: json

    body: "{{ disable_api_body }}"

    return_content: true

    headers:

      Accept: application/json

      Content-Type: application/json

      Authtoken: "{{ login_authtoken }}"

    status_code: 200

    validate_certs: false

  register: disable_livesync

  retries: "4"

  delay: "10"

  delegate_to: localhost

- debug:
    var: disable_livesync
When you run the book and your have an active failover setup correctly with commvault. In the command center under the control panel you should see livesync. If you click on this you should see either it is checked or unchecked.
How to Deploy LVM’s with Ansible
Provisioning-LVM-Filesystems:
This role is designed to use ansible-merge-vars module. An Ansible plugin to merge all variables in context with a certain suffix (lists or dicts only) and create a new variable that contains the result of this merge. This is an Ansible action plugin, which is basically an Ansible module that runs on the machine running Ansible rather than on the host that Ansible is provisioning.
Benefits: Configuring disks into LVM
Note: This post assumes you have already ansible installed and running.
Install ansible-merge-vars module:
1. root@KVM-test-box:~# pip install ansible_merge_vars
Requirement already satisfied: ansible_merge_vars in
/usr/local/lib/python3.8/dist-packages (5.0.0)
By default, Ansible will look for action plugins in an action_plugins folder adjacent to the running playbook. For more information on this, or to change the location where ansible looks for action plugin.
from ansible_merge_vars import ActionModule
Role Setup:
Once the plugin has been setup, you now you will want to setup a role.
Now we will create a task that will merge variable names associated with a list and then itemise the list for variables we will pass to provision the filesystem via the inventory/host_var or group_var
– name: Merge VG variables
merge_vars:
suffix_to_merge: vgs__to_merge
merged_var_name: merged_vgs
expected_type: ‘list’
– name: Merge LV variables
merge_vars:
suffix_to_merge: lvs__to_merge
merged_var_name: merged_lvs
expected_type: ‘list’
– name: Merge FS variables
merge_vars:
suffix_to_merge: fs__to_merge
merged_var_name: merged_fs
expected_type: ‘list’
– name: Merge MOUNT variables
merge_vars:
suffix_to_merge: mnt__to_merge
merged_var_name: merged_mnt
expected_type: ‘list’
– name: Create VGs
lvg:
vg: “{{ item.vg }}”
pvs: “{{ item.pvs }}”
with_items: “{{ merged_vgs }}”
– name: Create LVs
lvol:
vg: “{{ item.vg }}”
lv: “{{ item.lv }}”
size: “{{ item.size }}”
pvs: “{{ item.pvs | default(omit) }}”
shrink: no
with_items: “{{ merged_lvs }}”
– name: Create FSs
filesystem:
dev: “{{ item.dev }}”
fstype: “{{ item.fstype }}”
with_items: “{{ merged_fs }}”
– name: Mount FSs
mount:
path: “{{ item.path }}”
src: “{{ item.src }}”
state: mounted
fstype: “{{ item.fstype }}”
opts: “{{ item.opts | default(‘defaults’) }}”
dump: “{{ item.dump | default(‘1’) }}”
passno: “{{ item.passno | default(‘2’) }}”
with_items: “{{ merged_mnt }}”
Note: Now this currently task has no safe guards for /dev/sda or checks to ensure the disk is wiped properly in order for the disks to be added to the volume group. I have created such safe guards for others. But for the purposes of this blog post this is basics. If you want to my help you can contact me via email or the ticketing system.
Now what we are going to do is define our inventory file with what file lvm we want to crave out.
Setup inventory:
1.Go inside your inventory/host_var or group_var file and create a file for testserver1
- .nano inventory/host_var/testserver1
2. save the file.
Definitions of the variables above:
vgs__to_merge: This section is the creation volume/physical groups
– vg: vg_vmguest (this is the volume group name)
pvs: /dev/sdb (this is the physical assigned to the above volume group
– vg: vg_sl_storage (This the second volume name)
pvs: /dev/sdc (This is the second physical disk assigned to the above
volume
*You can add as many as you like*
lvs__to_merge: This section is the logical Volume creations
– vg: vg_vmguest (this is the volume group created)
lv: lv_vg_vmguest (this is the logical volume that is attached to above vg
size: 100%FREE (this says please use the whole disk)
shrink: no (this is needed to so the disk space is used correctly)
– vg: vg_sl_storage (this is the second volume created)
lv: lv_vg_sl_storage (this is the second lvm created attached to above vg)
size: 100%FREE (this is use the whole disk)
shrink: no (this is needed so the disk space is properly used)
fs__to_merge: This section formats the lvm
– dev: /dev/vg_vmguest/lv_vg_vmguest (lvm name)
fstype: ext4 (file system you want to format with)
– dev: /dev/vg_sl_storage/lv_vg_sl_storage (2nd lvm name)
fstype: ext4 (file system you want to format with)
mnt__to_merge: This section will create the path,mount, and add to fstab
– path: /vmguests (path you want created for mount)
src: /dev/vg_vmguest/lv_vg_vmguest (lvm you want to mount)
fstype: ext4 (this is for fstab adding)
– path: /sl_storage (this is second path to create)
src: /dev/vg_sl_storage/lv_vg_sl_storage (second lvm you want to mount)
fstype: ext4 (to add to fstab)
Running your playbook:
cd ansible/
Example: of justdofs.yml
– hosts: all
gather_facts: yes
any_errors_fatal: true
roles:
– role: provision-fs
Command:
ansible/$ ansible-playbook -i inventory/hosts justdofs.yml -u root -k –limit=’testservernick1′
Example of successful play:
ntailor@test-box:~/ansible/computelab$ ansible-playbook –i inventory/hosts justdofs.yml -u root -k –limit=’testservernick1‘
SSH password:
PLAY [all] *******************************************************************************************************************************************************************************************************
TASK [provision-fs : Merge VG variables] *************************************************************************************************************************************************************************
ok: [testservernick1]
TASK [provision-fs : Merge LV variables] *************************************************************************************************************************************************************************
ok: [testservernick1]
TASK [provision-fs : Merge FS variables] *************************************************************************************************************************************************************************
ok: [testservernick1]
TASK [provision-fs : Merge MOUNT variables] **********************************************************************************************************************************************************************
ok: [testservernick1]
TASK [provision-fs : Create VGs] *********************************************************************************************************************************************************************************
ok: [testservernick1] => (item={‘vg’: ‘vg_vmguest‘, ‘pvs‘: ‘/dev/sdb‘})
ok: [testservernick1] => (item={‘vg’: ‘vg_sl_storage‘, ‘pvs‘: ‘/dev/sdc‘})
TASK [provision-fs : Create LVs] *********************************************************************************************************************************************************************************
ok: [testservernick1] => (item={‘vg’: ‘vg_vmguest‘, ‘lv’: ‘lv_vg_vmguest‘, ‘size’: ‘100%FREE’, ‘shrink’: False})
ok: [testservernick1] => (item={‘vg’: ‘vg_sl_storage‘, ‘lv’: ‘lv_vg_sl_storage‘, ‘size’: ‘100%FREE’, ‘shrink’: False})
TASK [provision-fs : Create FSs] *********************************************************************************************************************************************************************************
ok: [testservernick1] => (item={‘dev’: ‘/dev/vg_vmguest/lv_vg_vmguest‘, ‘fstype‘: ‘ext4’})
ok: [testservernick1] => (item={‘dev’: ‘/dev/vg_sl_storage/lv_vg_sl_storage‘, ‘fstype‘: ‘ext4’})
TASK [provision-fs : Mount FSs] **********************************************************************************************************************************************************************************
ok: [testservernick1] => (item={‘path’: ‘/vmguests‘, ‘src‘: ‘/dev/vg_vmguest/lv_vg_vmguest‘, ‘fstype‘: ‘ext4’})
ok: [testservernick1] => (item={‘path’: ‘/sl_storage‘, ‘src‘: ‘/dev/vg_sl_storage/lv_vg_sl_storage‘, ‘fstype‘: ‘ext4’})
PLAY RECAP *******************************************************************************************************************************************************************************************************
testservernick1 : ok=8 changed=0 unreachable=0 failed=0 skipped=0 rescued=0 ignored=0
How to add VM-Tags and Custom attributes with Anisble(VMware)
So whether your using cloud or doing in house deploys. Tagging is a used a lot especially in cloud type environments. Which we will cover in later posts.
So a common reason to tag your vm is wanting to have the creation date and the type of server or environment its using, handy for backup solutions & other auditables.
Pre-requisites: Assumed.
Step by Step:
1.Create a roles directory inside /etc/ansible/roles
b.mkdir -p /etc/ansible/roles/ custom-tags-attributes-vmware/defaults
2.Now you want to create a task for the snapshots.
d.Create a file called main.yml
Note: Okay for the custom attributes to work you need to get the MOID, UUID & Folder of the vm by using the vm name. So we need to gather facts about the vm and the set those facts as variables that we can pass to the next tasks.
– name: get list of facts
vmware_guest_facts:
hostname: “{{ vcenter_host }}”
username: “{{ vcenter_username }}”
password: “{{ vcenter_password }}”
name: “{{ inventory_hostname }}”
datacenter: “{{ vcenter_dc }}”
validate_certs: False
delegate_to: localhost
ignore_errors: true
register: vm_facts
Note: So when we use the vmware_guest_facts module to gather the facts about the vm by register the facts to a variable “vm_facts”, which when you run the playbook with –vvvv will spit out the facst you can pass as indicated below.
“hw_folder“: “/SysUnix/Testing“,
“hw_guest_full_name“: “Red Hat Enterprise Linux 7 (64-bit)”,
“hw_guest_ha_state“: true,
“hw_guest_id“: “rhel7_64Guest”,
“hw_interfaces“: [
“eth0”
],
“hw_is_template“: false,
“hw_memtotal_mb“: 2048,
“hw_name“: “v-sits-test4”,
“hw_power_status“: “poweredOn“,
“hw_processor_count“: 2,
“hw_product_uuid“: “4226d4e1-6be8-9447-5ced-b037075e2ffd”,
“hw_version“: “vmx-11”,
“instance_uuid“: “50263518-c95b-c3be-5c77-4e1ea69ec295”,
“ipv4”: “192.168.1.29“,
“ipv6”: null,
“module_hw“: true,
“moid“: “vm-296678”,
“snapshots”: [],
“vimref“: “vim.VirtualMachine:vm-296678”,
“vnc“: {}
Note: Now that we have the UUID, MOID, & Folder. We now want to create static variables for UUID, MOID, & folder by using the previous variable we registered as “vm_facts”, and we want to set them as static variables by setting them as facts we can past to the tasks after. As indicated below. Again setting facts is the same as defining variables in bash. Just ansible way to do it.
– set_fact:
vm_uuid: “{{ vm_facts.instance.instance_uuid }}”
– set_fact:
moid: “{{ vm_facts.instance.moid }}”
– set_fact:
vm_folder: “{{ vm_facts.instance.hw_folder }}”
Note: Now want to use the ansible server date and pass that as a variable so you don’t have to input the date as manual value each time you deploy a new host. So we want to grab the date and setup a static fact and then pass it as its own variable. Like we did above…
– name: Get Date
shell: date +%Y-%m-%d
register: date
delegate_to: localhost
Note: We use shell module to get the date in the format we want, then register the result as the variable {{ date }}. We then set a static fact of the result and create another variable called date with using the result from the above.
– set_fact:
date: “{{ date.stdout }}”
Note: We now want to pass all the fact to the “vmware_guest_custom_attributes” module UUID, MOID, DATE, and Folder indicated as below.
– name: Add multiple virtual machine custom attributes
vmware_guest_custom_attributes:
hostname: “{{ vcenter_host }}”
username: “{{ vcenter_username }}”
password: “{{ vcenter_password }}”
name: “{{ inventory_hostname }}”
datacenter: “{{ vcenter_dc }}”
folder: “{{ vm_folder }}”
uuid: “{{ vm_facts.instance.instance_uuid }}”
moid: “{{ vm_facts.instance.moid }}”
state: present
validate_certs: False
use_instance_uuid: True
attributes:
– name: Creation Date
value: “{{ date }}”
# – name: MyAttribute2 – Note: You can add additional attributes if you wish
# value: test2 – Note: You can add additional attributes if you wish
delegate_to: localhost
register: attributes
Note: Okay so depending on which module you use, some require you to gather facts about the vmware categories. This is just incase you need the cateogory_id which is usually derived from using a REST API in json or other method. The “community.vmware.vmware_category_facts”will be able to pull the info and then you can pass it as a variable or a static value. IF YOU NEED, however this is NOT needed. If you use the “vmware_tag_manager” module”
– name: Gather facts about tag categories
community.vmware.vmware_category_facts:
hostname: “{{ vcenter_host }}”
username: “{{ vcenter_username }}”
password: “{{ vcenter_password }}”
validate_certs: no
delegate_to: localhost
register: all_tag_category_facts
ok: [v-sits-test4] => {
“changed”: false,
“invocation”: {
“module_args“: {
“hostname”: “vmware.nicktailor.com“,
“password”: “VALUE_SPECIFIED_IN_NO_LOG_PARAMETER”,
“port”: 443,
“protocol”: “https”,
“username”: “admin“,
“validate_certs“: false
}
},
“tag_category_facts“: [
{
“category_associable_types“: [
“VirtualMachine“
],
“category_cardinality“: “SINGLE”,
“category_description“: “VM Type – Clone, Decomm, Dev, Prod, SRM, SLM, Template or Test”,
“category_id“: “urn:vmomi:InventoryServiceCategory:f1024eb4-d7d4-49fe-9725-4dcba39fbe3b:GLOBAL”,
“category_name“: “VMType“,
“category_used_by“: []
},
{
“category_associable_types“: [
“VirtualMachine“
],
“category_cardinality“: “SINGLE”,
“category_description“: “Team or Department”,
“category_id“: “urn:vmomi:InventoryServiceCategory:888a0877-5335-4477-9347-6d8de5b3e60e:GLOBAL”,
“category_name“: “Team/Dept”,
“category_used_by“: []
}
]
}
Note: Now that we want to create the tag for the vm using the ““vmware_tag_manager” module. The only variable that is passed from outside the defaults at the inventory_hostname level “host_var/nicktest1” is the {{ vm_tag }} Make sure you have this defined for the role to work properly.
– name: Add tags to a virtual machine
vmware_tag_manager:
hostname: ‘{{ vcenter_host }}’
username: ‘{{ vcenter_username }}’
password: ‘{{ vcenter_password }}’
validate_certs: no
tag_names:
– “{{ vm_tag }}” – passed at the host_var/nicktest1
object_name: “{{ inventory_hostname }}”
object_type: VirtualMachine
state: present
delegate_to: localhost
Note: You will likely have a group_var from you vmdeploy role that you can use for here.
vcenter_username: admin
vcenter_password: should be vault encrypted variable
vcenter_host: vmware.nicktailor.com
vcenter_dc: London
/etc/ansible/inventory/TEST/hosts
Run your playbook: from /etc/ansible
Playbook log:
[root@ansible-server]# ansible-playbook –i inventory/TEST/hosts justcustomattrib.yml –ask-vault-pass –limit=’v-sits-test4′
Vault password:
PLAY [all] **********************************************************************************************************************************
TASK [custom-tags-attributes-vmware : get list of facts] ************************************************************************************
[DEPRECATION WARNING]: The ‘vmware_guest_facts‘ module has been renamed to ‘vmware_guest_info‘. This feature will be removed in version
2.13. Deprecation warnings can be disabled by setting deprecation_warnings=False in ansible.cfg.
ok: [v-sits-test4]
TASK [custom-tags-attributes-vmware : set_fact] *********************************************************************************************
ok: [v-sits-test4]
TASK [custom-tags-attributes-vmware : set_fact] *********************************************************************************************
ok: [v-sits-test4]
TASK [custom-tags-attributes-vmware : set_fact] *********************************************************************************************
ok: [v-sits-test4]
TASK [custom-tags-attributes-vmware : Get Date] *********************************************************************************************
changed: [v-sits-test4]
TASK [custom-tags-attributes-vmware : set_fact] *********************************************************************************************
ok: [v-sits-test4]
TASK [custom-tags-attributes-vmware : Add multiple virtual machine custom attributes] *******************************************************
ok: [v-sits-test4]
TASK [custom-tags-attributes-vmware : Gather facts about tag categories] ********************************************************************
ok: [v-sits-test4]
TASK [custom-tags-attributes-vmware : Add tags to a virtual machine] ************************************************************************
ok: [v-sits-test4]
PLAY RECAP **********************************************************************************************************************************
v-sits-test4 : ok=9 changed=1 unreachable=0 failed=0 skipped=0 rescued=0 ignored=0
How to remove snapshots with Ansible(VMware)
Okay, so lots of folks ask me about this, and there are a number of ways you can do this.
But if you’re using vmware and redhat satellite for central patch management for your redhat environment.
Then depending on how you patch your systems. If you snapshot every group prior to patching. Then this post will be perfect for you.
Process:
Pre-requisites: Assumed.
Step by Step:
1.Create a roles directory inside /etc/ansible/roles
b.mkdir -p /etc/ansible/roles/remove-snapshot/defaults
2.Now you want to create a task for the snapshots.
d.Create a file called main.yml
– name: Login into vCenter and get cookies
delegate_to: localhost
uri:
url: https://{{ vcenter_host }}/rest/com/vmware/cis/session
force_basic_auth: yes
validate_certs: no
method: POST
user: ‘{{ vcenter_username }}’
password: ‘{{ vcenter_password }}’
register: login
Note: Okay so what we want to do is find the virtual machine in vsphere by name and then grab its folder value and pass it as a variable so you don’t need to define it statically in your host_var. The main reason is, say you deployed a vm and months later moved it to another folder, your code will likely have the origin folder which would be annoying, and the ansible documentation doesn’t really cover this approach, you basically figure it out as you do it. So im going to save you all time. Here is how you do it. The below will gather vm_facts based on the inventory_hostname
– name: Find Guest’s Folder using name
vmware_guest_find:
hostname: “{{ vcenter_host }}”
username: “{{ vcenter_username }}”
password: “{{ vcenter_password }}”
validate_certs: no
name: “{{ inventory_hostname }}”
delegate_to: localhost
ignore_errors: true
register: vm_facts
Note: It will than gather those facts and find the folder value. You then register the facts to a variable “vm_facts” Now it will spit out what it finds when you do –vvvv when you do your play. From there you can see the folder setting. You now want to set that that folder setting as its own variable that you can pass to another task as indicated below.
ok: [ansible-server] => {
“changed”: false,
“folders”: [
“/SysUnix/Teststuff“
],
“invocation”: {
“module_args“: {
“datacenter“: null,
“hostname”: “vmware.nicktailor.com“,
“name”: ” ansible-server“,
“password”: “VALUE_SPECIFIED_IN_NO_LOG_PARAMETER”,
“port”: 443,
“proxy_host“: null,
“proxy_port“: null,
“use_instance_uuid“: false,
“username”: “svc_ans“,
“uuid“: null,
“validate_certs“: false
}
}
}
– name: “vm_folder – setting folder value”
set_fact:
folder : “{{ vm_facts.folders }}”
Note: So you can see that the facts has a sub fact called “folders”. We want to pass that by setting that value as its own variable by making it a fact. Ansible way to set variables is setting facts. So we make that value above into a variable “vm_facts.folders” and then pass that into the next task where it asks for folders. This will get around the having to provide the exact folder the vm_resides to create snapshotting for an array of hosts. This section is basically identical to create except the “state” is set to absent
– name: Remove Snapshot
vmware_guest_snapshot:
hostname: “{{ vcenter_host }}”
username: “{{ vcenter_username }}”
password: “{{ vcenter_password }}”
datacenter: “{{ vcenter_dc }}”
validate_certs: no
name: “{{ inventory_hostname }}”
state: absent
snapshot_name: “Ansible Managed Snapshot”
folder: “‘{{ vm_facts.folders }}'”
description: “This snapshot is created by Ansible Playbook”
delegate_to: localhost
Note: You will likely have a group_var from you vmdeploy role that you can use for here.
vcenter_username: admin
vcenter_password: should be vault encrypted variable
vcenter_host: vmware.nicktailor.com
vcenter_dc: London
/etc/ansible/inventory/TEST/hosts
Run your playbook: from /etc/ansible
Playbook log:
[root@ansible-server]# ansible-playbook –i inventory/TEST/hosts justremovevmsnap.yml –ask-vault-pass –limit=’nicktest1‘
Vault password:
PLAY [all] **********************************************************************************************************************************
TASK [remove_snapshot : Login into vCenter and get cookies] *********************************************************************************
ok: [nicktest1]
TASK [remove_snapshot : Find Guest’s Folder using name] *************************************************************************************
ok: [nicktest1]
TASK [remove_snapshot : vm_folder – setting folder value] ***********************************************************************************
ok: [nicktest1]
TASK [remove_snapshot : remove Snapshot] ****************************************************************************************************
ok: [nicktest1]
PLAY RECAP **********************************************************************************************************************************
nicktest1 : ok=4 changed=0 unreachable=0 failed=0 skipped=0 rescued=0 ignored=0
Note: This uses the snapshot name to remove as the one you used to create. If another snapshot exists with a different name it will ignore it entirely. If you pass snapshot variable with another name and run the book again, it will remove another snapshot. The same applies to removing snapshots, it will remove based on the name.
How to create snapshots with Ansible (VMware)
Okay, so lots of folks ask me about this, and there are a number of ways you can do this.
But if you’re using vmware and redhat satellite for central patch management for your redhat environment.
Then depending on how you patch your systems. If you snapshot every group prior to patching. Then this post will be perfect for you.
Patching Processes:
– (these are not in this post) part 2
Note: There is a step to change the content view of all your hosts and cleaning your yum repos on all the hosts. I have not written a post on this step yet, but you should obviously automate that. I will eventually get around to including it, when I have some time.
Pre-requisites: Assumed.
Step by Step:
b.mkdir -p /etc/ansible/roles/create-snapshot/defaults
2.Now you want to create a task for the snapshots.
d.Create a file called main.yml
3.Add the following code and save the file
– name: Login into vCenter and get cookies
delegate_to: localhost
uri:
url: https://{{ vcenter_host }}/rest/com/vmware/cis/session
force_basic_auth: yes
validate_certs: no
method: POST
user: ‘{{ vcenter_username }}’
password: ‘{{ vcenter_password }}’
register: login
Note: Okay so what we want to do is find the virtual machine in vsphere by name and then grab its folder value and pass it as a variable so you don’t need to define it statically in your host_var. The main reason is, say you deployed a vm and months later moved it to another folder, your code will likely have the origin folder which would be annoying, and the ansible documentation doesn’t really cover this approach, you basically figure it out as you do it. So im going to save you all time. Here is how you do it. The below will gather vm_facts based on the inventory_hostname
– name: Find Guest’s Folder using name
vmware_guest_find:
hostname: “{{ vcenter_host }}”
username: “{{ vcenter_username }}”
password: “{{ vcenter_password }}”
validate_certs: no
name: “{{ inventory_hostname }}”
delegate_to: localhost
ignore_errors: true
register: vm_facts
Note: It will than gather those facts and find the folder value. You then register the facts to a variable “vm_facts” Now it will spit out what it finds when you do –vvvv when you do your play. From there you can see the folder setting. You now want to set that that folder setting as its own variable that you can pass to another task as indicated below.
ok: [ansible-server] => {
“changed”: false,
“folders”: [
“/SysUnix/Teststuff“
],
“invocation”: {
“module_args“: {
“datacenter“: null,
“hostname”: “vmware.nicktailor.com“,
“name”: “ ansible-server“,
“password”: “VALUE_SPECIFIED_IN_NO_LOG_PARAMETER”,
“port”: 443,
“proxy_host“: null,
“proxy_port“: null,
“use_instance_uuid“: false,
“username”: “admin“,
“uuid“: null,
“validate_certs“: false
}
}
}
– name: “vm_folder – setting folder value”
set_fact:
folder : “{{ vm_facts.folders }}”
Note: So you can see that the facts has a sub fact called “folders”. We want to pass that by setting that value as its own variable by making it a fact. Ansible way to set variables is setting facts. So we make that value above into a variable “vm_facts.folders” and then pass that into the next task where it asks for folders. This will get around the having to provide the exact folder the vm_resides to create snapshotting for an array of hosts.
– name: Create Snapshot
vmware_guest_snapshot:
hostname: “{{ vcenter_host }}”
username: “{{ vcenter_username }}”
password: “{{ vcenter_password }}”
datacenter: “{{ vcenter_dc }}”
validate_certs: no
name: “{{ inventory_hostname }}”
state: present
snapshot_name: “Ansible Managed Snapshot”
folder: “‘{{ vm_facts.folders }}'”
description: “This snapshot is created by Ansible Playbook”
delegate_to: localhost
Note: You will likely have a group_var from you vmdeploy role that you can use for here.
vcenter_username: admin
vcenter_password: should be vault encrypted variable
vcenter_host: vmware.nicktailor.com
vcenter_dc: London
/etc/ansible/inventory/TEST/hosts
Run your playbook: from /etc/ansible
Playbook log:
[root@ansible–server]# ansible-playbook –i inventory/TEST/hosts justcreatevmsnap.yml –ask-vault-pass –limit=’nicktest1‘
Vault password:
PLAY [all] **********************************************************************************************************************************
TASK [create_snapshot : Login into vCenter and get cookies] *********************************************************************************
ok: [nicktest1]
TASK [create_snapshot : Find Guest’s Folder using name] *************************************************************************************
ok: [nicktest1]
TASK [create_snapshot : vm_folder – setting folder value] ***********************************************************************************
ok: [nicktest1]
TASK [create_snapshot : Create Snapshot] ****************************************************************************************************
ok: [nicktest1]
PLAY RECAP **********************************************************************************************************************************
nicktest1 : ok=4 changed=0 unreachable=0 failed=0 skipped=0 rescued=0 ignored=0
Note: This uses the snapshot name to create. If another snapshot exists with a different name it will ignore it entirely. If you pass snapshot variable with another name and run the book again, it will create another snapshot. The same applies to removing snapshots, it will remove based on the name. We will cover that in my post to remove snapshots.
How to Create a New Host in Foreman with Ansible
Okay…this one was quite difficult to find online. Seems like the ansible documentation for the foreman module was seriously lacking or not kept up to date by anyone. I searched for awhile to see if anyone had an actual working model of it.
Not even in the ansible chat rooms did anyone know….which was weak.
So I spent some time getting this to work smoothly, and you will probably not find anywhere else on the web on how to do this. If you do show me….so I can kick myself.
Lets get dangerous then. 😊
Step by step:
Foreman – Already setup and your “computer resource” is hooked in (VMware)
Note: The compute profile(vmware) when hooked in, will also trigger a new vm creation in vsphere prepped to do DHCP. You can combine variables from vmware_guest module and this module as they require similar variables to be passed. To setup a one stop shop to deploy in foreman and vmware with just using ansible. Iv done this already…..
Special notes: The foreman I had setup did not have organisation or location configured. This caused the module to not function properly and I had to contact one of the developers who helped me patch the code so I didn’t require them to be configured or defined. Which I will show you all how to do.
Ansible – Assuming you have it setup and working with python 2.7 not sure this module will work with python 3. Havent tried that yet…..
Module – TheForeman Collection
Note: You can find the locations of these certs on foreman server. You will to copy them over to ansible for the callback to work properly. However, it is not needed to complete the host creation, you likely just see an error at the end of the play.
[callback_foreman]
url = ‘http://foreman-1.tdr.corp-apps.com’
ssl_cert = /etc/foreman-proxy/ssl-cert.pem
ssl_key = /etc/foreman-proxy/ssl-pvt.pem
verify_certs = /etc/foreman-proxy/ssl-ca
Okay once installed you. If you look at the ansible documentation on how to manage hosts using this module…from redhat.
It utterly useless…and will not work if you try to use the examples below.
https://people.redhat.com/evgeni/fam-antsibull/plugins/host_module.html
– name: “Create a host”
host:
username: “admin”
password: “changeme“
server_url: “https://foreman.example.com”
name: “new_host“
hostgroup: my_hostgroup
state: present
The fix was to avoid trying to touch a specific resource that is only available when you have Org/Loc enabled.
diff –git plugins/module_utils/foreman_helper.py plugins/module_utils/foreman_helper.py
index 432c76df..c9a3abda 100644
— plugins/module_utils/foreman_helper.py
+++ plugins/module_utils/foreman_helper.py
@@ -396,8 +396,9 @@ class ForemanAnsibleModule(AnsibleModule):
_host_update = next(x for x in _host_methods if x[‘name’] == ‘update’)
for param in [‘location_id‘, ‘organization_id‘]:
– _host_update_taxonomy_param = next(x for x in _host_update[‘params’] if x[‘name’] == param)
– _host_update[‘params’].remove(_host_update_taxonomy_param)
+ _host_update_taxonomy_param = next((x for x in _host_update[‘params’] if x[‘name’] == param), None)
+ if _host_update_taxonomy_param is not None:
+ _host_update[‘params’].remove(_host_update_taxonomy_param)
@_check_patch_needed(fixed_version=’2.0.0′)
def _patch_templates_resource_name(self):
Trick: with ansible you can write some of the code and run the playbook and if there are missing variables it will tell you what they are.
fatal: [testnick1]: FAILED! => {
“changed”: false,
“invocation”: {
“module_args“: {
“activation_keys“: null,
“architecture”: null,
“build”: null,
“comment”: null,
“compute_attributes“: null,
“compute_profile“: null,
“compute_resource“: null,
“config_groups“: null,
“content_source“: null,
“content_view“: null,
“domain”: null,
“enabled”: null,
“environment”: null,
“hostgroup“: “my_hostgroup“,
“image”: null,
“interfaces_attributes“: null,
“ip“: null,
“kickstart_repository“: null,
“lifecycle_environment“: null,
“location”: null,
“mac”: null,
“managed”: null,
“medium”: null,
“name”: “testnick1”,
“openscap_proxy“: null,
“operatingsystem“: null,
“organization”: null,
“owner”: null,
“owner_group“: null,
“parameters”: null,
“password”: “VALUE_SPECIFIED_IN_NO_LOG_PARAMETER”,
“provision_method“: null,
“ptable“: null,
“puppet_ca_proxy“: null,
“puppet_proxy“: null,
“puppetclasses“: null,
“pxe_loader“: null,
“realm”: null,
“root_pass“: null,
“server_url“: “http://foreman-1.nictailor.com/”,
“state”: “present”,
“subnet”: null,
“subnet6”: null,
“username”: “ntailor“,
“validate_certs“: true
}
},
“msg“: “The hostname must be FQDN”
}
PLAY RECAP ************************************************************************************************************************************************************************
testnick1 : ok=0 changed=0 unreachable=0 failed=1 skipped=0 rescued=0 ignored=0
Create a Host: This code is what you need for this module to work.
– name: “Create a host”
theforeman.foreman.host:
username: “{{ foreman_user }}”
password: “{{ vcenter_password }}”
server_url: “{{ server_url }}”
name: “{{ inventory_hostname }}”
hostgroup: “{{ host_group }}”
managed: no
build: no
compute_profile: “{{ compute_profile }}”
compute_resource: “{{ computer_resource }}”
compute_attributes:
cpus: “{{ vm_cpu_count }}”
memory_mb: “{{ vm_memory }}”
interfaces_attributes:
– type: “interface”
primary: true
compute_attributes:
name: nic1
network: “{{ vm_vlan_name }}”
interface: “{{ vm_interface }}”
subnet: “{{ vm_subnet }}”
ip: “{{ vm_ip }}”
domain: “{{ domain }}”
provision: yes
operatingsystem: “{{ operating_system }}”
medium: “{{ medium }}”
architecture: x86_64
pxe_loader: PXELinux BIOS
puppet_ca_proxy: “{{ puppet_ca_proxy }}”
puppet_proxy: “{{ puppet_proxy }}”
root_pass: “{{ root_pass }}”
environment: tdr
# ptable: Centos – LVM – / , swap
ptable: “{{ ptable }}”
# owner: unix
state: present
validate_certs: false
delegate_to: localhost
– name: “Switch host on”
theforeman.foreman.host_power:
username: “{{ foreman_user }}”
password: “{{ foreman_password }}”
server_url: “{{ server_url }}”
hostname: “{{ inventory_hostname }}”
state: on
validate_certs: false
delegate_to: localhost
Note: You can find all these variables inside foreman GUI with a bit of digging.
foreman_user: Reptilianfilth
foreman_password: { generally want a ansible vault password }
compute_profile: vmware
computer_resource: vcenter.nic.internal
domain: nic.internal
medium: 7.8-CentOS
puppet_ca_proxy: puppet-2.nic.internal
puppet_proxy: puppet-2.nic.internal
#VM creation variables
vm_network: niccorp-192.168.65_corp
vm_interface: VMXNET3
vm_subnet: 192.168.65.0
vm_ip: 192.168.65.103
domain: nic.internal
managed: no
host_group: Base-Server/Centos-7.8.2003
operating_system: Centos 7.8.2003
ptable: Centos – LVM – / , swap
root_pass: changemetwiceaday
medium: 7.8-CentOS
Special Note: Now if you wanted to have it so you can use foreman module or vmware_guest module combining the variables names between the modules.
You can do as below. You will need to ensure the variables match but it works. You can get around having to rely on DHCP with this.
#VM creation variables foreman and vmware together
vm_vlan_name: nic_192.168.44_db_stor2
vm_datastore: esx_nicrcorp
vm_dvswitch: VDS-nic-Corporate
vm_interface: VMXNET3
vm_subnet: 192.1268.44.0
vm_ip: 192.168.44.14
vm_netmask: 255.255.255.0
vm_gateway: 192.168.44.254
vm_dns_servers: [192.168.1.1]
vm_dns_suffix: nic.internal
vm_cpu_count: 4
vm_memory: 16384
vm_state: poweredon
vm_connected: true
domain: tdr.internal
managed: no
host_group: Base-Server/Centos-7.8.2003
operating_system: Centos 7.8.2003
ptable: Centos – LVM – / , swap
root_pass: changemetwiceaday
medium: 7.8-CentOS
Before you to start one last thing. If you remember in the defaults we outlined
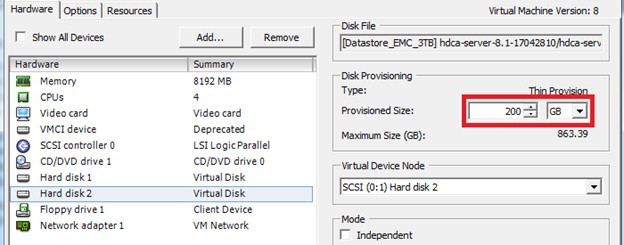
compute_profile: vmware
(this is the foreman profile it will use, so whatever defaults you have set for network and disksize here is what will be used to trigger foreman to create a host in vcenter, so it good to go check this in foreman first.)
Run playbook: from /etc/ansible
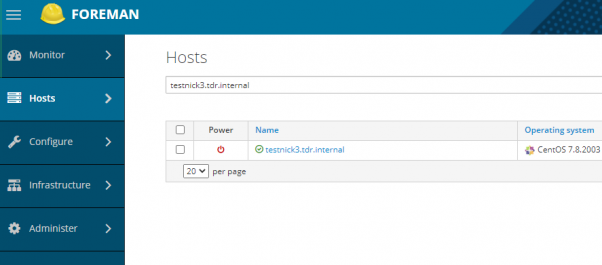
[root@nick ansible]# ansible-playbook –i inventory/TDR/hosts foremancreatehost.yml –ask-vault-pass –limit ‘testnick3.tdr.internal’
Vault password:
PLAY [all] **********************************************************************************************************************************************
TASK [ansible-provision-foreman : Create a host] ********************************************************************************************************
changed: [testnick3.tdr.internal]
PLAY RECAP *******************************************************************************************************************************************************************************
testnick3.tdr.internal : ok=1 changed=1 unreachable=0 failed=0 skipped=0 rescued=0 ignored=0
403 Client Error: Forbidden for url: http://foreman-1.nic.corp.com/api/v2/reports (if you see this, just ignore it) Its just callback report.
How to add a custom tomcat installation to SystemD with ansible.
Okay so say you have a custom install of tomcat and java, which is what a lot of people do because java update and tomcat updates can bring things down. So things need to be tested before updates and standard patch cycles can end up affecting the environment.
But you want to handle the startup and stopping via systemd to be able to get status outputs and let system handle the service on reboots. This is how to do it slick.
Ansible Setup:
Role:
Setup the new role:
Main.yml
===========================================
Note: this will install the redhat tomcat version of tomcat. Do not worry we are not going to be using this tomcat. This is just so redhat automatically setups all the needed services and locations. We will then update the SystemD config for tomcat to use the custom version.
– name: Install the latest version of tomcat
package:
name: tomcat
state: latest
Note: This symlink is important as tomcat default install by redhat is inside /opt/tomcat. Update the src to the custom location of your tomcat
– name: Create symbolic link for “tomcat” in /opt
file:
src: /custom/install/tomcat
path: /opt/tomcat
force: yes
state: link
Note: This will enable tomcat to start up on reboot
– name: Enable tomcat service on startup
shell: systemctl enable tomcat
Note: This is the tomcat systemd service file that systemd uses for the default install. We are going to empty.
– name: Null tomcat.service file
shell: “>/etc/systemd/system/tomcat.service“
Note: We are now going to add our custom block for tomcat into the tomcat.service file we just emptied above using the blockinfle module. This means that this whole section will also be managed by ansible as well. Make sure you adjust the java_home if your java isn’t location inside tomcat. Along with the user,group,umask for to your custom tomcat.
– name: Edit tomcat.service for systemd
blockinfile:
dest: /etc/systemd/system/tomcat.service
insertafter:
block: |
[Unit]
Description=Apache Tomcat Web Application Container
After=syslog.target network.target
[Service]
Type=forking
Environment=JAVA_HOME=/opt/tomcat
Environment=CATALINA_PID=/opt/tomcat/temp/tomcat.pid
Environment=CATALINA_HOME=/opt/tomcat
Environment=CATALINA_BASE=/opt/tomcat
Environment=’CATALINA_OPTS=-Xms512M -Xmx1024M -server –XX:+UseParallelGC‘
Environment=’JAVA_OPTS=-Djava.awt.headless=true –Djava.security.egd=file:/dev/./urandom‘
ExecStart=/opt/tomcat/bin/startup.sh
ExecStop=/bin/kill -15 $MAINPID
User=tomcat
Group=tomcat
UMask=
RestartSec=10
Restart=always
[Install]
WantedBy=multi-user.target
Note: This will then reload the custom tomcat via systemd
– name: Start tomcat service with Systemd
systemd:
name: tomcat
daemon_reload: yes
Note: This will then check to see if the new tomcat is service running and out to the ansible playbook log.
– name: get service facts
service_facts:
– name: Check to see if tomcat is running
debug:
var: ansible_facts.services[“tomcat.service“]
Ansibe playbook log:
[root@nickansible]# ansible-playbook –i inventory/DEV/hosts justtomcatrole.yml –limit ‘nicktestvm‘ -k
SSH password:
PLAY [all] ************************************************************************************************************************************************************************************************
TASK [AddTomCatSystemD : Create symbolic link for “tomcat” in /opt] ***************************************************************************************************************************************
changed: nicktestvm]
TASK [AddTomCatSystemD : Enable tomcat service on startup] ************************************************************************************************************************************************
changed: nicktestvm]
TASK [AddTomCatSystemD : Null tomcat.service file] ********************************************************************************************************************************************************
changed: nicktestvm]
TASK [AddTomCatSystemD : Edit tomcat.service for systemd] *************************************************************************************************************************************************
changed: nicktestvm]
TASK [AddTomCatSystemD : Start tomcat service with Systemd] ***********************************************************************************************************************************************
ok: nicktestvm]
TASK [AddTomCatSystemD : get service facts] ***************************************************************************************************************************************************************
ok: nicktestvm]
TASK [AddTomCatSystemD : Check to see if tomcat is running] ***********************************************************************************************************************************************
ok: nicktestvm] => {
“ansible_facts.services[\”tomcat.service\”]”: {
“name”: “tomcat.service“,
“source”: “systemd“,
“state”: “running”,
“status”: “enabled”
}
}
PLAY RECAP ************************************************************************************************************************************************************************************************
nicktestvm : ok=7 changed=4 unreachable=0 failed=0 skipped=0 rescued=0 ignored=0
==========================
[root@nicktestvm ~]# cat /etc/systemd/system/tomcat.service
# BEGIN ANSIBLE MANAGED BLOCK
[Unit]
Description=Apache Tomcat Web Application Container
After=syslog.target network.target
[Service]
Type=forking
Environment=JAVA_HOME=/opt/tomcat
Environment=CATALINA_PID=/opt/tomcat/temp/tomcat.pid
Environment=CATALINA_HOME=/opt/tomcat
Environment=CATALINA_BASE=/opt/tomcat
Environment=’CATALINA_OPTS=-Xms512M -Xmx1024M -server -XX:+UseParallelGC’
Environment=’JAVA_OPTS=-Djava.awt.headless=true -Djava.security.egd=file:/dev/./urandom’
ExecStart=/opt/tomcat/bin/startup.sh
ExecStop=/bin/kill -15 $MAINPID
User=tomcat
Group=tomcat
UMask=0028
RestartSec=10
Restart=always
[Install]
WantedBy=multi-user.target
# END ANSIBLE MANAGED BLOCK
SystemD Status:
root@nicktestvm ~]# systemctl status tomcat
● tomcat.service – Apache Tomcat Web Application Container
Loaded: loaded (/etc/systemd/system/tomcat.service; enabled; vendor preset: disabled)
Active: active (running) since Thu 2020-12-24 05:11:21 GMT; 21h ago
Process: 6333 ExecStop=/bin/kill -15 $MAINPID (code=exited, status=0/SUCCESS)
Process: 6353 ExecStart=/opt/tomcat/bin/startup.sh (code=exited, status=0/SUCCESS)
Main PID: 6363 (java)
CGroup: /system.slice/tomcat.service
└─6363 /usr/local/java/java -Djava.util.logging.config.file=/opt/tomcat/conf/logging.properties -Djava.util.logging.manager=org.apache.juli.ClassLoaderLogManager -server -Xms1…
Dec 24 05:11:21 nicktestvm systemd[1]: Starting Apache Tomcat Web Application Container…
Dec 24 05:11:21 nicktestvm startup.sh[6353]: Existing PID file found during start.
Dec 24 05:11:21 nicktestvm startup.sh[6353]: Removing/clearing stale PID file.
Dec 24 05:11:21 nicktestvm systemd[1]: Started Apache Tomcat Web Application Container.
How to generate new Network UUID’s with Ansible
Okay some of you might have deployed linux vm’s from clone templates using ansible by way of the vmware_guest module.
Now everybody goes about it differently, and from what I read online…. It would seem that lots of people over complicate the generation of the UUID with over complicated code to generate the UUID.
At the end of the day all a UUID is….is JUST A “UNIQUE IDENTIFIER”. It serves no other function other than being another form of labelling the network interface on the vm. There is no need to over complicate the creation of a UUID. This is also provided you defined UUID’s on your deployments.
Why…would you want to do this? Well if you cloned from a template. The new clone with have the same network UUID on every new machine you create. Now this wont impact your infrastructure in anyway, other than you *might* get duplicate UUID warning at some point. However, it can be problematic when doing backups, restores, migrations, and monitoring in some cases.
Ansible Setup:
Role :
–
Note: This just runs the ‘uuidgen’ command on the linux vm and then registers the result into a variable that is passed to the next task.
– name: Generate new UUID
shell: uuidgen
register: new_uuid_result
– debug:
var: new_uuid_result
Note: This updates the network file on redhat and adds the UUID line with the newly generated UUID and shows a log of the new UUID that was added. This section will also be outlined in the file as managed by ansible
– name: Add New UUID to network config
blockinfile:
dest: /etc/sysconfig/network-scripts/ifcfg-ens192
insertafter: NAME=”ens192″
block: |
UUID=”{{ new_uuid_result[‘stdout‘] }}”
register: filecontents
– debug: msg=”{{ filecontents }}”
Ansible playbook run:
vi createnewUUID.yml
– hosts: all
gather_facts: no
roles:
– role: CreateNewNetworkUUID
Ansible playbook run:
Note: this run the role against all your hosts defined in inventory/DEV/hosts via ssh. You will need to know the root/pass for your ssh connection to be able to carry out the tasks.
Ansible playbook log:
SSH password:
PLAY [all] ****************************************************************************************************************************************************************************************************
TASK [CreateNewUUID : Generate new UUID] **********************************************************************************************************************************************************************
changed: [nicktestvm]
TASK [CreateNewUUID : debug] **********************************************************************************************************************************************************************************
ok: [nicktestvm] => {
“new_uuid_result“: {
“ansible_facts“: {
“discovered_interpreter_python“: “/usr/bin/python”
},
“changed”: true,
“cmd“: “uuidgen“,
“delta”: “0:00:00.010810”,
“end”: “2020-12-21 20:13:36.614154”,
“failed”: false,
“rc“: 0,
“start”: “2020-12-21 20:13:36.603344”,
“stderr”: “”,
“stderr_lines“: [],
“stdout“: “49242349-5168-4713-bcb6-a53840b2e1d6”,
“stdout_lines“: [
“49242349-5168-4713-bcb6-a53840b2e1d6”
]
}
}
TASK [CreateNewUUID : Add New UUID to network config] *********************************************************************************************************************************************************
changed: [nicktestvm]
TASK [CreateNewUUID : debug] **********************************************************************************************************************************************************************************
ok: [nicktestvm] => {
“new_uuid_result.stdout“: “49242349-5168-4713-bcb6-a53840b2e1d6”
}
PLAY RECAP ****************************************************************************************************************************************************************************************************
nicktestvm : ok=4 changed=2 unreachable=0 failed=0 skipped=0 rescued=0 ignored=0
Nicktestvm:
[root@nicktestvm ~]$ cat /etc/sysconfig/network-scripts/ifcfg-ens192
TYPE=”Ethernet”
PROXY_METHOD=”none”
BROWSER_ONLY=”no”
BOOTPROTO=”none”
DEFROUTE=”yes”
IPV4_FAILURE_FATAL=”no”
IPV6INIT=”yes”
IPV6_AUTOCONF=”yes”
IPV6_DEFROUTE=”yes”
IPV6_FAILURE_FATAL=”no”
IPV6_ADDR_GEN_MODE=”stable-privacy”
NAME=”ens192″
# BEGIN ANSIBLE MANAGED BLOCK
UUID=”49242349-5168-4713-bcb6-a53840b2e1d6″
# END ANSIBLE MANAGED BLOCK
DEVICE=”ens192″
ONBOOT=”yes”
IPADDR=”192.168.1.69″
PREFIX=”24″
GATEWAY=”192.168.1.254″
DNS1=”8.8.8.1″
DNS2=”8.8.8.2″
DOMAIN=”nicktailor.co.uk”
IPV6_PRIVACY=”no”
How to deploy Vmware VM’s using Ansible from Cloned Templates
QUICK OVERVIEW OF WHAT ANSIBLE IS..
Ansible is a radically simple IT automation engine that automates cloud provisioning, configuration management, application deployment, intra-service orchestration, and many other IT needs.
Designed for multi-tier deployments since day one, Ansible models your IT infrastructure by describing how all of your systems inter-relate, rather than just managing one system at a time.
It uses no agents and no additional custom security infrastructure, so it’s easy to deploy – and most importantly, it uses a very simple language (YAML, in the form of Ansible Playbooks) that allow you to describe your automation jobs in a way that approaches plain English.
On this page, we’ll give you a really quick overview so you can see things in context. For more detail, hop over to docs.ansible.com.
EFFICIENT ARCHITECTURE
Ansible works by connecting to your nodes and pushing out small programs, called “Ansible modules” to them. These programs are written to be resource models of the desired state of the system. Ansible then executes these modules (over SSH by default), and removes them when finished.
Your library of modules can reside on any machine, and there are no servers, daemons, or databases required. Typically you’ll work with your favorite terminal program, a text editor, and probably a version control system to keep track of changes to your content.
Example power on and off a vm, or connect or disconnect network, etc.
For the purposes of this post we are are going to dive into using “vmware_guest” module by way of using http api authentication session & cookies. There are many other python modules which you can search in the ansible documentation and or ansible-galaxy
https://docs.ansible.com/ansible/latest/collections/community/vmware/index.html
Now it definitely helps to be able to code in python or at least be able to read python code, however completely not necessary. Anyone with basic understanding of bash scripting can learn ansible. I could teach a newbie ansible in a couple days. Sharing is caring.
Anyone who says otherwise……don’t hire them.
Ansible Setup:
Pre-Module install Steps:
Requirements
The below requirements are needed on the host that executes this module.
Note: Now on centos its not available out of the box
Centos 7 PIP install:
Install PyVmomi:
It will look like…..
[root@nick roles]# pip install –upgrade pyvmomi
Collecting pyvmomi
Downloading https://files.pythonhosted.org/packages/ba/69/4e8bfd6b0aae49382e1ab9e3ce7de9ea6318eac007b3076e6006dbe5a7cd/pyvmomi-7.0.1.tar.gz (584kB)
100% |████████████████████████████████| 593kB 861kB/s
Cache entry deserialization failed, entry ignored
Collecting requests>=2.3.0 (from pyvmomi)
Downloading https://files.pythonhosted.org/packages/29/c1/24814557f1d22c56d50280771a17307e6bf87b70727d975fd6b2ce6b014a/requests-2.25.1-py2.py3-none-any.whl (61kB)
100% |████████████████████████████████| 61kB 3.5MB/s
Collecting six>=1.7.3 (from pyvmomi)
Downloading https://files.pythonhosted.org/packages/ee/ff/48bde5c0f013094d729fe4b0316ba2a24774b3ff1c52d924a8a4cb04078a/six-1.15.0-py2.py3-none-any.whl
Cache entry deserialization failed, entry ignored
Collecting certifi>=2017.4.17 (from requests>=2.3.0->pyvmomi)
Downloading https://files.pythonhosted.org/packages/5e/a0/5f06e1e1d463903cf0c0eebeb751791119ed7a4b3737fdc9a77f1cdfb51f/certifi-2020.12.5-py2.py3-none-any.whl (147kB)
100% |████████████████████████████████| 153kB 6.5MB/s
Cache entry deserialization failed, entry ignored
Collecting urllib3<1.27,>=1.21.1 (from requests>=2.3.0->pyvmomi)
Downloading https://files.pythonhosted.org/packages/f5/71/45d36a8df68f3ebb098d6861b2c017f3d094538c0fb98fa61d4dc43e69b9/urllib3-1.26.2-py2.py3-none-any.whl (136kB)
100% |████████████████████████████████| 143kB 6.9MB/s
Cache entry deserialization failed, entry ignored
Collecting idna<3,>=2.5 (from requests>=2.3.0->pyvmomi)
Downloading https://files.pythonhosted.org/packages/a2/38/928ddce2273eaa564f6f50de919327bf3a00f091b5baba8dfa9460f3a8a8/idna-2.10-py2.py3-none-any.whl (58kB)
100% |████████████████████████████████| 61kB 4.4MB/s
Cache entry deserialization failed, entry ignored
Collecting chardet<5,>=3.0.2 (from requests>=2.3.0->pyvmomi)
Downloading https://files.pythonhosted.org/packages/19/c7/fa589626997dd07bd87d9269342ccb74b1720384a4d739a1872bd84fbe68/chardet-4.0.0-py2.py3-none-any.whl (178kB)
100% |████████████████████████████████| 184kB 3.5MB/s
Installing collected packages: certifi, urllib3, idna, chardet, requests, six, pyvmomi
Found existing installation: certifi 2018.4.16
Uninstalling certifi-2018.4.16:
Successfully uninstalled certifi-2018.4.16
Found existing installation: urllib3 1.22
Uninstalling urllib3-1.22:
Successfully uninstalled urllib3-1.22
Found existing installation: idna 2.6
Uninstalling idna-2.6:
Successfully uninstalled idna-2.6
Found existing installation: chardet 3.0.4
Uninstalling chardet-3.0.4:
Successfully uninstalled chardet-3.0.4
Found existing installation: requests 2.18.4
Uninstalling requests-2.18.4:
Successfully uninstalled requests-2.18.4
Found existing installation: six 1.9.0
Uninstalling six-1.9.0:
Successfully uninstalled six-1.9.0
Running setup.py install for pyvmomi … done
Successfully installed certifi-2020.12.5 chardet-4.0.0 idna-2.10 pyvmomi-7.0.1 requests-2.25.1 six-1.15.0 urllib3-1.26.2
You are using pip version 10.0.1, however version 20.3.3 is available.
You should consider upgrading via the ‘pip install –upgrade pip’ command.
(You noticed this at the bottom)
A lot of the time you need to upgrade pip for the modules to install as python is always evolving at a fast pace
So run
[root@nick roles]# pip install –upgrade pip
Collecting pip
Downloading https://files.pythonhosted.org/packages/54/eb/4a3642e971f404d69d4f6fa3885559d67562801b99d7592487f1ecc4e017/pip-20.3.3-py2.py3-none-any.whl (1.5MB)
100% |████████████████████████████████| 1.5MB 799kB/s
Installing collected packages: pip
Found existing installation: pip 8.1.2
Uninstalling pip-8.1.2:
Successfully uninstalled pip-8.1.2
Successfully installed pip-10.0.1
You get the idea……
Vpshere – Pre-requistes for this to work:
You will need a vmware user who has api access permission for the following items. If the user you have setup in vcenter is unable to see these items. This module will fail. You do not need a user with full admin privileges, which is what a lot of documentation says online cryptically. I have tested this and confirmed that is not the case. Obivously, its way better to just give admin privileges to the user and trust the people you hire and use ansible vault to hide the credentials. Which we will get into later….
You can also check these parameters in your code by validating using assertions to see if they are all working with your user prior to moving on the next task.
– vSphere API configuration
– VM details
– vcenter_host
– cluster
– datacenter
– folder
– vm_disk_size
– vm_cpu_count
– vm_memory
– vm_vlan
– vm_vlan_name
– vm_dvswitch
– vm_datatstore
–vmware tools and or open_vm_tools must installed the clone template (super important)
Okay so now were on setting up the vmware_guest module using yaml code.
Setting vmware_guest module on ansible:
Now what I like to do is set everything up as a role in ansible to call in your playbooks, it keeps things cleaner and its much easier to find spacing mistakes in your code when writing in yaml. Lots of NBTo aid in checking for mistakes. But ultimately its experience. I’m a bit of both but I tend just pop a vi open and just write and much in there
Note: Now we do most of our work in this directory. Your primary yaml file is always called “main.yml” Your playbooks always look for this file when trying to call python modules.
Setting up the yaml:
1. First stage of the yaml is use the http login to the vcenter host and successfully authenticate and then grab those session cookies to carry out the next set of tasks which utilise the vmware_guest module.
– name: Login into vCenter and get cookies
delegate_to: localhost
uri:
url: https://{{ vcenter_host }}/rest/com/vmware/cis/session
force_basic_auth: yes
validate_certs: no
method: POST
user: ‘{{ vcenter_username }}’
password: ‘{{ vcenter_password }}’
register: login
2. Okay so this where we are now actually calling the vmware_guest module in yaml. You can see that the code has a lot of areas that are variablelised. These variable are passed in a couple of ways. You need to pass the defaults through the defaults directory we created earlier, and the second is host specific variables which will be under your host_vars directory under your inventory structure, which we will get into later.
Note: Now remember this is code to deploy from an existing cloned template you have sitting on datastore somewhere in your environment. The process to deploy a vm using kickstart using DHCP that’s bit different to setup I wrote this to help out those people who cant see the wisdom and efficiency of having DHCP’d deployments
You will be passing these variables
– name: Create a VM
vmware_guest:
hostname: “{{ vcenter_host }}”
username: “{{ vcenter_username }}”
password: “{{ vcenter_password }}”
validate_certs: False
cluster: “{{ vcenter_cluster }}”
datacenter: “{{ vcenter_dc }}”
Note: name: This will be the name of the new vm created. Keep in mind the vm host will also be setup with a shortname for the hostname of the server not the FQDN. You can probably fix this using vmshell or I used a completely separate role to setup the network for physical machines which uses jinja templates and inside the role I passed the new name as a variable. But that’s for another post
name: “{{ inventory_hostname }}”
folder: “{{ vm_folder }}”
template: “{{ VMTemplate }}”
state: “{{ vm_state }}”
Note: guest_id: this is what kind of OS will the VM Run, almost every hypervisor asks that prior to creating a vm. You can find the list online.
guest_id: “{{ vm_guest_id }}”
Note: disk: this section you could technically pass it through as a variable in your host_vars on the specific hosts, but since were using a template. I kept these parameters static here inside the role.
disk:
– size_gb: 80
type: thin
datastore: “{{ vm_datastore }}”
– size_gb: 100
type: thin
datastore: “{{ vm_datastore }}”
hardware:
memory_mb: “{{ vm_memory }}”
num_cpus: “{{ vm_cpu_count }}”
scsi: paravirtual
Note: Customization: This section is very important because without it your dns in /etc/resolv.conf will not be configured correctly. A lot of people have a hell of time with this on the net, as the parsing of this in yaml is bit tricky, and people resort to using vm_guest_file to update the /etc/resolv.conf, which sucks because now you need the root/pass via ssh. My way will work
customization:
dns_servers: “{{ vm_dns_servers }}”
dns_suffix: “{{ vm_dns_suffix }}”
Note: networks: This section is the section which will use vmware-tools or open_vm_tools to update the network config on host after powering on the vm, but before the OS is booted, provided you said to power it on in your host_var file. This section helps people get around the issue of having no DHCP and having to deploy each server using the same static address on a dedicated vlan. This section will go and update the vm network parameters and the template vm will deploy on a whatever vlan, with different ip, gateway, netmask. It will also register a new mac address to the vm, so you don’t end up with vm’s with duplicate mac-addresses. Lastly, it will update /etc/hosts with the new ip and shortname of the server
networks:
– name: “{{ vm_vlan_name }}”
type: static
dvswitch_name: “{{ vm_dvswitch }}”
ip: “{{ vm_ip }}”
netmask: “{{ vm_netmask }}”
gateway: “{{ vm_gateway }}”
start_connected: “{{ vm_connected }}”
# wait_for_ip_address: yes (this is if you are using DHCP)
delegate_to: localhost
register: vm_deploy
Note: This section is just spits out verbose information on the how the build went and the mac-address of the vm. This hand to pay attention to so you can ensure your template mac and your new vm don’t have duplicate macs. If you do. You will need to go into vshere find the VM. Remove the network and readd it manually, to register a new mac
– debug:
var: vm_deploy.instance.hw_eth0.macaddress
– debug:
var: deploy_vm
– debug:
var: mac
Not: Its easier to put all your defaults here and then comment out the ones you want to pass through your host_vars specific files after you got it working the way you want.
—
vm_disks: 100
vm_cpu_count: 2
vm_state: present
vm_memory: 2048
#vm_datastore: vmfs-datastore1234
vcenter_username: BruceWayne
vcenter_password: ( you will put ansible_vault encrypted variable here, for now just put in your password for testing)
vm_dvswitch: DvSwitch
vcenter_cluster: ProdCluster
vcenter_host: vcenter.nicktailor.com
vcenter_dc: London
#vm_folder: /Production/Unix/
#vm_vlan_name: VM76123
vm_guest_id: rhel7_64Guest
#VMTemplate: redhat-template2020
Ansible Hosts and Inventory:
Okay so this is where everyone handles things uniquely. I personally like to take the approach of creating inventory based on environment. Its logical and the best way to manage hosts in very large infrastructures.
So if you have DEV/STAGING/PRODUCTION as your environments. Then I would set it up as such
1. Inside your /etc/ansible directory create the following
For the purposes of this post we are just going to
create one group
=====================================
[All]
nicktestvm.nicktailor.com ansible_host=192.168.1.200
=====================================
Note: ansible_host=(ip) This is used when you want to override dns of the host and tell ansible. Do not resolve the dns this host only connect to this ip. You don’t need this here, however if your’re using ‘a’ static address to deploy vm’s initially and not using vmwre_tools to configure the network, and went with SSH after for configuration of the host. Then it will need to know which host to connect to setup the network. So I just like to have there in case I want to temporary tell ansible look here for this server.
Note: You can see all the variables that were in the role and defaults are now being passed through here for this specific host. It has to be done in this fashion for it all work correctly. If you pass all this through the role may crap out on you.
#vm_requirements
vm_ip: 192.168.1.86
vm_netmask: 255.255.255.0
vm_gateway: 192.168.1.1
vm_vlan_name: VM76123
VMTemplate: redhat-template2020
vm_folder: /Production/Unix
vm_state: poweredon
vm_connected: true
vm_datastore: vmfs-datastore1234
note: vm_dns_servers: this section is very important. This was the only way I could get the dns server to parse and update the /etc/resolv.conf properly. If you list them out individually as one lineers. It seems to be a bug and will simply empty out the file, which will leave your vm unable to resolve dns.
vm_dns_servers: [8.8.8.1, 8.8.8.2]
vm_dns_suffix: nicktailor.co.uk
Setting Ansible Vault and Encrypted variables:
there a couple of ways to do this you can do it via file, or via prompt. I’m going to show you how to do it via file.
Note: the –-name is the variable you want to pass in your code. So whatever you call that has to be there.
ansible-vault encrypt_string –vault-id 1@vault.pass.txt ‘vcenter-password-here’ –name ‘vcenter_password‘
vcenter_password: !vault |
$ANSIBLE_VAULT;1.2;AES256;1
31623638366337643437633065623538663565336232333863303763336364396438663032363364
3665376363663839306165663435356365643965343364310a313832393261363466393237666666
36666437626563386366653938383565663361646333333732336439356633616231653639626465
3130656134383365320a323032366238303366336562653865663130333963316237393839373830
65396139323739323266643961653766333633366638336435613933373966643561
Encryption successful
vcenter_password: !vault |
$ANSIBLE_VAULT;1.2;AES256;1
31623638366337643437633065623538663565336232333863303763336364396438663032363364
3665376363663839306165663435356365643965343364310a313832393261363466393237666666
36666437626563386366653938383565663361646333333732336439356633616231653639626465
3130656134383365320a323032366238303366336562653865663130333963316237393839373830
65396139323739323266643961653766333633366638336435613933373966643561
- • You should also store the vault password somewhere offsite in some password database and delete the vault.pass.txt file you created.
Deploy VM with ansible:
– hosts: all
gather_facts: no
roles:
– role: ansible-vmware-deploy
Note: Important thing to remember when deploying linux machines from a template is that all your machines will have the same ‘Network’ UUID as the template machine. If you define these…. You will need to write some code to fix that up after the VM is deployed and powered up. Check out the link below on how to do that.
http://www.nicktailor.com/?p=1177
Special Note: if you attempt to deploy multiple hosts at the same time. This will deploy 5 clones in parallel at a time and not one by one. Which will reduce deployment time significantly. I didnt bother to see if i could override this….:)
Output log of successful automated ansible deploy:
[root@nickansible]# ansible-playbook –i inventory/DEV/hosts standard_build.yml –ask-vault –limit ‘nicktestvm‘
Vault password: (paste password here in your shell window)
PLAY [all] ****************************************************************************************************************************************************************************************************
TASK [ansible-vmware-deploy : Validate Project Requirements] **********************************************************************************************************************************************
ok
TASK [ansible-vmware-deploy : Login into vCenter and get cookies] *****************************************************************************************************************************************
ok: [nicktestvm]
TASK [ansible-vmware-deploy : Create a VM] ****************************************************************************************************************************************************************
changed: [nicktestvm]
TASK [ansible-vmware-deploy : debug] **********************************************************************************************************************************************************************
ok: [nicktestvm] => {
“vm_deploy.instance.hw_eth0.macaddress”: “00:40:51:53:11:a6”
}
nicktestvm : ok=4 changed=1 unreachable=0 failed=0 skipped=0 rescued=0 ignored=0
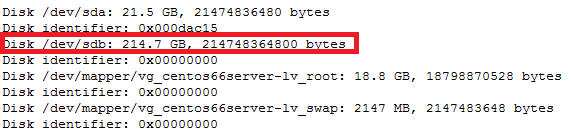
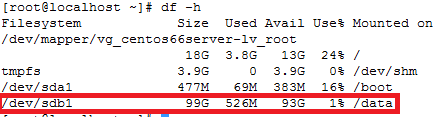
How to increase disk size on virtual scsi drive using gpart
Power ON VM guest after editing disk size.

ls -d /sys/block/sd*/device/scsi_device/* |awk -F ‘[/]’ ‘{print $4,”- SCSI”,$7}’
service crond stop
Note: If you observe “Device is busy” error then make sure that your current session is not in /data partition.
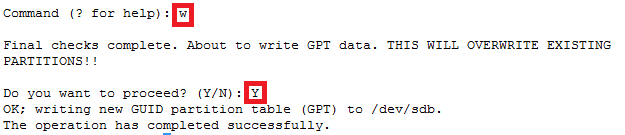
For GPT partition type
In this case parted -l command will give below for “sdb” disk partition
*****************************************************
Model: VMware Virtual disk (scsi)
Disk /dev/sdb: 215GB
Sector size (logical/physical): 512B/512B
Partition Table: gpt
Number Start End Size File system Name Flags
1 1049kB 215GB 215GB ext4 Linux LVM lvm
*****************************************************