
Category: Diskstuff
How to Deploy LVM’s with Ansible
Provisioning-LVM-Filesystems:
This role is designed to use ansible-merge-vars module. An Ansible plugin to merge all variables in context with a certain suffix (lists or dicts only) and create a new variable that contains the result of this merge. This is an Ansible action plugin, which is basically an Ansible module that runs on the machine running Ansible rather than on the host that Ansible is provisioning.
Benefits: Configuring disks into LVM
Note: This post assumes you have already ansible installed and running.
Install ansible-merge-vars module:
1. root@KVM-test-box:~# pip install ansible_merge_vars
Requirement already satisfied: ansible_merge_vars in
/usr/local/lib/python3.8/dist-packages (5.0.0)
By default, Ansible will look for action plugins in an action_plugins folder adjacent to the running playbook. For more information on this, or to change the location where ansible looks for action plugin.
from ansible_merge_vars import ActionModule
Role Setup:
Once the plugin has been setup, you now you will want to setup a role.
Now we will create a task that will merge variable names associated with a list and then itemise the list for variables we will pass to provision the filesystem via the inventory/host_var or group_var
– name: Merge VG variables
merge_vars:
suffix_to_merge: vgs__to_merge
merged_var_name: merged_vgs
expected_type: ‘list’
– name: Merge LV variables
merge_vars:
suffix_to_merge: lvs__to_merge
merged_var_name: merged_lvs
expected_type: ‘list’
– name: Merge FS variables
merge_vars:
suffix_to_merge: fs__to_merge
merged_var_name: merged_fs
expected_type: ‘list’
– name: Merge MOUNT variables
merge_vars:
suffix_to_merge: mnt__to_merge
merged_var_name: merged_mnt
expected_type: ‘list’
– name: Create VGs
lvg:
vg: “{{ item.vg }}”
pvs: “{{ item.pvs }}”
with_items: “{{ merged_vgs }}”
– name: Create LVs
lvol:
vg: “{{ item.vg }}”
lv: “{{ item.lv }}”
size: “{{ item.size }}”
pvs: “{{ item.pvs | default(omit) }}”
shrink: no
with_items: “{{ merged_lvs }}”
– name: Create FSs
filesystem:
dev: “{{ item.dev }}”
fstype: “{{ item.fstype }}”
with_items: “{{ merged_fs }}”
– name: Mount FSs
mount:
path: “{{ item.path }}”
src: “{{ item.src }}”
state: mounted
fstype: “{{ item.fstype }}”
opts: “{{ item.opts | default(‘defaults’) }}”
dump: “{{ item.dump | default(‘1’) }}”
passno: “{{ item.passno | default(‘2’) }}”
with_items: “{{ merged_mnt }}”
Note: Now this currently task has no safe guards for /dev/sda or checks to ensure the disk is wiped properly in order for the disks to be added to the volume group. I have created such safe guards for others. But for the purposes of this blog post this is basics. If you want to my help you can contact me via email or the ticketing system.
Now what we are going to do is define our inventory file with what file lvm we want to crave out.
Setup inventory:
1.Go inside your inventory/host_var or group_var file and create a file for testserver1
- .nano inventory/host_var/testserver1
2. save the file.
Definitions of the variables above:
vgs__to_merge: This section is the creation volume/physical groups
– vg: vg_vmguest (this is the volume group name)
pvs: /dev/sdb (this is the physical assigned to the above volume group
– vg: vg_sl_storage (This the second volume name)
pvs: /dev/sdc (This is the second physical disk assigned to the above
volume
*You can add as many as you like*
lvs__to_merge: This section is the logical Volume creations
– vg: vg_vmguest (this is the volume group created)
lv: lv_vg_vmguest (this is the logical volume that is attached to above vg
size: 100%FREE (this says please use the whole disk)
shrink: no (this is needed to so the disk space is used correctly)
– vg: vg_sl_storage (this is the second volume created)
lv: lv_vg_sl_storage (this is the second lvm created attached to above vg)
size: 100%FREE (this is use the whole disk)
shrink: no (this is needed so the disk space is properly used)
fs__to_merge: This section formats the lvm
– dev: /dev/vg_vmguest/lv_vg_vmguest (lvm name)
fstype: ext4 (file system you want to format with)
– dev: /dev/vg_sl_storage/lv_vg_sl_storage (2nd lvm name)
fstype: ext4 (file system you want to format with)
mnt__to_merge: This section will create the path,mount, and add to fstab
– path: /vmguests (path you want created for mount)
src: /dev/vg_vmguest/lv_vg_vmguest (lvm you want to mount)
fstype: ext4 (this is for fstab adding)
– path: /sl_storage (this is second path to create)
src: /dev/vg_sl_storage/lv_vg_sl_storage (second lvm you want to mount)
fstype: ext4 (to add to fstab)
Running your playbook:
cd ansible/
Example: of justdofs.yml
– hosts: all
gather_facts: yes
any_errors_fatal: true
roles:
– role: provision-fs
Command:
ansible/$ ansible-playbook -i inventory/hosts justdofs.yml -u root -k –limit=’testservernick1′
Example of successful play:
ntailor@test-box:~/ansible/computelab$ ansible-playbook –i inventory/hosts justdofs.yml -u root -k –limit=’testservernick1‘
SSH password:
PLAY [all] *******************************************************************************************************************************************************************************************************
TASK [provision-fs : Merge VG variables] *************************************************************************************************************************************************************************
ok: [testservernick1]
TASK [provision-fs : Merge LV variables] *************************************************************************************************************************************************************************
ok: [testservernick1]
TASK [provision-fs : Merge FS variables] *************************************************************************************************************************************************************************
ok: [testservernick1]
TASK [provision-fs : Merge MOUNT variables] **********************************************************************************************************************************************************************
ok: [testservernick1]
TASK [provision-fs : Create VGs] *********************************************************************************************************************************************************************************
ok: [testservernick1] => (item={‘vg’: ‘vg_vmguest‘, ‘pvs‘: ‘/dev/sdb‘})
ok: [testservernick1] => (item={‘vg’: ‘vg_sl_storage‘, ‘pvs‘: ‘/dev/sdc‘})
TASK [provision-fs : Create LVs] *********************************************************************************************************************************************************************************
ok: [testservernick1] => (item={‘vg’: ‘vg_vmguest‘, ‘lv’: ‘lv_vg_vmguest‘, ‘size’: ‘100%FREE’, ‘shrink’: False})
ok: [testservernick1] => (item={‘vg’: ‘vg_sl_storage‘, ‘lv’: ‘lv_vg_sl_storage‘, ‘size’: ‘100%FREE’, ‘shrink’: False})
TASK [provision-fs : Create FSs] *********************************************************************************************************************************************************************************
ok: [testservernick1] => (item={‘dev’: ‘/dev/vg_vmguest/lv_vg_vmguest‘, ‘fstype‘: ‘ext4’})
ok: [testservernick1] => (item={‘dev’: ‘/dev/vg_sl_storage/lv_vg_sl_storage‘, ‘fstype‘: ‘ext4’})
TASK [provision-fs : Mount FSs] **********************************************************************************************************************************************************************************
ok: [testservernick1] => (item={‘path’: ‘/vmguests‘, ‘src‘: ‘/dev/vg_vmguest/lv_vg_vmguest‘, ‘fstype‘: ‘ext4’})
ok: [testservernick1] => (item={‘path’: ‘/sl_storage‘, ‘src‘: ‘/dev/vg_sl_storage/lv_vg_sl_storage‘, ‘fstype‘: ‘ext4’})
PLAY RECAP *******************************************************************************************************************************************************************************************************
testservernick1 : ok=8 changed=0 unreachable=0 failed=0 skipped=0 rescued=0 ignored=0
How to add a new SCSI LUN while server is Live
REDHAT/CENTOS:
In order to get wwn ids from a server:
Or:
Run this to find the new disks after you have added them to your VM
Note: rescan-scsi-bus.sh is part of the sg3-utils package
# That’s it, unless you want to fix the name from mpath(something) to something else
• vi /etc/multipath_bindings
# Go into the multipath consolde and re add the multipath device with your new shortcut name (nickdsk2 in this case)
• add map nickdsk2
Note: Not going to lie, sometimes you could do all this and still need a reboot, majority of the time this should work. But what do i know…haha
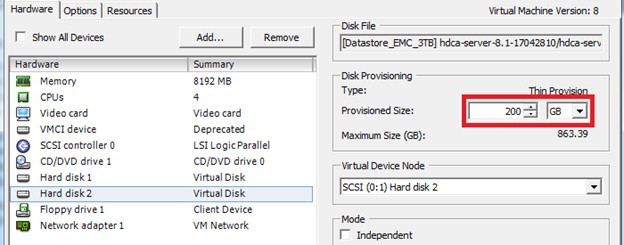
How to increase disk size on virtual scsi drive using gpart
Power ON VM guest after editing disk size.

ls -d /sys/block/sd*/device/scsi_device/* |awk -F ‘[/]’ ‘{print $4,”- SCSI”,$7}’
service crond stop
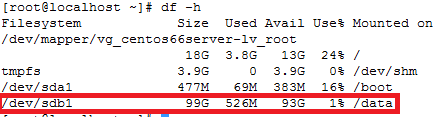
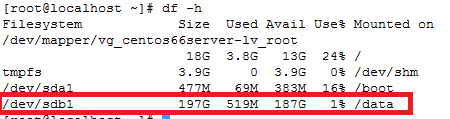
Note: If you observe “Device is busy” error then make sure that your current session is not in /data partition.
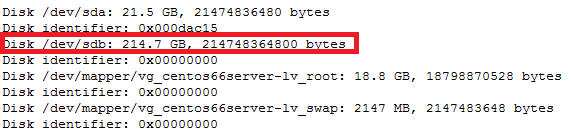
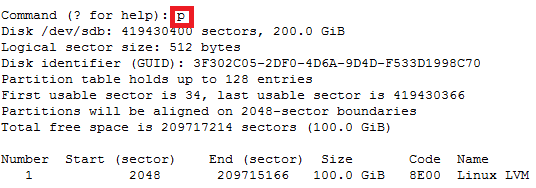
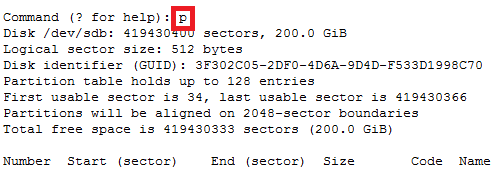
For GPT partition type
In this case parted -l command will give below for “sdb” disk partition
*****************************************************
Model: VMware Virtual disk (scsi)
Disk /dev/sdb: 215GB
Sector size (logical/physical): 512B/512B
Partition Table: gpt
Number Start End Size File system Name Flags
1 1049kB 215GB 215GB ext4 Linux LVM lvm
*****************************************************
How to recover file system corruption on 4T LVM using DDrescue on a VM
How to recover file system corruption on 4T LVM on ubuntu using a VM
In this example we will be fixing a xfs filesystem that failed initial xfs_repair
If this happens don’t panic. We can fix most likely fix it.
Steps to do
Create new physical volume, volume group and logical volume
Now install ddrescue and make image of the corrupted file system on the new logical volume
Make swap size 30gigs – this is needed so when we repair the filesystem it doesn’t time out because it runs out of memory. Which tends to be the problem when trying to repair such large filesystems.
Sample outputs
Create rescue image on new logical volume
◦ ddrescue -d -r3 $oldfilesyetem imagefile.img loglocationpath.logfile
ddrescue -d -r3 /dev/recovery/data /mnt/recovery/recovery.img /mnt/recovery/recoverylog.logfile
Once the file is created we want to repair it using xfs_repair
– agno = 29
– agno = 9
– agno = 10
– agno = 11
– agno = 12
– agno = 13
– agno = 14
– 20:02:48: check for inodes claiming duplicate blocks – 88951488 of 88951488 inodes done
Phase 5 – rebuild AG headers and trees…
– 20:02:57: rebuild AG headers and trees – 41 of 41 allocation groups done
– reset superblock…
Phase 6 – check inode connectivity…
– resetting contents of realtime bitmap and summary inodes
– traversing filesystem …
– traversal finished …
– moving disconnected inodes to lost+found …
Phase 7 – verify and correct link counts…
Done
Written By Nick Tailor
How to do a full restore if you wiped all your LVM’s
I’m sure some of you have had the wonderful opportunity to experience loosing all your LVM info in error. Well all is not lost and there is hope. I will show ya how to restore it.
The beauty of LVM is that is naturally creates a backup of the Logical Volumes in the following location.
- /etc/lvm/archive/
Now If you had just wiped out your LVM and it was simply using one physical disk for all your LVM’s you could simply do a full restore doing the following.
-
-
- vgcfgrestore -f /etc/lvm/archive/(volumegroup to restore) (destination volumegroup)
o (ie.)vgcfgrestore -f /etc/lvm/archive/vg_dev1_006.000001.vg vg_dev
- vgcfgrestore -f /etc/lvm/archive/(volumegroup to restore) (destination volumegroup)
-
If you had multiple disks attached to your volume group then you need to do a couple more things to be able to do a restore.
- Cat the file /etc/lvm/archive/whatevervolumgroup.vg file you should see something like below
- physical_volumes {
pv0 {
id = “ecFWSM-OH8b-uuBB-NVcN-h97f-su1y-nX7jA9”
device = “/dev/sdj” # Hint only
status = [“ALLOCATABLE”]
flags = []
dev_size = 524288000 # 250 Gigabytes
pe_start = 2048
pe_count = 63999 # 249.996 Gigabytes
}
You will need to recreate all the physical volume UUID inside that .vg file for volume group to be able to restore.
-
- pvcreate –restore /etc/lvm/archive/vgfilename.vg –uuid <UUID> <DEVICE>
o (IE) pvcreate –restorefile /etc/lvm/archive/vg_data_00122-1284284804.vg –uuid ecFWSM-OH8b-uuBB-NVcN-h97f-su1y-nX7jA9 /dev/sdj
- pvcreate –restore /etc/lvm/archive/vgfilename.vg –uuid <UUID> <DEVICE>
- Repeat this step for all the physical volumes in the archive vg file until they have all been created.
Once you have completed the above step you should now be able to restore your voluegroups that were wiped
-
- vgcfgrestore -f /etc/lvm/archive/(volumegroup to restore) (destination volumegroup)
o (ie.)vgcfgrestore -f /etc/lvm/archive/vg_dev1_006.000001.vg vg_dev
- vgcfgrestore -f /etc/lvm/archive/(volumegroup to restore) (destination volumegroup)
- Running the command vgdisplay and pvdisplay should show you that everything is back the way it should be
If you have questions email nick@nicktailor.com
Cheers
How to setup NFS server on Centos 6.x
Setup NFS Server in CentOS / RHEL / Scientific Linux 6.3/6.4/6.5
1. Install NFS in Server
- [root@server ~]# yum install nfs* -y
2. Start NFS service
- [root@server ~]# /etc/init.d/nfs start
Starting NFS services: [ OK ]
Starting NFS mountd: [ OK ]
Stopping RPC idmapd: [ OK ]
Starting RPC idmapd: [ OK ]
Starting NFS daemon: [ OK ]
- [root@server ~]# chkconfig nfs on
3. Install NFS in Client
- [root@vpn client]# yum install nfs* -y
4. Start NFS service in client
- [root@vpn client]# /etc/init.d/nfs start
Starting NFS services: [ OK ]
Starting NFS quotas: [ OK ]
Starting NFS mountd: [ OK ]
Stopping RPC idmapd: [ OK ]
Starting RPC idmapd: [ OK ]
Starting NFS daemon: [ OK ]
- [root@vpn client]# chkconfig nfs on
5. Create shared directories in server
Let us create a shared directory called ‘/home/nicktailor’ in server and let the client users to read and write files in the ‘home/nicktailor’ directory.
- [root@server ~]# mkdir /home/nicktailor
- [root@server ~]# chmod 755 /home/nicktailor/
6. Export shared directory on server
Open /etc/exports file and add the entry as shown below
- [root@server ~]# vi /etc/exports
- add the following below
- /home/nicktailor 192.168.1.0/24(rw,sync,no_root_squash,no_all_squash)
where,
/home/nicktailor – shared directory
192.168.1.0/24 – IP address range of clients to access the shared folder
rw – Make the shared folder to be writable
sync – Synchronize shared directory whenever create new files/folders
no_root_squash – Enable root privilege (Users can read, write and delete the files in the shared directory)
no_all_squash – Enable user’s authority
Now restart the NFS service.
- [root@server ~]# /etc/init.d/nfs restart
Shutting down NFS daemon: [ OK ]
Shutting down NFS mountd: [ OK ]
Shutting down NFS services: [ OK ]
Starting NFS services: [ OK ]
Starting NFS mountd: [ OK ]
Stopping RPC idmapd: [ OK ]
Starting RPC idmapd: [ OK ]
Starting NFS daemon: [ OK ] –
7. Mount shared directories in client
Create a mount point to mount the shared directories of server.
To do that create a directory called ‘/nfs/shared’ (You can create your own mount point)
- [root@vpn client]# mkdir -p /nfs/shared
Now mount the shared directories from server as shown below
- [root@vpn client]# mount -t nfs 192.168.1.200:/home/nicktailor/ /nfs/shared/
This will take a while and shows a connection timed out error for me. Well, don’t panic, firewall might be restricting the clients to mount shares from server. Simply stop the iptables to rectify the problem or you can allow the NFS service ports through iptables.
To do that open the /etc/sysconfig/nfs file and uncomment the lines which are marked in bold.
- [root@server ~]# vi /etc/sysconfig/nfs
#
# Define which protocol versions mountd
# will advertise. The values are “no” or “yes”
# with yes being the default
#MOUNTD_NFS_V2=”no”
#MOUNTD_NFS_V3=”no”
#
#
# Path to remote quota server. See rquotad(8)
#RQUOTAD=”/usr/sbin/rpc.rquotad”
# Port rquotad should listen on.
RQUOTAD_PORT=875
# Optinal options passed to rquotad
#RPCRQUOTADOPTS=””
#
#
# Optional arguments passed to in-kernel lockd
#LOCKDARG=
# TCP port rpc.lockd should listen on.
LOCKD_TCPPORT=32803
# UDP port rpc.lockd should listen on.
LOCKD_UDPPORT=32769
#
#
# Optional arguments passed to rpc.nfsd. See rpc.nfsd(8)
# Turn off v2 and v3 protocol support
#RPCNFSDARGS=”-N 2 -N 3″
# Turn off v4 protocol support
#RPCNFSDARGS=”-N 4″
# Number of nfs server processes to be started.
# The default is 8.
#RPCNFSDCOUNT=8
# Stop the nfsd module from being pre-loaded
#NFSD_MODULE=”noload”
# Set V4 grace period in seconds
#NFSD_V4_GRACE=90
#
#
#
# Optional arguments passed to rpc.mountd. See rpc.mountd(8)
#RPCMOUNTDOPTS=””
# Port rpc.mountd should listen on.
MOUNTD_PORT=892
#
#
# Optional arguments passed to rpc.statd. See rpc.statd(8)
#STATDARG=””
# Port rpc.statd should listen on.
STATD_PORT=662
# Outgoing port statd should used. The default is port
# is random
STATD_OUTGOING_PORT=2020
# Specify callout program
#STATD_HA_CALLOUT=”/usr/local/bin/foo”
#
#
# Optional arguments passed to rpc.idmapd. See rpc.idmapd(8)
#RPCIDMAPDARGS=””
#
# Set to turn on Secure NFS mounts.
#SECURE_NFS=”yes”
# Optional arguments passed to rpc.gssd. See rpc.gssd(8)
#RPCGSSDARGS=””
# Optional arguments passed to rpc.svcgssd. See rpc.svcgssd(8)
#RPCSVCGSSDARGS=””
#
# To enable RDMA support on the server by setting this to
# the port the server should listen on
#RDMA_PORT=20049
Now restart the NFS service
- [root@server ~]# /etc/init.d/nfs restart
Shutting down NFS daemon: [ OK ]
Shutting down NFS mountd: [ OK ]
Shutting down NFS services: [ OK ]
Starting NFS services: [ OK ]
Starting NFS mountd: [ OK ]
Stopping RPC idmapd: [ OK ]
Starting RPC idmapd: [ OK ]
Starting NFS daemon: [ OK ]
Add the lines shown in bold in ‘/etc/sysconfig/iptables’ file.
- [root@server ~]# vi /etc/sysconfig/iptables
# Firewall configuration written by system-config-firewall
# Manual customization of this file is not recommended.
*filter
-A INPUT -m state –state NEW -m udp -p udp –dport 2049 -j ACCEPT
-A INPUT -m state –state NEW -m tcp -p tcp –dport 2049 -j ACCEPT
-A INPUT -m state –state NEW -m udp -p udp –dport 111 -j ACCEPT
-A INPUT -m state –state NEW -m tcp -p tcp –dport 111 -j ACCEPT
-A INPUT -m state –state NEW -m udp -p udp –dport 32769 -j ACCEPT
-A INPUT -m state –state NEW -m tcp -p tcp –dport 32803 -j ACCEPT
-A INPUT -m state –state NEW -m udp -p udp –dport 892 -j ACCEPT
-A INPUT -m state –state NEW -m tcp -p tcp –dport 892 -j ACCEPT
-A INPUT -m state –state NEW -m udp -p udp –dport 875 -j ACCEPT
-A INPUT -m state –state NEW -m tcp -p tcp –dport 875 -j ACCEPT
-A INPUT -m state –state NEW -m udp -p udp –dport 662 -j ACCEPT
-A INPUT -m state –state NEW -m tcp -p tcp –dport 662 -j ACCEPT
:INPUT ACCEPT [0:0]
:FORWARD ACCEPT [0:0]
:OUTPUT ACCEPT [0:0]
-A INPUT -m state –state ESTABLISHED,RELATED -j ACCEPT
-A INPUT -p icmp -j ACCEPT
-A INPUT -i lo -j ACCEPT
-A INPUT -m state –state NEW -m tcp -p tcp –dport 22 -j ACCEPT
-A INPUT -j REJECT –reject-with icmp-host-prohibited
-A FORWARD -j REJECT –reject-with icmp-host-prohibited
COMMIT
Now restart the iptables service
[root@server ~]# service iptables restart
iptables: Flushing firewall rules: [ OK ]
iptables: Setting chains to policy ACCEPT: filter [ OK ]
iptables: Unloading modules: [ OK ]
iptables: Applying firewall rules: [ OK ]
Again mount the share from client
- [root@vpn client]# mount -t nfs 192.168.1.200:/home/nicktailor/ /nfs/shared/
Finally the NFS share is mounted without any connection timed out error.
To verify whether the shared directory is mounted, enter the mount command in client system.
- [root@vpn client]# mount
/dev/mapper/vg_vpn-lv_root on / type ext4 (rw)
proc on /proc type proc (rw)
sysfs on /sys type sysfs (rw)
devpts on /dev/pts type devpts (rw,gid=5,mode=620)
tmpfs on /dev/shm type tmpfs (rw,rootcontext=”system_u:object_r:tmpfs_t:s0″)
/dev/sda1 on /boot type ext4 (rw)
none on /proc/sys/fs/binfmt_misc type binfmt_misc (rw)
sunrpc on /var/lib/nfs/rpc_pipefs type rpc_pipefs (rw)
nfsd on /proc/fs/nfsd type nfsd (rw)
192.168.1.200:/home/ostechnix/ on /nfs/shared type nfs (rw,vers=4,addr=192.168.1.200,clientaddr=192.168.1.29)
8. Testing NFS
Now create some files or folders in the ‘/nfs/shared’ directory which we mounted in the previous step.
- [root@vpn shared]# mkdir test
- [root@vpn shared]# touch file1 file2 file3
Now go to the server and change to the ‘/home/nicktailor’ directory.
[root@server ~]# cd /home/nicktailor/
- [root@server nicktailor]# ls
file1 file2 file3 test
- [root@server nicktailor]#
Now the files and directories are listed which are created from the client. Also you can share the files from server to client and vice versa.
9. Automount the Shares
If you want to mount the shares automatically instead mounting them manually at every reboot, add the following lines shown in bold in the ‘/etc/fstab’ file of client system.
- [root@vpn client]# vi /etc/fstab
#
# /etc/fstab
# Created by anaconda on Wed Feb 27 15:35:14 2013
#
# Accessible filesystems, by reference, are maintained under ‘/dev/disk’
# See man pages fstab(5), findfs(8), mount(8) and/or blkid(8) for more info
#
/dev/mapper/vg_vpn-lv_root / ext4 defaults 1 1
UUID=59411b1a-d116-4e52-9382-51ff6e252cfb /boot ext4 defaults 1 2
/dev/mapper/vg_vpn-lv_swap swap swap defaults 0 0
tmpfs /dev/shm tmpfs defaults 0 0
devpts /dev/pts devpts gid=5,mode=620 0 0
sysfs /sys sysfs defaults 0 0
proc /proc proc defaults 0 0
192.168.1.200:/home/nicktailor/nfs/sharednfsrw,sync,hard,intr0 0
10. Verify the Shares
Reboot your client system and verify whether the share is mounted automatically or not.
- [root@vpn client]# mount
/dev/mapper/vg_vpn-lv_root on / type ext4 (rw)
proc on /proc type proc (rw)
sysfs on /sys type sysfs (rw)
devpts on /dev/pts type devpts (rw,gid=5,mode=620)
tmpfs on /dev/shm type tmpfs (rw,rootcontext=”system_u:object_r:tmpfs_t:s0″)
/dev/sda1 on /boot type ext4 (rw)
none on /proc/sys/fs/binfmt_misc type binfmt_misc (rw)
sunrpc on /var/lib/nfs/rpc_pipefs type rpc_pipefs (rw)
192.168.1.200:/home/nicktailor on /nfs/shared type nfs (rw,sync,hard,intr,vers=4,addr=192.168.1.200,clientaddr=192.168.1.29)
nfsd on /proc/fs/nfsd type nfsd (rw)
How to move off san boot to local disk with HP servers
How to move off san boot to local disk
===========================
1. add the disks to the server
next do a rescan-scsi-bus.sh to see if the new disks show up
2. Setup the Raid controler f8 (hp)
3. Boot off of system rescue cd
4. find the new drive, use fdisk -l
5. copy partition over using dd and reboot to see new parition table
Examples:
- dd if=/dev/mapper/3600508b4000618d90000e0000b8f0000 of=/dev/sda bs=1M
or - dd if=/dev/sdar of=/dev/cciss/c0d0 bs=1M
reboot unpresent the SAN’s from virtual connect or whatever storage interface your using.
You need to have the boot from san volumes disabled in VCEM
6. make new swap using cfdisk and then run
- mkswap /dev/cciss/c0d0p9 (This controller0 drive0 Parititon 9)
- The size of the swap partition will vary, I used 32000M when i created it in cfdisk, you are free to use fdisk to do this also.
7. now you need to mount / to a directory, so make a empty directory
- mkdir /mnt/root
and mount it, examples below
mount /dev/sda6 /mnt/root or mount /dev/cciss/c0d0p6 /mnt/root
9. fix the fstab (cfdisk works great for this if your system rescue disk)
- vi /mnt/root/etc/fstab
- change /dev/mapper/mpath0p* to cciss/c0d0*
- comment out the swap volume
- add new swap (/dev/cciss/c0d0p9)
10. next fix vi /mnt/root/etc/multipath.conf
- uncomment: devnode “^cciss!c[0-9]d[0-9]*”
- for EMC add:
device {
vendor “EMC”
product “Invista”
product_blacklist “LUNZ”
getuid_callout “/sbin/scsi_id -g -u -s /block/%n”
features “0”
hardware_handler “0”
path_selector “round-robin 0”
path_grouping_policy multibus
rr_weight uniform
no_path_retry 5
rr_min_io 1000
path_checker tur
}
11. next mount the boot parition
Examples
- mount /dev/sda1 /mnt/root/boot
or - mount /dev/cciss/c0d0p1 /mnt/root/boot
12. edit grub.conf
- vi /mnt/root/boot/grub.conf
- change /dev/mapper/mpath0p* to /dev/sda*
or - change /dev/mapper/mpath0p* to /dev/cciss/c0d0
13. edit device.map
- vi /mnt/root/boot/device.map
- change /dev/mapper/mpath0 to /dev/sda
or - change /dev/mapper/mpath0 to /dev/cciss/c0d0
14. fix the initrd
- zcat /mnt/root/boot/initrd-2.6.18-3……. | cpio -i -d
- edit the file ‘init’
- change mkrootdev line to /dev/cciss/c0d0p6 (this is the is / partition)
- change resume line to /dev/cciss/c0d0p9 (this is the new swap partition)
15. Make a backup of the new partition
- mv /mnt/root/boot/initrd-2.6.18-…. /mnt/root/boot/initrd-2.6.18-……backup
16. recompress the new initrd
- find . | cpio -o -H newc |gzip -9 > /mnt/root/boot/initrd-2.6.18-348.2.1.el5.img
17. upon reboot, change the boot order in the bios settings to use the hp smart array controller
18. You may need to create a new inird using the redhat linux distro if the initrd doesnt boot.
- chroot to /mnt/sysimage for /
- then go to the boot parition and
- mkinitrd -f -v initrd-2.6.18-53.1.4.el5.img 2.6.18-53.1.4.el5
19. reboot