Category: Active Directory
How to Join Windows Servers to your DC with Ansible
How to use this role:
Example file: hosts.dev, hosts.staging, hosts.prod
Note: If there is no group simply list the server outside grouping, the –limit flag will pick it
up.
Descriptions:
Operational Use:
Descriptions:
Operational Use:
passed parameters: example: roles/add-server-to-dc/default/main.yml
dns_domain_name: ad.nicktailor.com
computer_name: testmachine1
domain_ou_path: “OU=Admin,DC=nicktailor,DC=local”
domain_admin_user: adminuser@nicktailor.com
state: domain
Running your playbook:
Example: of ansible/joinservertodomain.yml
– hosts: all
gather_facts: no
vars_prompt:
– name: domain_pass
prompt: Enter Admin Domain Password
roles:
– role: add–servers-to–dc
Command:
ansible-playbook –i inventory/dev/hosts joinservertodomain.yml ––limit=’testmachine1.nicktailor.com‘
Successful example run of the book:
[alfred@ansible.nicktailor.com ~]$ ansible-playbook –i inventory/hosts joinservertodomain.yml –limit=’testmachine1.nicktailor.com‘
ansible-playbook 2.9.27
config file = /etc/ansible/ansible.cfg
configured module search path = [‘/home/alfred/.ansible/plugins/modules’, ‘/usr/share/ansible/plugins/modules’]
ansible python module location = /usr/lib/python3.6/site-packages/ansible
executable location = /usr/bin/ansible-playbook
python version = 3.6.8 (default, Nov 10 2021, 06:50:23) [GCC 8.5.0 20210514 (Red Hat 8.5.0-3.0.2)]
PLAYBOOK: joinservertodomain.yml *****************************************************************************************************************************************************
Positional arguments: joinservertodomain.yml
verbosity: 4
connection: smart
timeout: 10
become_method: sudo
tags: (‘all’,)
inventory: (‘/home/alfred/inventory/hosts’,)
subset: testmachine1.nicktailor.com
forks: 5
1 plays in joinservertodomain.yml
Enter Domain Password:
PLAY [all] ***********************************************************************************************************************************************************************
META: ran handlers
TASK [addservertodc : Join windows host to Domain Controller] ********************************************************************************************************************
task path: /home/alfred/roles/addservertodc/tasks/main.yml:1
Using module file /usr/lib/python3.6/site-packages/ansible/modules/windows/win_domain_membership.ps1
Pipelining is enabled.
<testmachine1.nicktailor.com> ESTABLISH WINRM CONNECTION FOR USER: ansibleuser on PORT 5986 TO testmachine1.nicktailor.com
EXEC (via pipeline wrapper)
changed: [testmachine1.nicktailor.com] => {
“changed”: true,
“reboot_required“: true
}
TASK [addservertodc : win_reboot] ************************************************************************************************************************************************
win_reboot: system successfully rebooted
changed: [testmachine1.nicktailor.com] => {
“changed”: true,
“elapsed”: 23,
“rebooted”: true
}
META: ran handlers
META: ran handlers
PLAY RECAP ***********************************************************************************************************************************************************************
testmachine1.nicktailor.com : ok=2 changed=2 unreachable=0 failed=0 skipped=0 rescued=0 ignored=0
How to deploy ansibleconfigure powershell script on windows
Okay fun stuff, so I tried this a number of ways which I will describe in this blog post.
So if your windows server is joined to the domain and you have a machine that can reach all he virtual machines, WinRM is configured, and you have powershell 3.0 or higher setup.
Then you could try the following powershell for loop from SYSVOL share
Sample powershell For Loop
powershell loop deploy – ask credentials
$serverfiles=import-CSV ‘d:\scripts\hosts.csv’
$cred = get-credential
Foreach ($server in $serverfiles) {
write-output $server.names
invoke-command -computername $server.names -filepath d:\scripts\ansibleconfigure.ps1 -credential $cred
}
Note: This method sucked and failed for me due to WinRM not being there and other restrictions like host having. The other was I’m not exactly powershell intermediate had to muddle around a lot.
What you want to do here is copy the configure script to SYSVOL so all the joined machines can reach the script.
In the search bar type: (replace domain to match)


script name
How to add Redhat Server 6.0 to Active Directory
We will be using sssd/kerberos/ldap to join the server to a domain in Active directory for SSO(Single Sign On Authentication)
Note: After you have successfully deployed a server using kickstart or manually registered a redhat server to satellite, next we need to join the server to domain controller aka Active Directory
The output will look like something this:
Load smb config files from /etc/samba/smb.conf
Loaded services file OK.
Server role: ROLE_DOMAIN_MEMBER
Press enter to see a dump of your service definitions
[global]
workgroup = NICKSTG
realm = NICKSTG.NICKTAILOR.COM
security = ADS
kerberos method = secrets and keytab
log file = /var/log/
client signing = Yes
idmap config * : backend = tdb
Note: If the nets join fails. It will be due to most likely three reasons.
I ran into the NTP issue. Here is how you fix it.
If your server is not registered to satellite
You will need to have the following files configured as such
/etc/krb5.conf
[logging]
default = FILE:/var/log/krb5libs.log
kdc = FILE:/var/log/krb5kdc.log
admin_server = FILE:/var/log/kadmind.log
[libdefaults]
default_realm = NICKSTG.NICKTAILOR.COM
dns_lookup_realm = false
dns_lookup_kdc = false
ticket_lifetime = 24h
renew_lifetime = 7d
forwardable = true
[realms]
NICKSTG.NICKTAILOR.COM = {
kdc = DC1.NICKTAILOR.COM
admin_server = DC1.NICKTAILOR.COM
}
[domain_realm]
.nickstg.nicktailor.com = = NICKSTG.NICKTAILOR.COM
nickstg.nicktailor.com = = NICKSTG.NICKTAILOR.COM
/etc/oddjobd.conf.d/oddjobd-mkhomedir.conf
<?xml version=”1.0″?>
<!– This configuration file snippet controls the oddjob daemon. It
provides access to mkhomedir functionality via a service named
“com.redhat.oddjob_mkhomedir”, which exposes a single object
(“/”).
The object allows the root user to call any of the standard D-Bus
introspection interface’s methods (these are implemented by
oddjobd itself), and also defines an interface named
“com.redhat.oddjob_mkhomedir”, which provides two methods. –>
<oddjobconfig>
<service name=”com.redhat.oddjob_mkhomedir”>
<object name=”/”>
<interface name=”org.freedesktop.DBus.Introspectable”>
<allow min_uid=”0″ max_uid=”0″/>
<!– <method name=”Introspect”/> –>
</interface>
<interface name=”com.redhat.oddjob_mkhomedir”>
<method name=”mkmyhomedir”>
<helper exec=”/usr/libexec/oddjob/mkhomedir -u 0077″
arguments=”0″
prepend_user_name=”yes”/>
<!– no acl entries -> not allowed for anyone –>
</method>
<method name=”mkhomedirfor”>
<helper exec=”/usr/libexec/oddjob/mkhomedir -u 0077″
arguments=”1″/>
<allow user=”root”/>
</method>
</interface>
</object>
</service>
</oddjobconfig>
================================================================================
/etc/pam.d/password-auth-ac
#%PAM-1.0
# This file is auto-generated.
# User changes will be destroyed the next time authconfig is run.
auth required pam_env.so
auth sufficient pam_unix.so nullok try_first_pass
auth requisite pam_succeed_if.so uid >= 500 quiet
auth sufficient pam_sss.so use_first_pass
auth required pam_deny.so
account required pam_unix.so
account sufficient pam_localuser.so
account sufficient pam_succeed_if.so uid < 500 quiet
account [default=bad success=ok user_unknown=ignore] pam_sss.so
account required pam_permit.so
password requisite pam_cracklib.so try_first_pass retry=3
password sufficient pam_unix.so md5 shadow nullok try_first_pass use_authtok
password sufficient pam_sss.so use_authtok
password required pam_deny.so
session optional pam_keyinit.so revoke
session required pam_limits.so
session optional pam_oddjob_mkhomedir.so skel=/etc/skel
session [success=1 default=ignore] pam_succeed_if.so service in crond quiet use_uid
session required pam_unix.so
session optional pam_sss.so
/etc/pam.d/su
#%PAM-1.0
auth sufficient pam_rootok.so
auth [success=2 default=ignore] pam_succeed_if.so use_uid user ingroup grp_technology_integration_servertech_all
auth [success=1 default=ignore] pam_succeed_if.so use_uid user ingroup wheel
auth required pam_deny.so
auth include system-auth
account sufficient pam_succeed_if.so uid = 0 use_uid quiet
account include system-auth
password include system-auth
session include system-auth
session optional pam_xauth.so
#This line is the last line
/etc/pam.d/system-auth-ac
#%PAM-1.0
# This file is auto-generated.
# User changes will be destroyed the next time authconfig is run.
auth required pam_env.so
auth sufficient pam_fprintd.so
auth sufficient pam_unix.so nullok try_first_pass
auth requisite pam_succeed_if.so uid >= 500 quiet
auth sufficient pam_sss.so use_first_pass
auth required pam_deny.so
account required pam_unix.so
account sufficient pam_localuser.so
account sufficient pam_succeed_if.so uid < 500 quiet
account [default=bad success=ok user_unknown=ignore] pam_sss.so
account required pam_permit.so
password requisite pam_cracklib.so try_first_pass retry=3
password sufficient pam_unix.so md5 shadow nullok try_first_pass use_authtok
password sufficient pam_sss.so use_authtok
password required pam_deny.so
session optional pam_keyinit.so revoke
session required pam_limits.so
session optional pam_oddjob_mkhomedir.so skel=/etc/skel
session [success=1 default=ignore] pam_succeed_if.so service in crond quiet use_uid
session required pam_unix.so
session optional pam_sss.so
/etc/samba/smb.conf
[global]
workgroup = NICKSTG
client signing = yes
client use spnego = yes
kerberos method = secrets and keytab
realm = NICKSTG.NICKTAILOR.COM
security = ads
log file = /var/log/
/etc/sssd/sssd.conf
[sssd]
config_file_version = 2
reconnection_retries = 3
sbus_timeout = 30
services = nss, pam
domains = default, nickstg.nicktailor.com
[nss]
filter_groups = root
filter_users = root,bin,daemon,adm,lp,sync,shutdown,halt,mail,news,uucp,operator,games,gopher,ftp,nobody,vcsa,pcap,ntp,dbus,avahi,rpc,sshd,xfs,rpcuser,nfsnobody,haldaemon,avahi-autoipd,gdm,nscd,oracle, ,deploy,tomcat,jboss,apache,ejabberd,cds,distcache,squid,mailnull,smmsp,backup,bb,clam,obdba,postgres,named,mysql,quova, reconnection_retries = 3
[pam]
reconnection_retries = 3
[domain/nickstg.nicktailor.com]
id_provider = ad
access_provider = simple
cache_credentials = true
#ldap_search_base = OU=NICKSTG-Users,DC=NICKSTG,DC=nicktailor,DC=com
override_homedir = /home/%u
default_shell = /bin/bash
simple_allow_groups = ServerTech_All,Server_Systems_Integration
/etc/sudoers
## /etc/sudoers
## nicktailor sudoers configuration
## Include all configuration from /etc/sudoers.d
## Note: the single # is needed in the line below and is NOT a comment!
#includedir /etc/sudoers.d
##%NICKSTG\\domain\ users ALL = NOPASSWD: ALL
% ServerTech_All ALL = NOPASSWD: ALL
% Server_Systems_Integration ALL = NOPASSWD: ALL
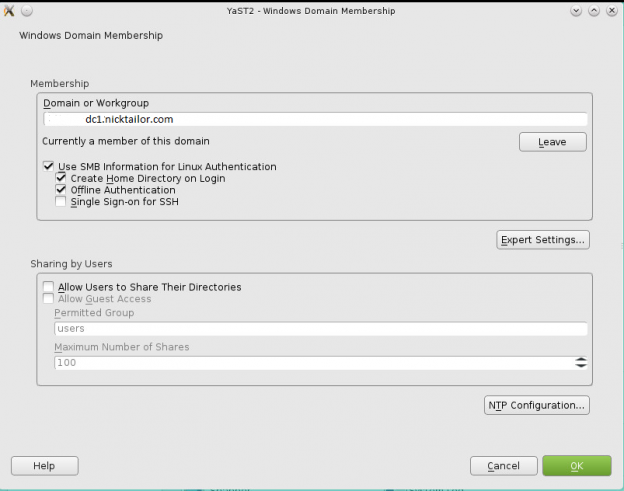
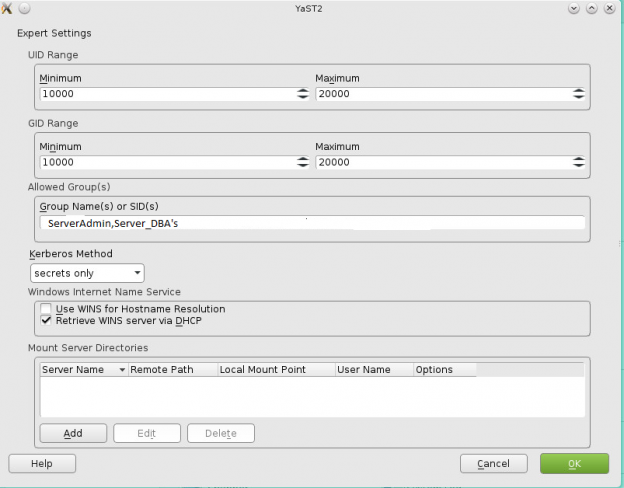
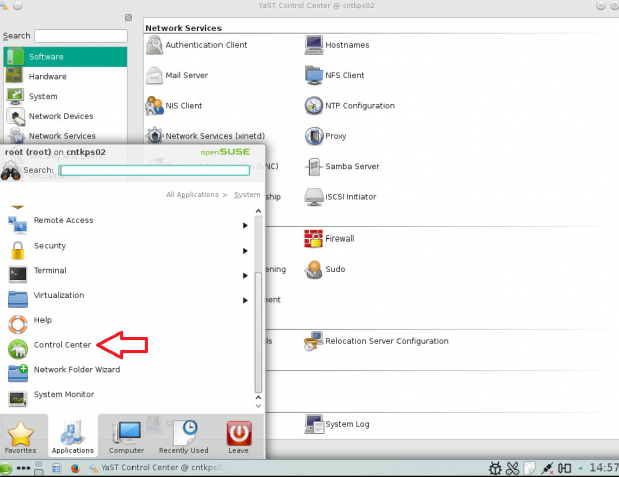
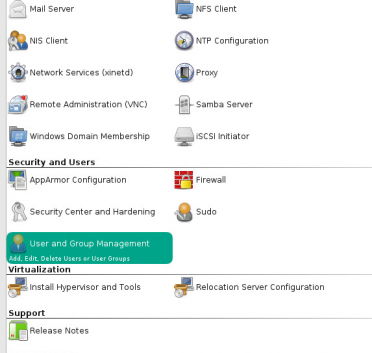
How to join a OpenSuse Host to Active Directory
nameserver 192.168.0.10
nameserver 192.168.0.11
Note: Prior to running these steps you will need to ensure that you have administrator account for the domain controller and have properly setup the dns for the Desktop / Server in Active Directory