How to Deploy Another VPC in AWS with Scalable EC2’s for HA using Terraform
So we are going to do this a bit different than the other post. As the other post is just deploying one instance in an existing VPC.
This one is more fun. The structure we will use this time will allow you to scale your ec2 instances very cleanly. If you are using git repos to push out changes. Then having a main.tf for your instance is much simpler to manage at scale.
File structure:
terraform-project/
├── main.tf <– Your main configuration file
├── variables.tf <– Variables file that has the inputs to pass
├── outputs.tf <– Outputs file
├── security_group.tf <– File containing security group rules
└── modules/
└── instance/
├── main.tf <- this file contains your ec2 instances
└── variables.tf <- variable file that defines we will pass for the module in main.tf to use
Explaining the process:
Main.tf
provider “aws“ {
region = “us-west-2”
}
resource “aws_key_pair“ “my-nick-test-key” {
key_name = “my-nick-test-key”
public_key = file(“${path.module}/terraform-aws-key.pub”)
}
resource “aws_vpc“ “vpc2” {
cidr_block = “10.0.0.0/16”
}
resource “aws_subnet“ “newsubnet“ {
vpc_id = aws_vpc.vpc2.id
cidr_block = “10.0.1.0/24”
map_public_ip_on_launch = true
}
module “web_server“ {
source = “./module/instance”
ami_id = var.ami_id
instance_type = var.instance_type
key_name = var.key_name_instance
subnet_id = aws_subnet.newsubnet.id
instance_count = 2 // Specify the number of instances you want
security_group_id = aws_security_group.newcpanel.id
}
Variables.tf
variable “ami_id“ {
description = “The AMI ID for the instance”
default = “ami-0913c47048d853921” // Amazon Linux 2 AMI ID
}
variable “instance_type“ {
description = “The instance type for the instance”
default = “t2.micro“
}
variable “key_name_instance“ {
description = “The key pair name for the instance”
default = “my-nick-test-key”
}
Security_group.tf
resource “aws_security_group“ “newcpanel“ {
name = “newcpanel“
description = “Allow inbound traffic”
vpc_id = aws_vpc.vpc2.id
// POP3 TCP 110
ingress {
from_port = 110
to_port = 110
protocol = “tcp“
cidr_blocks = [“0.0.0.0/0”]
}
// Custom TCP 20
ingress {
from_port = 20
to_port = 20
protocol = “tcp“
cidr_blocks = [“0.0.0.0/0”]
}
// Custom TCP 587
ingress {
from_port = 587
to_port = 587
protocol = “tcp“
cidr_blocks = [“0.0.0.0/0”]
}
// DNS (TCP) TCP 53
ingress {
from_port = 53
to_port = 53
protocol = “tcp“
cidr_blocks = [“0.0.0.0/0”]
}
// SMTPS TCP 465
ingress {
from_port = 465
to_port = 465
protocol = “tcp“
cidr_blocks = [“0.0.0.0/0”]
}
// HTTPS TCP 443
ingress {
from_port = 443
to_port = 443
protocol = “tcp“
cidr_blocks = [“0.0.0.0/0”]
}
// DNS (UDP) UDP 53
ingress {
from_port = 53
to_port = 53
protocol = “udp“
cidr_blocks = [“0.0.0.0/0”]
}
// IMAP TCP 143
ingress {
from_port = 143
to_port = 143
protocol = “tcp“
cidr_blocks = [“0.0.0.0/0”]
}
// IMAPS TCP 993
ingress {
from_port = 993
to_port = 993
protocol = “tcp“
cidr_blocks = [“0.0.0.0/0”]
}
// Custom TCP 21
ingress {
from_port = 21
to_port = 21
protocol = “tcp“
cidr_blocks = [“0.0.0.0/0”]
}
// Custom TCP 2086
ingress {
from_port = 2086
to_port = 2086
protocol = “tcp“
cidr_blocks = [“0.0.0.0/0”]
}
// Custom TCP 2096
ingress {
from_port = 2096
to_port = 2096
protocol = “tcp“
cidr_blocks = [“0.0.0.0/0”]
}
// HTTP TCP 80
ingress {
from_port = 80
to_port = 80
protocol = “tcp“
cidr_blocks = [“0.0.0.0/0”]
}
// SSH TCP 22
ingress {
from_port = 22
to_port = 22
protocol = “tcp“
cidr_blocks = [“0.0.0.0/0”]
}
// POP3S TCP 995
ingress {
from_port = 995
to_port = 995
protocol = “tcp“
cidr_blocks = [“0.0.0.0/0”]
}
// Custom TCP 2083
ingress {
from_port = 2083
to_port = 2083
protocol = “tcp“
cidr_blocks = [“0.0.0.0/0”]
}
// Custom TCP 2087
ingress {
from_port = 2087
to_port = 2087
protocol = “tcp“
cidr_blocks = [“0.0.0.0/0”]
}
// Custom TCP 2095
ingress {
from_port = 2095
to_port = 2095
protocol = “tcp“
cidr_blocks = [“0.0.0.0/0”]
}
// Custom TCP 2082
ingress {
from_port = 2082
to_port = 2082
protocol = “tcp“
cidr_blocks = [“0.0.0.0/0”]
}
}
output “newcpanel_sg_id“ {
value = aws_security_group.newcpanel.id
description = “The ID of the security group ‘newcpanel‘”
}
Outputs.tf
output “public_ips“ {
value = module.web_server.public_ips
description = “List of public IP addresses for the instances.”
}
Okay so now we want to create the scalable ec2
We create a modules/instance directory and inside here define the instances as resources
modules/instance/main.tf
resource “aws_instance“ “Tailor-Server” {
count = var.instance_count // Control the number of instances with a variable
ami = var.ami_id
instance_type = var.instance_type
subnet_id = var.subnet_id
key_name = var.key_name
vpc_security_group_ids = [var.security_group_id]
tags = {
Name = format(“Tailor-Server%02d”, count.index + 1) // Naming instances with a sequential number
}
root_block_device {
volume_type = “gp2”
volume_size = 30
delete_on_termination = true
}
}
Modules/instance/variables.tf
Each variable serves as an input that can be set externally when the module is called, allowing for flexibility and reusability of the module across different environments or scenarios.
So here we defining it as a list of items we need to pass for the module to work. We will later provide the actual parameter to pass to the variables being called in the main.tf
Cheat sheet:
ami_id: Specifies the Amazon Machine Image (AMI) ID that will be used to launch the EC2 instances. The AMI determines the operating system and software configurations that will be loaded onto the instances when they are created.
instance_type: Determines the type of EC2 instance to launch. This affects the computing resources available to the instance (CPU, memory, etc.).
Type: It is expected to be a string that matches one of AWS’s predefined instance types (e.g., t2.micro, m5.large).
key_name: Specifies the name of the key pair to be used for SSH access to the EC2 instances. This key should already exist in the AWS account.
subnet_id: Identifies the subnet within which the EC2 instances will be launched. The subnet is part of a specific VPC (Virtual Private Cloud).
instance_names: A list of names to be assigned to the instances. This helps in identifying the instances within the AWS console or when querying using the AWS CLI.
security_group_Id: Specifies the ID of the security group to attach to the EC2 instances. Security groups act as a virtual firewall for your instances to control inbound and outbound traffic.
variable “ami_id“ {}
variable “instance_type“ {}
variable “key_name“ {}
variable “subnet_id“ {}
variable “instance_names“ {
type = list(string)
description = “List of names for the instances to create.”
}
variable “security_group_id“ {
description = “Security group ID to assign to the instance”
type = string
}
variable “instance_count“ {
description = “The number of instances to create”
type = number
default = 1 // Default to one instance if not specified
}
Time to deploy your code: I didnt bother showing the plan here just the apply
my-terraform-vpc$ terraform apply
Do you want to perform these actions?
Terraform will perform the actions described above.
Only ‘yes’ will be accepted to approve.
Enter a value: yes
aws_subnet.newsubnet: Destroying… [id=subnet-016181a8999a58cb4]
aws_subnet.newsubnet: Destruction complete after 1s
aws_subnet.newsubnet: Creating…
aws_subnet.newsubnet: Still creating… [10s elapsed]
aws_subnet.newsubnet: Creation complete after 11s [id=subnet-0a5914443d2944510]
module.web_server.aws_instance.Tailor-Server[1]: Creating…
module.web_server.aws_instance.Tailor-Server[0]: Creating…
module.web_server.aws_instance.Tailor-Server[1]: Still creating… [10s elapsed]
module.web_server.aws_instance.Tailor-Server[0]: Still creating… [10s elapsed]
module.web_server.aws_instance.Tailor-Server[0]: Still creating… [20s elapsed]
module.web_server.aws_instance.Tailor-Server[1]: Still creating… [20s elapsed]
module.web_server.aws_instance.Tailor-Server[1]: Still creating… [30s elapsed]
module.web_server.aws_instance.Tailor-Server[0]: Still creating… [30s elapsed]
module.web_server.aws_instance.Tailor-Server[0]: Still creating… [40s elapsed]
module.web_server.aws_instance.Tailor-Server[1]: Still creating… [40s elapsed]
module.web_server.aws_instance.Tailor-Server[1]: Still creating… [50s elapsed]
module.web_server.aws_instance.Tailor-Server[0]: Still creating… [50s elapsed]
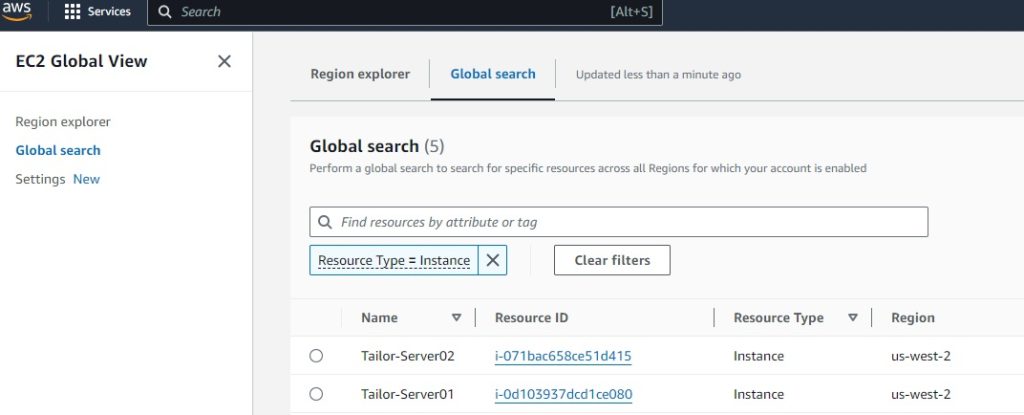
module.web_server.aws_instance.Tailor-Server[0]: Creation complete after 52s [id=i-0d103937dcd1ce080]
module.web_server.aws_instance.Tailor-Server[1]: Still creating… [1m0s elapsed]
module.web_server.aws_instance.Tailor-Server[1]: Still creating… [1m10s elapsed]
module.web_server.aws_instance.Tailor-Server[1]: Creation complete after 1m12s [id=i-071bac658ce51d415]
Apply complete! Resources: 3 added, 0 changed, 1 destroyed.
Outputs:
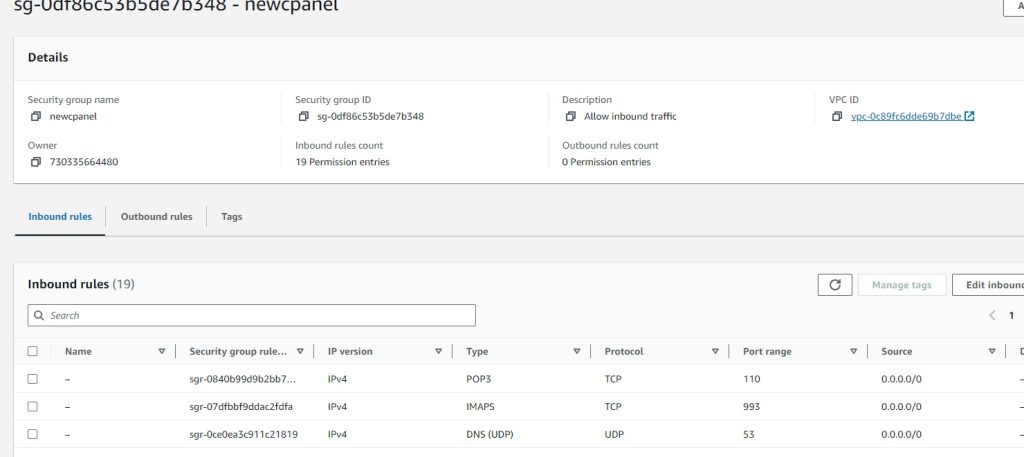
newcpanel_sg_id = “sg-0df86c53b5de7b348”
public_ips = [
“34.219.34.165”,
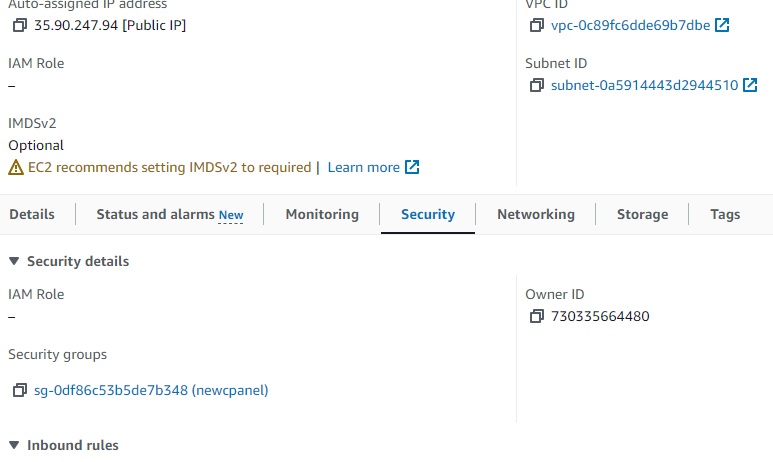
“35.90.247.94”,
]
Results:
VPC successful:

EC2 successful:

Security-Groups:


Key Pairs:

Ec2 assigned SG group:

