
Category: Mysql
Using Keepalived for Mysql Failover with Master to Master Replication
Hello,
I’m sure many people are wondering how to do this. So I decided to write this up on how I setup the architecture. This also for people who cant use mysql multimaster, because the application they are using doesn’t “offically” support mysql multimaster. If it does, you should look at that avenue before attempting this type of setup 🙂
Its pretty awesome, hope it helps you.
I did not do VRRP failover, which is what some people on the net say to do. This would mean that your VIP would be bound to one server and require an ARP for it to failover to the secondary in a failover scenerio, for mysql this is verrrrrry bad especially in a production high traffic site. In my setup the VIP is bound to both DB’s and will NOT require an ARP for failover.
At the time I wrote this VMAC support was not included in keepalived and it’s just starting to come out in keepalived, however still in its infancy and I don’t recommend trying it unless you’ve tested it thoughorly. Also I did this setup using Virtual Machines in a Production Environment for a University and it worked flawlessly.
Architecture Setup will consist of
–Two LVS Pair Doing Direct Route
–Two MYSQL DB servers doing MASTER TO MASTER replication in fail over scenerio with replication synch and failure protection
–Keepalived will be using a custom misc_chk script which does a TCP, PORT, MYSQL SERVICE RUNNING, and TABLE WRITE check. Should this fail 3 times, it fails to the secondary DB.
-Setting mysql backups as well, you will be able to do backups and restores without breaking replication or stopping mysql.
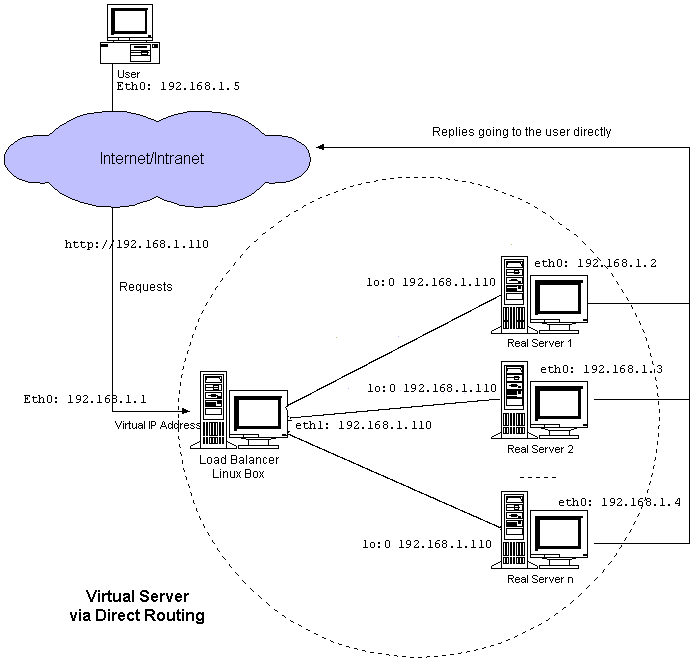
DIRECT ROUTE
– The virtual IP address is shared by real servers and the load balancer. The load balancer has an interface configured with the virtual IP address too, which is used to accept request packets, and it directly route the packets to the chosen servers. All the real servers have their non-arp alias interface configured with the virtual IP address or redirect packets destined for the virtual IP address to a local socket, so that the real servers can process the packets locally. The load balancer and the real servers must have one of their interfaces physically linked by a HUB/Switch. The architecture of virtual server via direct routing is illustrated as follows:
1. Provision yourself some servers using Debian or Ubuntu just for the keepalived stuff. I find that redhat has issues with compiling and its a bit slow. Your DB’s can be whatever distro you want.
Note. Ensure that you have two nics setup on your VM’s and that they are on the same vlan’s. This setup is single armed. If you are Doing NAT you will need two VLANS.
2. COMPILE YOUR KEEPALIVED AND SETUP
If you decided to use debian you will need the following packages to compile from source. I would recommend compiling from source, so you don’t have to worry about updates from the OS repo affecting your environments by accident. Ensure that you have the Kernel Headers installed, as you will need them.
apt-get install gcc libssl-dev libpopt-dev libnl-dev ipvsadm
./configure –with-kernel-dir=/usr/src/linux-headers-2.6.35-23-server/
make && make install
Once this installed you will need to make some modification the startup scripts
mv /etc/init.d/keepalived /etc/init.d/keepalived.bak
cd /etc/init.d/
ln -s /usr/local/etc/rc.d/init.d/keepalived keepalived
mv /usr/sbin/keepalived /usr/sbin/keepalived.original
cd /usr/sbin
ln -s /usr/local/sbin/keepalived keepalived
Update the /etc/init.d/keepalived script
updated /etc/init.d/keepalived
=================================
#!/bin/sh
#
# Startup script for the Keepalived daemon
#
# processname: keepalived
# pidfile: /var/run/keepalived.pid
#config: /usr/local/etc/keepalived
# chkconfig: – 21 79
# description: Start and stop Keepalived
PATH=/sbin:/bin:/usr/sbin:/usr/bin
DAEMON=/usr/local/sbin/keepalived
NAME=keepalived
DESC=keepalived
CONFIG=/etc/keepalived/keepalived.conf
# Source function library
#. /etc/rc.d/init.d/functions
. /lib/lsb/init-functions
# Source configuration file (we set KEEPALIVED_OPTIONS there)
#. /etc/sysconfig/keepalived
. /usr/local/etc/sysconfig/
====================================================
Next you will need to edit the file below on both lvs servers
/etc/sysctl.conf on both LVS1 and LVS2 save the file and run ‘sysctl -p‘ to load it to the running config
net.ipv4.ip_forward = 1
==========================================
3. Configure your nics on LVS1 and LVS2
/etc/network/interfaces (The ip’s listed below are example only please dont use them hoping it will work)
# This file describes the network interfaces available on your system
# and how to activate them. For more information, see interfaces(5).
# The loopback network interface
auto lo
iface lo inet loopback
#This line adds a static route for the entire subnet so traffic can reach the real servers #properly, this line is not necessary, however if the packets are dropping at the destination, #this line helps correct that, it usually better to have this in place.
up ip route add 172.16.0.1/26 dev eth0;:
# The primary network interface
auto eth0 eth1
iface eth0 inet static
address 172.16.0.1
netmask 255.255.255.192
network 172.16.0.1
broadcast 172.16.0.1
gateway 172.16.0.1
# dns-* options are implemented by the resolvconf package, if installed
dns-nameservers 172.16.0.1 172.16.0.1
dns-search sa.it.nicktailor.com
iface eth1 inet static
#This interface is on the same vlan as the primary eth0 interface on purpose. This i#nterface is soley used by keepalived as the sync interface / hearbeat for keepalived #daemon to sync to the second director lvs2.
address 172.16.98.2
#This ip should be an non routable address you define, just make sure that lvs2 is on the #same subnet as this non routeble address, so if this is lvs1 then lvs2 will be 172.16.98.3 #kind of thing.
netmask 255.255.255.0
=============================================================
4. Now what I have done is setup a reload script that will update LVS2 upon reload so I dont have to keep updating both LVS server everytime I have to do a graceful reload, not sure why keepalive has not implemented this feature yet. Developer, don’t think like systems engineers and vice versa.
- . setup ssh keys on both server so that root can ssh to lvs2 via ssh key
- Login into destination server
- cd /root/.ssh
- run ‘ssh-keygen -t rsa’
- run ‘cat id_rsa.pub > authorized_keys && chmod 600 authorized_keys’
- Login into to lvs1
- cd /root/.ssh
- copy both id_rsa fils into this directory from lvs2
- run ‘cat id_rsa.pub > authorized_keys && chmod 600 authorized_keys’
You should be able to ssh now ‘ssh root@hostname‘ and it should login. If it didn’t go google why 😛
5. A) Setup keepalived and automating the reload process
Login into LVS1
cd /etc/keepalived/
mkdir conf.d/
mkdir backups/
Create a keepalived.conf in /etc/keepalived/ and copy past the following in it, you will need to update the varibles according to your own setup
sample keepalived.conf
https://www.nicktailor.com/files/keepalived.conf.lvs1
https://www.nicktailor.com/files/keepalived.conf.lvs2
##WARNING:
#If this configuration is copied over to the SLAVE LVS as is stuff will EXPLODE
### There are elements within that need to stay unique on each server.
### Specifically:
### -lvs id
### -state
### -priority
#########################################################################
global_defs {
notification_email {
nick.tailor@nicktailor.com
}
notification_email_from root@lvs1
smtp_server 127.0.0.1
smtp_connect_timeout 30
lvs_id lvs1
}
vrrp_instance external_linux {
state MASTER
smtp_alert
interface eth0
lvs_sync_daemon_interface eth0
virtual_router_id 42
priority 150
advert_int 1
preempt
authentication {
auth_type PASS
auth_pass nicktailor
}
virtual_ipaddress {
#VIP’s are listed and or Gateway ip is listed here if using NAT for DB boxes
172.16.10.1
}
virtual_server 172.16.10.1 3306 {
delay_loop 10
lb_algo rr
lb_kind DR
protocol TCP
# persistence_timeout 30 (this is not needed for db with replication setup,
# only enabled if you absolutely have to)
#When removing servers from the pool comment starting below this line
real_server 142.103.18.2 3306 {
MISC_CHECK {
misc_path “/root/keepalived/dbcheck.sh 142.103.18.2”
misc_timeout 30
}
}
#make sure to comment above bracket when removing above server from pool
real_server 142.103.18.3 3306 {
MISC_CHECK {
misc_path “/root/keepalived/dbcheck.sh 142.103.18.2”
misc_timeout 30
}
}
#make sure to comment above last bracket when removing above server from pool, do not comment out below bracket
}
================================================================
I have broken the keepalived.conf file into three sections for the purpose of automating & config updates to LVS2
Create
/etc/keepalived/head <- Contains the Global LVS directives for the directors(director means LVS1 or LVS2) there are links below for example files.
==================
Warning: Directives within the GLOBAL section MUST differ on each server in a failover setup!!!
Global-Directives
* Unique Directives:
- o lvs_id – { name of the LVS, usually lvs1-domain)
- o state – { MASTER or BACKUP depends on what is role of this server }
- o priority – { This value must be higher on master for example 100 on MASTER and 50 on BACKUP }
* Shared Directives
- o virtual_router_id – { this should be differnet for each LVS configuration, tcpdump -n -p 112, will show you which ones are in use }
- o vrrp_instance – { name of instance, usually domain, or domain_eth0 }
Example /etc/keepalived/head (whatever you put in your keepalived.conf for the globaldefs put in your head file copy past it here is a sample ones.
http://www.nikktailor.com/files/headfilelvs1
https://www.nicktailor.com/files/headfilelvs2
====================
global_defs {
notification_email {
nick.tailor@nicktailor.com
}
notification_email_from root@lvs1.nicktailor.com
smtp_server 127.0.0.1
smtp_connect_timeout 30
lvs_id lvs1
}
vrrp_instance external_linux {
state BACKUP
smtp_alert
interface eth0
lvs_sync_daemon_interface eth1
virtual_router_id 42
priority 50
advert_int 1
preempt
authentication {
auth_type PASS
auth_pass nicktailor
}
===================
/etc/keepalived/virtual_ips.conf <- Contains the VIP ip’s, whatever you have in your keepalived.conf create this file and copy paste it.
https://www.nicktailor.com/files/virtual_ips.conf
================================
virtual_ipaddress {
#VIP’s are listed and or Gateway ip is listed here if using NAT for DB boxes
172.16.10.1 #Development VIP
172.16.10.2 #Production VIP
}
================================
inside the conf.d/ directory you will have the real server config. Make sure you never have duplicates as the reload script will mess up your keepalived.conf file if do and you can bring down your VIPS
https://www.nicktailor.com/files/testmschk.conf (Example)
/etc/keepalived/conf.d/testmschkscript.conf
==================================================
#reload config with ‘/etc/init.d/keepalive_reload’ this will update lvs2 with changes automatically
#DO NOT RELOAD CONFIG FROM LVS2
#To see pool use ‘watch ipvsadm -L -n’
#’ip addr’ will show you which lvs the vip is bound to
virtual_server 172.16.10.1 3306 {
delay_loop 10
lb_algo rr
lb_kind DR
protocol TCP
# persistence_timeout 30 (this is not needed for db with replication setup, only enabled if you absolutely have to)
#this is the failover server if it fails over to this traffic is forced there are no checks done on this server by keepalived
sorry_server 142.103.18.2 3306
#When removing servers from the pool comment starting below this line
real_server 142.103.18.1 3306 {
MISC_CHECK {
misc_path “/root/keepalived/dbcheck.sh 142.103.18.1”
misc_timeout 30
}
}
#make sure to comment above last bracket when removing above server from pool, do not comment out below bracket
}
================================================================
B) Automation Reload Script
create the following file /etc/init.d/keepalivedreload and give it executable permissions.
create /etc/keepalived/backups directory as well.
/etc/init.d/keepalivedreload (LVS1)
https://www.nicktailor.com/files/keepalivedreloadlvs1
a) this will copy the virtual ips file and conf.d directory to lvs2 and reload the config lvs2 and make a backup of the config prior to update.
===============================
#!/bin/bash
KADIR=/etc/keepalived
BACKUPFILE=”$KADIR/backups/`date +’%Y%m%d-%H%M’`.conf”
CONFFILE=$KADIR/keepalived.conf
echo Making a backup of the conf file as $BACKUPFILE.gz
cp $KADIR/keepalived.conf $BACKUPFILE
gzip $BACKUPFILE
echo “Adding gateways and virtual IPs…”
cat $KADIR/head $KADIR/virtual_ips.conf > $CONFFILE
echo “}” >> $CONFFILE
#echo “}” >> $CONFFILE
echo “##################################################” >> $CONFFILE
echo “Adding virtual servers…”
for i in $KADIR/conf.d/*
do
cat $i >> $CONFFILE
done
echo “Copying gateways, virtual IPs, and virtual servers to lvs2nicktailor.com…”
scp $KADIR/virtual_ips.conf root@lvs2nicktailor.com:/etc/keepalived/
for i in $KADIR/conf.d/*
do
scp $i root@lvs2nicktailor.com:/etc/keepalived/conf.d/
done
echo “Reloading keepalived config…”
/etc/init.d/keepalived reload
echo “Issuing reload on lvs2nicktailor.com…”
echo “==============================”
ssh root@lvs2nicktailor.com /etc/init.d/keepalived_reload
echo “Done.”
============================================
Now I have made the second one so that you can’t make reloads updates to the primary lvs from the secondary, just because of human error. You’re free to do this however you please. I found this way to be beneficial.
(LVS2) /etc/init.d/keepalivedreload this script will just make a backup and reload on lvs2 and not update back to lvs1.
https://www.nicktailor.com/files/keepalivedreloadlvs2
====================================
#!/bin/bash
KADIR=/etc/keepalived
BACKUPFILE=”$KADIR/backups/`date +’%Y%m%d-%H%M’`.conf”
CONFFILE=$KADIR/keepalived.conf
echo Making a backup of the conf file as $BACKUPFILE.gz
cp $KADIR/keepalived.conf $BACKUPFILE
gzip $BACKUPFILE
echo “Adding gateways and virtual IPs…”
cat $KADIR/head $KADIR/virtual_ips.conf > $CONFFILE
echo “}” >> $CONFFILE
#echo “}” >> $CONFFILE
echo “##################################################” >> $CONFFILE
echo “Adding virtual servers…”
for i in $KADIR/conf.d/*
do
cat $i >> $CONFFILE
done
#echo “Copying gateways, virtual IPs, and virtual servers to lvsdevl22.webi.it.ubc.ca…”
#scp $KADIR/virtual_ips.conf
#root@lvs2nicktailor.com:/etc/keepalived/
#for i in $KADIR/conf.d/*
#do
#scp $i root@lvs2nicktailor.com:/etc/keepalived/conf.d/
#done
echo “Reloading keepalived config…”
/etc/init.d/keepalived reload
#echo “Issuing reload on lvs2nicktailor.com…”
#echo “==============================”
#ssh root@lvs2nicktailor.com /root/bin/keepalive_reload
#ssh root@lvs2nicktailor.com /etc/init.d/keepalived reload
echo “Done.”
6. Test the reload by running it and seeing if the upates take effect from lvs1 to lvs2. You should see the keepalived.conf and /etc/keepalived/conf.d directory all matching.
MYSQL DATABASE SERVER DEPLOYMENT AND REPLICATION SETUP
1. Provision your mysql DB servers instal mysql
2. Ensure that your DB servers are on the same vlan as the LVS
3. Configure the nics
4. configure the loopback interface so the VIP is bound to it, since we are doing Direct ROUTE
IE. redhat
/etc/sysconfig/network-scripts/ifcfg-lo:0
=================
DEVICE=lo:0
IPADDR=142.103.18.1
NETMASK=255.255.255.255
# If you’re having problems with gated making 127.0.0.0/8 a martian,
# you can change this to something else (255.255.255.255, for example)
ONBOOT=yes
NAME=loopback
5. Update /etc/sysctl.conf
net.ipv4.conf.default.arp_ignore=1
net.ipv4.conf.default.arp_announce=2
net.ipv4.conf.all.arp_ignore=1
net.ipv4.conf.all.arp_announce=2
and run ‘sysctl -p‘
Note: The reason for this is it will make sure the server doesn’t loop back and start ARP requests for the VIP.
MYSQL REPLICATION SETUP – i was too lazy to write it all out so I found his great link to explain how to set it up
http://www.howtoforge.com/mysql_master_master_replication
=============================================
Master 1/Slave 2 ip: 192.168.16.4
Master 2/Slave 1 ip : 192.168.16.5
Step 2:
On Master 1, make changes in my.cnf:
[mysqld]
datadir=/var/lib/mysql
socket=/var/lib/mysql/mysql.sock
old_passwords=1
log-bin
binlog-do-db=<database name> # input the database which should be replicated
binlog-ignore-db=mysql # input the database that should be ignored for replication
binlog-ignore-db=test
server-id=1
[mysql.server]
user=mysql
basedir=/var/lib
[mysqld_safe]
err-log=/var/log/mysqld.log
pid-file=/var/run/mysqld/mysqld.pid
Step 3:
On master 1, create a replication slave account in mysql.
mysql> grant replication slave on *.* to ‘replication’@192.168.16.5 \
identified by ‘slave’;
and restart the mysql master1.
Step 4:
Now edit my.cnf on Slave1 or Master2 :
[mysqld]
datadir=/var/lib/mysql
socket=/var/lib/mysql/mysql.sock
old_passwords=1
server-id=2
master-host = 192.168.16.4
master-user = replication
master-password = slave
master-port = 3306
[mysql.server]
user=mysql
basedir=/var/lib
[mysqld_safe]
err-log=/var/log/mysqld.log
pid-file=/var/run/mysqld/mysqld.pid
Step 5:
Restart mysql slave 1 and at
mysql> start slave;
mysql> show slave status\G;
*************************** 1. row ***************************
Slave_IO_State: Waiting for master to send event
Master_Host: 192.168.16.4
Master_User: replica
Master_Port: 3306
Connect_Retry: 60
Master_Log_File: MASTERMYSQL01-bin.000009
Read_Master_Log_Pos: 4
Relay_Log_File: MASTERMYSQL02-relay-bin.000015
Relay_Log_Pos: 3630
Relay_Master_Log_File: MASTERMYSQL01-bin.000009
Slave_IO_Running: Yes
Slave_SQL_Running: Yes
Replicate_Do_DB:
Replicate_Ignore_DB:
Replicate_Do_Table:
Replicate_Ignore_Table:
Replicate_Wild_Do_Table:
Replicate_Wild_Ignore_Table:
Last_Errno: 0
Last_Error:
Skip_Counter: 0
Exec_Master_Log_Pos: 4
Relay_Log_Space: 3630
Until_Condition: None
Until_Log_File:
Until_Log_Pos: 0
Master_SSL_Allowed: No
Master_SSL_CA_File:
Master_SSL_CA_Path:
Master_SSL_Cert:
Master_SSL_Cipher:
Master_SSL_Key:
Seconds_Behind_Master: 1519187
1 row in set (0.00 sec)
Above highlighted rows must be indicate related log files and Slave_IO_Running and Slave_SQL_Running: must be to YES.
Step 6:
On master 1:
mysql> show master status;
+————————+———-+————–+——————+
| File | Position | Binlog_Do_DB | Binlog_Ignore_DB |
+————————+———-+————–+——————+
|MysqlMYSQL01-bin.000008 | 410 | adam | |
+————————+———-+————–+——————+
1 row in set (0.00 sec)
The above scenario is for master-slave, now we will create a slave master scenario for the same systems and it will work as master master.
Step 7:
On Master2/Slave 1, edit my.cnf and master entries into it:
[mysqld]
datadir=/var/lib/mysql
socket=/var/lib/mysql/mysql.sock
# Default to using old password format for compatibility with mysql 3.x
# clients (those using the mysqlclient10 compatibility package).
old_passwords=1
server-id=2
master-host = 192.168.16.4
master-user = replication
master-password = slave
master-port = 3306
log-bin #information for becoming master added
binlog-do-db=adam
[mysql.server]
user=mysql
basedir=/var/lib
[mysqld_safe]
err-log=/var/log/mysqld.log
pid-file=/var/run/mysqld/mysqld.pid
Step 8:
Create a replication slave account on master2 for master1:
mysql> grant replication slave on *.* to ‘replication’@192.168.16.4 identified by ‘slave2’;
Step 9:
Edit my.cnf on master1 for information of its master.
[mysqld]
datadir=/var/lib/mysql
socket=/var/lib/mysql/mysql.sock
# Default to using old password format for compatibility with mysql 3.x
# clients (those using the mysqlclient10 compatibility package).
old_passwords=1
log-bin
binlog-do-db=adam
binlog-ignore-db=mysql
binlog-ignore-db=test
server-id=1
#information for becoming slave.
master-host = 192.168.16.5
master-user = replication
master-password = slave2
master-port = 3306
[mysql.server]user=mysqlbasedir=/var/lib
Step 10:
Restart both mysql master1 and master2.
On mysql master1:
mysql> start slave;
On mysql master2:
mysql > show master status;
On mysql master 1:
mysql> show slave status\G;
*************************** 1. row ***************************
Slave_IO_State: Waiting for master to send event
Master_Host: 192.168.16.5
Master_User: replica
Master_Port: 3306
Connect_Retry: 60
Master_Log_File: Mysql1MYSQL02-bin.000008
Read_Master_Log_Pos: 410
Relay_Log_File: Mysql1MYSQL01-relay-bin.000008
Relay_Log_Pos: 445
Relay_Master_Log_File: Mysql1MYSQL02-bin.000008
Slave_IO_Running: Yes
Slave_SQL_Running: Yes
Replicate_Do_DB:
Replicate_Ignore_DB:
Replicate_Do_Table:
Replicate_Ignore_Table:
Replicate_Wild_Do_Table:
Replicate_Wild_Ignore_Table:
Last_Errno: 0
Last_Error:
Skip_Counter: 0
Exec_Master_Log_Pos: 410
Relay_Log_Space: 445
Until_Condition: None
Until_Log_File:
Until_Log_Pos: 0
Master_SSL_Allowed: No
Master_SSL_CA_File:
Master_SSL_CA_Path:
Master_SSL_Cert:
Master_SSL_Cipher:
Master_SSL_Key:
Seconds_Behind_Master: 103799
1 row in set (0.00 sec)
ERROR:
No query specified
===========================================================================
NOW SETUP MYSQL FOR KEEPALIVED TO BE ABLE TO WRITE TO IT.
Note – if you setup replication correctly, this will replicate over to your secondary DB and you wont have to worry about setting this up on your secondary.
1. this is so keepalived msc_chk will be able to test to see if the db can be written to and it put a timestamp in the tables.
– You are now creating a DB for keepalived to write to
Copy Paste at MySQL prompt logged in as MySQL root
===========================================================
CREATE DATABASE `healthcheck` DEFAULT CHARACTER SET latin1 COLLATE latin1_swedish_ci;
CREATE TABLE `healthcheck`.`keepalived` (
`id` INT( 11 ) NOT NULL AUTO_INCREMENT ,
`data` VARCHAR( 100 ) NULL ,
PRIMARY KEY ( `id` )
) ENGINE = MYISAM;
CREATE TABLE `healthcheck`.`keepalived2` (
`id` INT( 11 ) NOT NULL AUTO_INCREMENT ,
`data` VARCHAR( 100 ) NULL ,
PRIMARY KEY ( `id` )
) ENGINE = MYISAM;
use healthcheck;
insert into keepalived (data) values (“hello”);
insert into keepalived (data) values (“hello”);
insert into keepalived2 (data) values (“hello”);
insert into keepalived2 (data) values (“hello”);
GRANT ALL ON *.* TO ‘lvs1’@’lvs1.nicktailor.com’ identified by ‘password’;
GRANT ALL ON *.* TO ‘lvs2’@’lvs2.nicktailor.com’ identified by ‘password’;
============================================================
2. A)Log back into LVS1
B)Also do the same for LVS2 with below steps.
touch /var/log/keepalived/dbcheckprod.log
create a directory called /root/keepalived/
– this is where your msck_chk script lives
– it will check tcp, port, mysql service and table write) 3 times and log it if it fails keepalived will fail to the secondary
– please note the UPDATE table section in this script needs to match the mysql ID you have in mysql below in the script
/root/keepalived/dbcheck.sh
https://www.nicktailor.com/files/dbcheck.sh
=======================================
#!/usr/bin/perl
#use strict;
#use warnings;
use DBI;
use POSIX;
#use Mysql;
use Sys::Hostname;
$host = $ARGV[$0] ;
$lvs_host=hostname;
$database = “healthcheck”;
$tablename = “keepalived”;
$user = “lvs1”;
$pw = “password”;
$dbinfo = “DBI:mysql:$database;host=$host;mysql_connect_timeout=2”;
$timestamp = strftime “%b%e %Y %H:%M:%S”, localtime;
$logdir = “/var/log/keepalived/dbcheckprod.log”;
open (LOG_FILE,”>>$logdir”);
if ($lvs_host eq “lvs1.nicktailor.com”)
{
$tablename = “keepalived”;
}
elsif ($lvs_host eq “lvs2.nicktailor.com”)
{
$tablename = “keepalived2”;
}
#$connect = Mysql->connect($host, $database, $user, $pw);
#$dbh = DBI->connect($dbinfo,$user,$pw,{ RaiseError => 1 }) or die $DBI::errstr;
$connect_fail = 0;
print LOG_FILE “\n\n\n$timestamp\n”;
print LOG_FILE “$host\n”;
# try to connect to db server
# exit with error if db connection fails 3x
for ($count=0; $count <= 2; $count++)
{
$dbh = DBI->connect($dbinfo,$user,$pw, {RaiseError => 0, PrintError=>0});
print LOG_FILE “Outer loop round $count: error is ” . $DBI::err . “\n”;
if (!$DBI::errstr)
{
print LOG_FILE “connected!\n”;
$myquery = “UPDATE $tablename SET data=’$timestamp’ WHERE id = ‘1’”;
$fail=0;
for ($count = 0; $count <= 2; $count++)
{
$result = $dbh->do($myquery);
if ($result > 0)
{
print LOG_FILE “$count “;
print LOG_FILE “success!\n”;
}
else
{
print LOG_FILE “$count “;
print LOG_FILE “fail!\n”;
$fail++;
}
sleep(8);
}
$dbh->disconnect();
if ($fail == 0)
{
print LOG_FILE “success because failed $fail times\n”;
print LOG_FILE “exit 0 from table test\n”;
close (LOG_FILE);
exit 0;
}
else
{
print LOG_FILE “failed $fail times\n”;
print LOG_FILE “exit 1 from table test\n”;
close (LOG_FILE);
exit 1;
}
}
else
{
$connect_fail++;
print LOG_FILE “connnect_fail = $connect_fail\n”;
}
sleep(8);
}
if ($connect_fail > 0)
{
print LOG_FILE “failed $connect_fail times!”;
print LOG_FILE “exit 1 from connect_fail test\n”;
close (LOG_FILE);
exit 1;
}
#else clause may not be necessary because if connect_fail < 3 then table check code would take care of exits
else
{
print LOG_FILE “connect fail is 3 but still in else clause?”;
print LOG_FILE “exit 0 from connect test\n”;
close (LOG_FILE);
exit 0;
}
================================================================
MYSQL REPLICATION SYNCHORIZATION/FAILURE PROTECTION
================================================================
– So we want to make sure that MYSQL in the event restarts doesnt allow traffic until both databases servers are caught with replication.
1. Log into mysql server
2. disabled mysql init startup script. If your on redhat its simply ‘chkconfig mysql off’
3. edit /etc/rc.local and add the line
/etc/init.d/mysql2 to the end and save it
3. Now your going to setup your start up script that will make sure the replication is caughtup before it allows traffic to the DB
a) Make sure you have iptables setup on your DB servers and that the rules are setup to allow lvs1 and lvs2 ips to connect on port 3306
/etc/init.d/mysql2
https://www.nicktailor.com/files/mysql2
==================================
#!/bin/bash
# This will script delete remove the lvs ips if they exist and then add them so there are no duplicate entries
# It greps for the seconds behind the Master until it hits ZERO if its at ZERO then it will allow the LVS server to connect to the DB.
# It will also send out an email if replication is broken and keep traffic blocked. My advice before setting this up is get familar with it # and test before using.
# Make healthcheck fail
IPTABLES=”$(which iptables)”
# Make sure rule doesn’t exist before we add so we don’t double up
$IPTABLES -D RH-Firewall-1-INPUT -s <lvs1ip> -p tcp –dport 3306 -j ACCEPT
$IPTABLES -D RH-Firewall-1-INPUT -s <lvs2ip> -p tcp –dport 3306 -j ACCEPT
# start mysql
service mysql start
GREP=”$(which grep)”
CUT=”$(which cut)”
SLEEP=”$(which sleep)”
# start values
POS=4
#EXEC_POS=5
#I=0
ECHO=”/bin/echo”
#$ECHO “Waiting for Replication “
#while ( test “$READ_POS” != “$EXEC_POS” )
$SLEEP 10
while [ “$POS” -gt 0 ];
do
POS=`/usr/bin/mysql -Bse ‘show slave status\\G’ -ppassword | grep ‘Seconds_Behind_Master’ | grep -o -E ‘[0-9]*$’`
if [[ $POS != [0-9]* ]];
then
$ECHO “Replication is broken so keeping port 3306 blocked.”
mail -s ‘Replication broken, keeping port 3306 blocked’ nicktailor\@nicktailor.com < ~root/mysqlstopped.txt
exit
fi
# READ_POS=`$ECHO $POS | $CUT -d\ -f1`
# EXEC_POS=`$ECHO $POS | $CUT -d\ -f2`
$ECHO “Seconds behind master is $POS”
#$ECHO “READ_POS is $READ_POS”
#$ECHO “EXEC_POS is $EXEC_POS”
# Output every ~10 sec
# if ( test “`$ECHO $(($I%10))`” -eq “0” )
# then
# $ECHO “inside timer loop READ_POS is $READ_POS”
# $ECHO “inside timer loop EXEC_POS $EXEC_POS”
# fi
# I=$(($I+1))
$SLEEP 1
done
# Make healthcheck succeed
$IPTABLES -I RH-Firewall-1-INPUT 12 -s <lvs1ip> -p tcp –dport 3306 -j ACCEPT
$IPTABLES -I RH-Firewall-1-INPUT 12 -s <lvs2ip> -p tcp –dport 3306 -j ACCEPT
===============================================================
4. Now we on your secondary DB we want to make sure that in the event a failure occurs the replication is not broken or the data would get out of sync. So we have a script that check replication every 5 seconds via a cron, if replication is broken it will change the DB to read only and send out an alert email.
/root/repl_check/dbhealth.pl
https://www.nicktailor.com/files/dbhealth.pl
======================================
#!/usr/bin/perl
use Sys::Hostname;
use POSIX;
$timestamp = strftime “%b%e %Y %H:%M:%S”, localtime;
$host = hostname;
$email_lock = “/root/email.lck”;
$mysql_socket = “/var/lib/mysql/mysql.sock”;
$show_slave_status = “/root/repl_check/show_slave_status.txt”;
$set_read_only = “/root/repl_check/set_db_read_only.sql”;
$pword = “password”;
# check to see if mysql socket exists. if it exists, means that mysql is running. if mysql not running, don’t need to run slave status check
sub check_mysql_socket
{
# Can’t connect to local MySQL server through socket ‘/var/lib/mysql/mysql.sock
if (-e $mysql_socket)
{
print “MySQL running, will proceed\n”;
return 1;
}
else
{
print “MySQL not running, will do nothing\n”;
return 0;
}
}
# check to see if email.lck exists. if it does, that means email has been sent, no need to keep resending it
sub check_email_lock
{
if (-e $email_lock)
{
print “email file exists\n”;
return 1;
}
else
{
print “no email file exists\n”;
return 0;
}
}
sub stop_mysql
{
print “**Show Read Only Status**\n”;
system(“mysql -p$pword < $set_read_only”);
if (check_email_lock)
{
print “email lock exists, keep email lock, no email will be sent “;
}
else
{
system (“mail -s ‘mysql stopped on $host’ nicktailor\@nicktailor.com < ~root/mysqlstopped.txt”);
system (“touch $email_lock”);
print “email sent, email lock created\n”;
}
}
print $timestamp . “\n”;
# if MySQL is running
if (check_mysql_socket)
{
# for testing with text file
# $last_io_errno = `less develscripts/slavestatus_master_down.txt | grep Last_IO_Errno | /usr/bin/awk ‘{print \$2}’`;
# $last_sql_errno = `less develscripts/slavestatus_master_down.txt | grep Last_SQL_Errno | /usr/bin/awk ‘{print \$2}’`;
system (“/usr/bin/mysql -Bse ‘show slave status\\G’ -p$pword > $show_slave_status”);
$last_io_errno = `less $show_slave_status | grep Last_IO_Errno | /usr/bin/awk ‘{print \$2}’`;
$last_sql_errno = `less $show_slave_status | grep Last_SQL_Errno | /usr/bin/awk ‘{print \$2}’`;
$slave_io_running = `less $show_slave_status | grep Slave_IO_Running | /usr/bin/awk ‘{print \$2}’`;
$slave_sql_running = `less $show_slave_status | grep Slave_SQL_Running | /usr/bin/awk ‘{print \$2}’`;
# trim newline character
chomp($last_io_errno);
chomp($last_sql_errno);
chomp($slave_io_running);
chomp($slave_sql_running);
print “last io error is ” . $last_io_errno . “\n”;
print “last sql errno is ” . $last_sql_errno . “\n”;
print “slave io running is ” . $slave_io_running . “\n”;
print “slave sql running is ” . $slave_sql_running . “\n”;
if (($last_io_errno > 0) && ($last_io_errno != 2013))
{
&stop_mysql;
}
elsif ($last_sql_errno > 0)
{
&stop_mysql;
}
# if slave not running = Slave_IO_Running and Slave_SQL_Running are set to No
elsif (($slave_io_running eq “No”) && ($slave_sql_running eq “No”))
{
&stop_mysql;
}
else
{
if (check_email_lock)
{
system (“rm $email_lock”);
}
print “replication fine or master’s just down, mysql can keep going, removed lock file\n”;
}
}
else
{
print “#2 MySQL not running, will do nothing\n”;
}
print “\n#########################\n”;
==================================================================================
Also create the following files for the above script to work
set_db_read_only.sql
https://www.nicktailor.com/files/
=========================
show variables like “read_only”;
set global read_only=on;
show variables like “read_only”;
=========================
touch show_slave_status.txt
===============================
unset_db_read_only.sql
https://www.nicktailor.com/files/unset_db_read_only.sql
===============================
show variables like “read_only”;
set global read_only=off;
show variables like “read_only”;
===============================
Next setup a cron to run this on the secondary DB however many seconds you like
FINAL SETUP PIECE!!
MYSQL BACKUPS
ON noth DB server you want to have mysql backups running via a cron
For multi-threaded backup and restores of InnoDB and myisam check out my https://www.nicktailor.com/?p=270 post here.
/root/backup/mysqldumpbackup.sh
https://www.nicktailor.com/files/mysqldumpbackup.sh
==============================
#Backup multiple MySQL databases into separate files and one full backup of all of them and then tars them in to archive directory and
#retains 7 day archives
#!/bin/bash
# backup each mysql db into a different file, rather than one big file
# as with –all-databases – will make restores easier
USER=”root”
PASSWORD=”password”
OUTPUTDIR=”mysqldumpoutput”
MYSQLDUMP=”/usr/bin/mysqldump”
MYSQL=”/usr/bin/mysql”
purgedir=”mysqldumptars”
now=`date ‘+%Y-%m-%d-%H-%M-%S’`
# clean up any old backups – save space
/bin/rm “OUTPUTDIR/*bak” > /dev/null 2>&1
# does a all database mysql dump backup
$MYSQLDUMP –single-transaction –force –opt –user=$USER –password=$PASSWORD –all-databases > “$OUTPUTDIR/alldbdump.bak”
# get a list of databases
databases=`$MYSQL –user=$USER –password=$PASSWORD -e “SHOW DATABASES;” | tr -d “| ” | grep -v Database`
# dump each database in turn
for db in $databases; do
echo $db
$MYSQLDUMP –single-transaction –force –opt –user=$USER –password=$PASSWORD –databases $db > “$OUTPUTDIR/$db.bak”
done
#Backup section
#===================
#this make a tar of the new separate dumpfiles with a time stamp and moves the tar to separate directory upon completion
cd mysqldumpoutput/
/bin/tar -zcvf mysqldump.tar ./*
/bin/mv mysqldumpoutput/mysqldump.tar /dd02/mysqldumptars/mysqldump_${now}.tar
#This deletes any tar that is more than 7 days old for the dump backups
/usr/bin/find ${purgedir} -maxdepth 1 -name “mysqldump_*” -mtime +6 -exec rm -rf {} \; -ls
===============================================================
I HOPE YOU ENJOYED THIS TUTORIAL AND SETUP I KNOW ITS LONG. 🙂
If you log into LVS1 now and run
watch ipvsadm -L you should see your servers
To see LVS pool type ‘watch ipvsadm -L -n’ <–This shows all VIPS and real servers bound to them
LVS-HINTS: If you want to watch a specific VIP only:
” watch -n1 ‘ipvsadm -L -n|grep -A$N $VIP:$PORT’ ” <– this will run the specified command updating every 1 second.
Replace $VIP with the virtual IP $PORT with the service and $N with the number of real servers, ie ” watch -n1 ‘ipvsadm -L -n | grep -A2 192.168.0.1:80’ ”
Eg View – ‘watch ipvsadm -L -n’
=============================================================================================
Every 2.0s: ipvsadm -L -n Tue Oct 25 16:47:22 2011
IP Virtual Server version 1.2.1 (size=4096)
Prot LocalAddress:Port Scheduler Flags
-> RemoteAddress:Port Forward Weight ActiveConn InActConn
TCP 172.16.10.1:3306 wlc <—-VIP
-> 142.103.18.1:3306 Route 1000 0 45 <–Real Server
==============================================================================================
‘ip addr’ will show you which lvs the vip is bound to
To Stop keepalived ‘/etc/init.d/keepalived stop’
To start keepalived ‘/usr/local/sbin/keepalived’
===============================
If you have questions you can email me at nick@nicktailor.com