
Author: admin
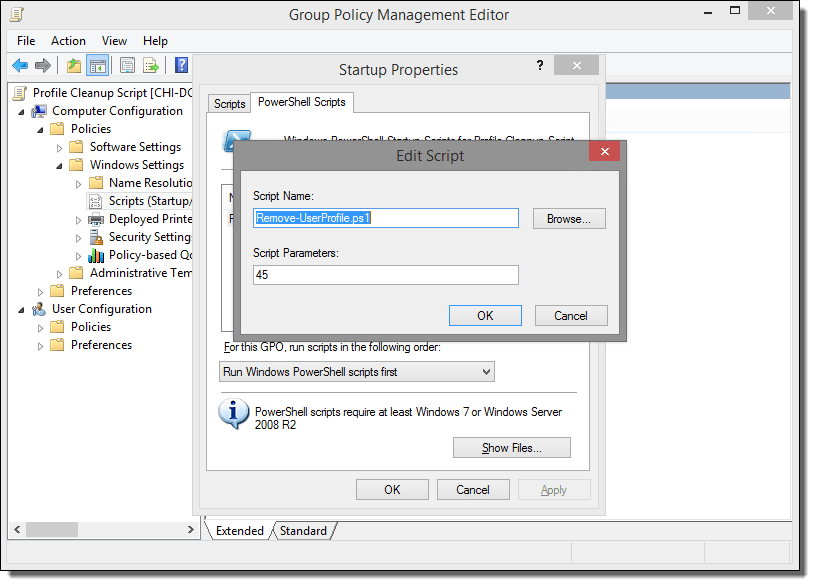
How to deploy ansibleconfigure powershell script on windows
Okay fun stuff, so I tried this a number of ways which I will describe in this blog post.
So if your windows server is joined to the domain and you have a machine that can reach all he virtual machines, WinRM is configured, and you have powershell 3.0 or higher setup.
Then you could try the following powershell for loop from SYSVOL share
Sample powershell For Loop
powershell loop deploy – ask credentials
$serverfiles=import-CSV ‘d:\scripts\hosts.csv’
$cred = get-credential
Foreach ($server in $serverfiles) {
write-output $server.names
invoke-command -computername $server.names -filepath d:\scripts\ansibleconfigure.ps1 -credential $cred
}
Note: This method sucked and failed for me due to WinRM not being there and other restrictions like host having. The other was I’m not exactly powershell intermediate had to muddle around a lot.
What you want to do here is copy the configure script to SYSVOL so all the joined machines can reach the script.
In the search bar type: (replace domain to match)


script name
How to diagnose a kernel panic caused by a killed process
You should install atop on your server as this is top on steroids and can help diagnose all kinds of server issues such as.
https://lwn.net/Articles/387202/ – Atop usage
- CPU load
- IO load
- Memory usage
- Process utilization of resources
- Paging/swaping
- etc…
- How you install atop on ubuntu/debian
- ‘apt-get install atop’
- Then you want to start the atop logging
- ‘/etc/init.d/atop start
- ‘/etc/init.d/atop start
Note : by default the atop logs every 10mins
Now lets say you console your VM or blade server. You see a message that states the server killed a process or ran out of memory or something.
Example:
- Out of memory: Kill process 11970 (php) score 80 or sacrifice child
Killed process 11970 (php) total-vm:1957108kB
When you reboot the server you will want to find out exactly how it happened. How you do this is by checking the kernel log. Now if you have kdump installed you can use that to get a dump of the kernel log and if not you can do this.
- dmesg | egrep -i ‘killed process’
- this will provide a log as indicated below
Kernel log
- [Wed July 10 13:27:30 2018] Out of memory: Kill process 11970 (php) score 80 or sacrifice child]
- [Wed July 10 13:27:30 2018] Killed process 11970 (php) total-vm:123412108kB, anon-rss:1213410764kB, file-rss:2420k]
Now once you have this log you can see the time stamp of when it occurred and you can use atop logs to drill down and find the process id, and see if you can see which daemon and or script caused the issue.
From the log ‘July 10 13:27:30 2018’ we can see the time stamp. Inside /var/log/atop you can do the following.
Run the following:
- ‘atop -r atop_20180710’
this will bring up a screen and you can toggle through the time intervals by using lowercase ‘T’ to move forward in time or Capital ‘T’ to go backward in time. - Once you find the time stamp you can
press – ‘c’ – full command-line per process to see which processes were running at that time stamp and you should be able to locate the id process from the kernel log
atop -r atop_20180710’
Example
- 3082 27% php
- 15338 27% php
- 26639 25% php
- 8520 8% php
- 8796 8% php
- 2157 8% /usr/sbin/apache2 -k start
- 11970 1% php – This is the process ID from the kernel log above and what appears to what was running. So we know it was a php script. Atop doesn’t always provide the exact script. However from the kernel log and this we can determine what was some type of rss feed. From this you can also see that it wasnt using very much CPU. This helps us determine that the php code is causing a memory leak and needs to be updated and or disabled.
- 10493 1% php
- 10942 1% php
- 5335 1% php
- 9964 0% php
Written by Nick Tailor
How to configure Ansible to manage Windows Hosts on Ubuntu 16.04
Note: This section assumes you already have ansible installed, working, active directory setup, and test windows host in communication with AD. Although its not needed to have AD. Its good practice for to have it all setup talking to each other for learning.
Setup
Now Ansible does not come with windows managing ability out of the box. Its is easier to setup on centos as the packages are better maintained on Redhat distros. However if you want to set it up on Ubuntu here is what you need to do.
Next Setup your /etc/krb5.conf
[logging]
default = FILE:/var/log/krb5libs.log
kdc = FILE:/var/log/krb5kdc.log
admin_server = FILE:/var/log/kadmind.log
[libdefaults]
default_realm = HOME.NICKTAILOR.COM
dns_lookup_realm = false
dns_lookup_kdc = false
ticket_lifetime = 24h
renew_lifetime = 7d
forwardable = true
[realms]
HOME.NICKTAILOR.COM = {
kdc = HOME.NICKTAILOR.COM
admin_server = HOME.NICKTAILOR.COM
}
[domain_realm]
.home.nicktailor.com = HOME.NICKTAILOR.COM
home.nicktailor.com = HOME.NICKTAILOR.COM
Test Kerberos
Run the following commands to test Kerberos:
kinit administrator@HOME.NICKTAILOR.COM <–make sure you do this exact case sensitive or your authenication will fail. Also the user has to have domain admin privileges.
You will be prompted for the administrator password klist
You should see a Kerberos KEYRING record.
[root@localhost win_playbooks]# klist
Ticket cache: FILE:/tmp/krb5cc_0Default principal: administrator@HOME.NICKTAILOR.COM
Valid starting Expires Service principal05/23/2018 14:20:50 05/24/2018 00:20:50 krbtgt/HOME.NICKTAILOR.COM@HOME.NICKTAILOR.COM renew until 05/30/2018 14:20:40
Configure Ansible
Ansible is complex and is sensitive to the environment. Troubleshooting an environment which has never initially worked is complex and confusing. We are going to configure Ansible with the least complex possible configuration. Once you have a working environment, you can make extensions and enhancements in small steps.
The core configuration of Ansible resides at /etc/ansible
We are only going to update two files for this exercise.
Update the Ansible Inventory file
Edit /etc/ansible/hosts and add:
[windows]
HOME.NICKTAILOR.COM
“[windows]” is a created group of servers called “windows”. In reality this should be named something more appropriate for a group which would have similar configurations, such as “Active Directory Servers”, or “Production Floor Windows 10 PCs”, etc.
Update the Ansible Group Variables for Windows
Ansible Group Variables are variable settings for a specific inventory group. In this case, we will create the group variables for the “windows” servers created in the /etc/ansible/hosts file.
Create /etc/ansible/group_vars/windows and add:
—
ansible_user: Administrator
ansible_password: Abcd1234
ansible_port: 5986
ansible_connection: winrm
ansible_winrm_server_cert_validation: ignore
This is a YAML configuration file, so make sure the first line is three dashes “‐‐‐”
Naturally change the Administrator password to the password for WinServer1.
For best practices, Ansible can encrypt this file into the Ansible Vault. This would prevent the password from being stored here in clear text. For this lab, we are attempting to keep the configuration as simple as possible. Naturally in production this would not be appropriate.
The powershell script must be run on the windows client in order for ansible to be table to talk to the host without issues.
Configure Windows Servers to Manage
To configure the Windows Server for remote management by Ansible requires a bit of work. Luckily the Ansible team has created a PowerShell script for this. Download this script from [here] to each Windows Server to manage and run this script as Administrator.
Loginto WinServer1 as Administrator, download ConfigureRemotingForAnsible.ps1 and run this PowerShell script without any parameters.Once this command has been run on the WinServer1, return to the Ansible1 Controller host.
Test Connectivity to the Windows Server
If all has gone well, we should be able to perform an Ansible PING test command. This command will simply connect to the remote WinServer1 server and report success or failure.
Type:
ansible windows -m win_ping
This command runs the Ansible module “win_ping” on every server in the “windows” inventory group.
Type: ansible windows -m setup to retrieve a complete configuration of Ansible environmental settings.
Type: ansible windows -c ipconfig
If this command is successful, the next steps will be to build Ansible playbooks to manage Windows Servers.
Managing Windows Servers with Playbooks
Let’s create some playbooks and test Ansible for real on Windows systems.
Create a folder on Ansible1 for the playbooks, YAML files, modules, scripts, etc. For these exercises we created a folder under /root called win_playbooks.
Ansible has some expectations on the directory structure where playbooks reside. Create the library and scripts folders for use later in this exercise.
Commands:
cd /root
mkdir win_playbooks
mkdir win_playbooks/library
mkdir win_playbooks/scripts
Create the first playbook example “netstate.yml”
The contents are:
– name: test cmd from win_command module
hosts: windows
tasks:
– name: run netstat and return Ethernet stats
win_command: netstat -e
register: netstat
– debug: var=netstat
This playbook does only one task, to connect to the servers in the Ansible inventory group “windows” and run the command netstat.exe -a and return the results.
To run this playbook, run this command on Ansible1:
Errors that I ran into
Now on ubuntu you might get some SSL error when trying to run a playbook. This is because the python libraries are trying to verify the self signed cert before opening a secure connection via https.
ansible windows -m win_ping
Wintestserver1 | UNREACHABLE! => {
“changed”: false,
“msg“: “ssl: 500 WinRMTransport. [SSL: CERTIFICATE_VERIFY_FAILED] certificate verify failed (_ssl.c:590)”,
“unreachable”: true
}
.
How you can get around the is update the python library to not care about looking for a valid cert and just open a secure connection.
Edit /usr/lib/python2.7/sitecustomize.py
——————–
import ssl
try:
_create_unverified_https_context = ssl._create_unverified_context
except AttributeError:
# Legacy Python that doesn’t verify HTTPS certificates by default
pass
else:
# Handle target environment that doesn’t support HTTPS verification
ssl._create_default_https_context = _create_unverified_https_context
——————————–
Then it should look like this
ansible windows -m win_ping
wintestserver1 | SUCCESS => {
“changed”: false,
“ping”: “pong”
}
Proxies and WSUS:
If you are using these you to disable proxies check on your host simply export
export no_proxy=127.0.0.1, winserver1, etc,
Or add a file in /etc/profile.d/whatever.sh
If you have WSUS configured you will need to check to see if there are updates from there or they will not show when the yaml searches for new updates.
Test windows updates yaml: The formatting is all wrong below so click on the link and it will have the proper formatted yaml for windows update.
—
– hosts: windows
gather_facts: no
tasks:
– name: Search Windows Updates
win_updates:
category_names:
– SecurityUpdates
– CriticalUpdates
– UpdateRollups
– Updates
state: searched
log_path: C:\ansible_wu.txt
– name: Install updates
win_updates:
category_names:
– SecurityUpdates
– CriticalUpdates
– UpdateRollups
– Updates
If it works properly the log file on the test host will have something like the following: C:\ansible_wu.txt
Logs show the update
2018-06-04 08:47:54Z Creating Windows Update session…
2018-06-04 08:47:54Z Create Windows Update searcher…
2018-06-04 08:47:54Z Search criteria: (IsInstalled = 0 AND CategoryIds contains ‘0FA1201D-4330-4FA8-8AE9-B877473B6441’) OR(IsInstalled = 0 AND CategoryIds contains ‘E6CF1350-C01B-414D-A61F-263D14D133B4′) OR(IsInstalled = 0 AND CategoryIds contains ’28BC880E-0592-4CBF-8F95-C79B17911D5F’) OR(IsInstalled = 0 AND CategoryIds contains ‘CD5FFD1E-E932-4E3A-BF74-18BF0B1BBD83’)
2018-06-04 08:47:54Z Searching for updates to install in category Ids 0FA1201D-4330-4FA8-8AE9-B877473B6441 E6CF1350-C01B-414D-A61F-263D14D133B4 28BC880E-0592-4CBF-8F95-C79B17911D5F CD5FFD1E-E932-4E3A-BF74-18BF0B1BBD83…
2018-06-04 08:48:33Z Found 2 updates
2018-06-04 08:48:33Z Creating update collection…
2018-06-04 08:48:33Z Adding update 67a00639-09a1-4c5f-83ff-394e7601fc03 – Security Update for Windows Server 2012 R2 (KB3161949)
2018-06-04 08:48:33Z Adding update ba0f75ff-19c3-4cbd-a3f3-ef5b5c0f88bf – Security Update for Windows Server 2012 R2 (KB3162343)
2018-06-04 08:48:33Z Calculating pre-install reboot requirement…
2018-06-04 08:48:33Z Check mode: exiting…
2018-06-04 08:48:33Z Return value:
{
“updates”: {
“67a00639-09a1-4c5f-83ff-394e7601fc03”: {
“title”: “Security Update for Windows Server 2012 R2 (KB3161949)”,
“id”: “67a00639-09a1-4c5f-83ff-394e7601fc03”,
“installed”: false,
“kb”: [
“3161949”
]
},
“ba0f75ff-19c3-4cbd-a3f3-ef5b5c0f88bf”: {
“title”: “Security Update for Windows Server 2012 R2 (KB3162343)”,
“id”: “ba0f75ff-19c3-4cbd-a3f3-ef5b5c0f88bf”,
“installed”: false,
“kb”: [
“3162343”
]
}
},
“found_update_count”: 2,
“changed”: false,
“reboot_required”: false,
“installed_update_count”: 0,
“filtered_updates”: {
}
}
Written By Nick Tailor
How to setup Anisble on Ubuntu 16.04
Installation
Type the following apt-get command or apt command:
$ sudo apt-get update
$ sudo apt-get upgrade
$ sudo apt-get install software-properties-common
Next add ppa:ansible/ansible to your system’s Software Source:
$ sudo apt-add-repository ppa:ansible/ansible
| Ansible is a radically simple IT automation platform that makes your applications and systems easier to deploy. Avoid writing scripts or custom code to deploy and update your applications— automate in a language that approaches plain English, using SSH, with no agents to install on remote systems.
http://ansible.com/ More info: https://launchpad.net/~ansible/+archive/ubuntu/ansible Press [ENTER] to continue or Ctrl-c to cancel adding it. gpg: keybox ‘/tmp/tmp6t9bsfxg/pubring.gpg’ created gpg: /tmp/tmp6t9bsfxg/trustdb.gpg: trustdb created gpg: key 93C4A3FD7BB9C367: public key “Launchpad PPA for Ansible, Inc.” imported gpg: Total number processed: 1 gpg: imported: 1 OK |
Update your repos:
$ sudo apt-get update
Sample outputs:
To install the latest version of ansible, enter:
| Ign:1 http://dl.google.com/linux/chrome/deb stable InRelease
Hit:2 http://dl.google.com/linux/chrome/deb stable Release Get:4 http://in.archive.ubuntu.com/ubuntu artful InRelease [237 kB] Hit:5 http://security.ubuntu.com/ubuntu artful-security InRelease Get:6 http://ppa.launchpad.net/ansible/ansible/ubuntu artful InRelease [15.9 kB] Get:7 http://ppa.launchpad.net/ansible/ansible/ubuntu artful/main amd64 Packages [560 B] Get:8 http://in.archive.ubuntu.com/ubuntu artful-updates InRelease [65.4 kB] Hit:9 http://in.archive.ubuntu.com/ubuntu artful-backports InRelease Get:10 http://ppa.launchpad.net/ansible/ansible/ubuntu artful/main i386 Packages [560 B] Get:11 http://ppa.launchpad.net/ansible/ansible/ubuntu artful/main Translation-en [340 B] Fetched 319 kB in 5s (62.3 kB/s) Reading package lists… Done |
$ sudo apt-get install ansible
Type the following command:Finding out Ansible version
$ ansible –version
Sample outputs:
| ansible 2.4.0.0
config file = /etc/ansible/ansible.cfg configured module search path = [u’/home/vivek/.ansible/plugins/modules’, u’/usr/share/ansible/plugins/modules’] ansible python module location = /usr/lib/python2.7/dist-packages/ansible executable location = /usr/bin/ansible python version = 2.7.14 (default, Sep 23 2017, 22:06:14) [GCC 7.2.0] |
Creating your hosts file
Ansible needs to know your remote server names or IP address. This information is stored in a file called hosts. The default is /etc/ansible/hosts. You can edit this one or create a new one in your $HOME directory:
$ sudo vi /etc/ansible/hosts
Or
$ vi $HOME/hosts
Append your server’s DNS or IP address:
[webservers]
server1.nicktailor.com
192.168.0.21
192.168.0.25
[devservers]
192.168.0.22
192.168.0.23
192.168.0.24
I have two groups. The first one named as webserver and other is called devservers.
Setting up ssh keys
You must configure ssh keys between your machine and remote servers specified in ~/hosts file:
$ ssh-keygen -t rsa -b 4096 -C “My ansisble key”
Use scp or ssh-copy-id command to copy your public key file (e.g., $HOME/.ssh/id_rsa.pub) to your account on the remote server/host:
$ ssh-copy-id -i $HOME/.ssh/id_rsa.pub root@server1.cyberciti.biz
$ ssh-copy-id -i $HOME/.ssh/id_rsa.pub root@192.168.0.22
$ ssh-copy-id -i $HOME/.ssh/id_rsa.pub root@192.168.0.23
$ ssh-copy-id -i $HOME/.ssh/id_rsa.pub root@192.168.0.24
$ eval $(ssh-agent)
$ ssh-add
Now ansible can talk to all remote servers using ssh command.
Send ping server to all servers
Just type the following command:
$ ansible -i ~/hosts -m ping all
Sample outputs:
192.168.0.22 | SUCCESS => {
“changed”: false,
“failed”: false,
“ping”: “pong”
}
192.168.0.23 | SUCCESS => {
“changed”: false,
“failed”: false,
“ping”: “pong”
}
192.168.0.24 | SUCCESS => {
“changed”: false,
“failed”: false,
“ping”: “pong”
}
Find out uptime for all hosts
$ ansible -i hosts -m shell -a ‘uptime’ all
Sample outputs:
| do-de.public | SUCCESS | rc=0
10:37:02 up 1 day, 8:39, 1 user, load average: 0.95, 0.27, 0.12
do-blr-vpn | SUCCESS | rc=0 16:07:11 up 1 day, 8:43, 1 user, load average: 0.01, 0.01, 0.00
ln.gfs01 | SUCCESS | rc=0 10:37:17 up 22 days, 5:30, 1 user, load average: 0.18, 0.12, 0.05 |
Where,
- -i ~/hosts: Specify inventory host path. You can setup shell variable and skip the -i option. For e.g.: export ANSIBLE_HOSTS=~/hosts
- -m shell: Module name to execute such as shell, apt, yum and so on
- -a ‘uptime’: Module arguments. For example, shell module will accept Unix/Linux command names. The apt module will accept options to update remote boxes using apt-get/apt command and so on.
- all: The all means “all hosts.” You can speificy group name such as devservers (ansible -i hosts -m shell -a ‘uptime’ dbservers) or host names too.
Update all Debian/Ubuntu server using apt module
Run the following command:
$ ansible -i ~/hosts -m apt -a ‘update_cache=yes upgrade=dist’ dbservers
Writing your first playbook
You can combine all modules in a text file as follows in yml format i.e. create a file named update.yml:
—
– hosts: dbservers
tasks:
– name: Updating host using apt
apt:
update_cache: yes
upgrade: dist
Fig.01: Ansible playbook in actionNow you can run it as follows:
$ ansible-playbook -i ~/hosts update.yml
How to setup Ansible to manage Windows hosts with Centos 7
Note- This assumes you already have a out of the box ansible setup and a windows AD and windows test VM joined to the domain.
Install Prerequisite Packages on centos7 with ansible already installed
Use Yum to install the following packages.
Install GCC required for Kerberos
yum -y group install “Development Tools”
Install EPEL
yum -y install epel-release
Install Ansible
yum -y install ansible
Install Kerberos
yum -y install python-devel krb5-devel krb5-libs krb5-workstation
Install Python PIP
yum -y install python-pip
Install BIND utilities for nslookup
yum -y install bind-utils
Bring all packages up to the latest version
yum -y update
Check that Ansible and Python is Installed
Run the commands:
ansible – – version | head -l 1
python – – version
The versions of Ansible and Python here are 2.4.2 and 2.7.5. Ansible is developing extremely rapidly so these instructions will likely change in the near future.
Configure Kerberos
There are other options than Kerberos, but Kerberos is generally the best option, though not the simplest.
Install the Kerberos wrapper:
pip install pywinrm[Kerberos]
Kerberos packages were installed previously which will have created /etc/krb5.conf
Edit /etc/krb5.conf
[logging]
default = FILE:/var/log/krb5libs.log
kdc = FILE:/var/log/krb5kdc.log
admin_server = FILE:/var/log/kadmind.log
[libdefaults]
default_realm = HOME.NICKTAILOR.COM
dns_lookup_realm = false
dns_lookup_kdc = false
ticket_lifetime = 24h
renew_lifetime = 7d
forwardable = true
[realms]
HOME.NICKTAILOR.COM = {
kdc = HOME.NICKTAILOR.COM
admin_server = HOME.NICKTAILOR.COM
}
[domain_realm]
.home.nicktailor.com = HOME.NICKTAILOR.COM
home.nicktailor.com = HOME.NICKTAILOR.COM
Test Kerberos
Run the following commands to test Kerberos:
kinit administrator@HOME.NICKTAILOR.COM <–make sure you do this exact case sensitive or your authenication will fail. Also the user has to have domain admin privileges.
You will be prompted for the administrator password klist
You should see a Kerberos KEYRING record.
[root@localhost win_playbooks]# klist
Ticket cache: FILE:/tmp/krb5cc_0Default principal: administrator@HOME.NICKTAILOR.COM
Valid starting Expires Service principal05/23/2018 14:20:50 05/24/2018 00:20:50 krbtgt/HOME.NICKTAILOR.COM@HOME.NICKTAILOR.COM renew until 05/30/2018 14:20:40
Configure Ansible
Ansible is complex and is sensitive to the environment. Troubleshooting an environment which has never initially worked is complex and confusing. We are going to configure Ansible with the least complex possible configuration. Once you have a working environment, you can make extensions and enhancements in small steps.
The core configuration of Ansible resides at /etc/ansible
We are only going to update two files for this exercise.
Update the Ansible Inventory file
Edit /etc/ansible/hosts and add:
[windows]
HOME.NICKTAILOR.COM
“[windows]” is a created group of servers called “windows”. In reality this should be named something more appropriate for a group which would have similar configurations, such as “Active Directory Servers”, or “Production Floor Windows 10 PCs”, etc.
Update the Ansible Group Variables for Windows
Ansible Group Variables are variable settings for a specific inventory group. In this case, we will create the group variables for the “windows” servers created in the /etc/ansible/hosts file.
Create /etc/ansible/group_vars/windows and add:
—
ansible_user: Administrator
ansible_password: Abcd1234
ansible_port: 5986
ansible_connection: winrm
ansible_winrm_server_cert_validation: ignore
This is a YAML configuration file, so make sure the first line is three dashes “‐‐‐”
Naturally change the Administrator password to the password for WinServer1.
For best practices, Ansible can encrypt this file into the Ansible Vault. This would prevent the password from being stored here in clear text. For this lab, we are attempting to keep the configuration as simple as possible. Naturally in production this would not be appropriate.
Configure Windows Servers to Manage
To configure the Windows Server for remote management by Ansible requires a bit of work. Luckily the Ansible team has created a PowerShell script for this. Download this script from [here] to each Windows Server to manage and run this script as Administrator.
Log into WinServer1 as Administrator, download ConfigureRemotingForAnsible.ps1 and run this PowerShell script without any parameters.
Once this command has been run on the WinServer1, return to the Ansible1 Controller host.
Test Connectivity to the Windows Server
If all has gone well, we should be able to perform an Ansible PING test command. This command will simply connect to the remote WinServer1 server and report success or failure.
Type:
ansible windows -m win_ping
This command runs the Ansible module “win_ping” on every server in the “windows” inventory group.
Type: ansible windows -m setup to retrieve a complete configuration of Ansible environmental settings.
Type: ansible windows -c ipconfig
If this command is successful, the next steps will be to build Ansible playbooks to manage Windows Servers.
Managing Windows Servers with Playbooks
Let’s create some playbooks and test Ansible for real on Windows systems.
Create a folder on Ansible1 for the playbooks, YAML files, modules, scripts, etc. For these exercises we created a folder under /root called win_playbooks.
Ansible has some expectations on the directory structure where playbooks reside. Create the library and scripts folders for use later in this exercise.
Commands:
cd /root
mkdir win_playbooks
mkdir win_playbooks/library
mkdir win_playbooks/scripts
Create the first playbook example “netstate.yml”
The contents are:
– name: test cmd from win_command module
hosts: windows
tasks:
– name: run netstat and return Ethernet stats
win_command: netstat -e
register: netstat
– debug: var=netstat
This playbook does only one task, to connect to the servers in the Ansible inventory group “windows” and run the command netstat.exe -a and return the results.
To run this playbook, run this command on Ansible1:
ansible-playbook netstat_e.yml
How to setup ansible on centos 7
Prerequisites
To follow this tutorial, you will need:
Step 1 — Installing Ansible
To begin exploring Ansible as a means of managing our various servers, we need to install the Ansible software on at least one machine.
To get Ansible for CentOS 7, first ensure that the CentOS 7 EPEL repository is installed:
Once the repository is installed, install Ansible with yum:
We now have all of the software required to administer our servers through Ansible.
Step 2 — Configuring Ansible Hosts
Ansible keeps track of all of the servers that it knows about through a “hosts” file. We need to set up this file first before we can begin to communicate with our other computers.
Open the file with root privileges like this:
You will see a file that has a lot of example configurations commented out. Keep these examples in the file to help you learn Ansible’s configuration if you want to implement more complex scenarios in the future.
The hosts file is fairly flexible and can be configured in a few different ways. The syntax we are going to use though looks something like this:
Example hosts file
[group_name]
alias ansible_ssh_host=your_server_ip
The group_name is an organizational tag that lets you refer to any servers listed under it with one word. The alias is just a name to refer to that server.
Imagine you have three servers you want to control with Ansible. Ansible communicates with client computers through SSH, so each server you want to manage should be accessible from the Ansible server by typing:
You should not be prompted for a password. While Ansible certainly has the ability to handle password-based SSH authentication, SSH keys help keep things simple.
We will assume that our servers’ IP addresses are 192.168.0.1, 192.168.0.2, and 192.168.0.3. Let’s set this up so that we can refer to these individually as host1, host2, and host3, or as a group as servers. To configure this, you would add this block to your hosts file:
/etc/ansible/hosts
[servers]
host1 ansible_ssh_host=192.168.0.1
host2 ansible_ssh_host=192.168.0.2
host3 ansible_ssh_host=192.168.0.3
Hosts can be in multiple groups and groups can configure parameters for all of their members. Let’s try this out now.
Ansible will, by default, try to connect to remote hosts using your current username. If that user doesn’t exist on the remote system, a connection attempt will result in this error:
Ansible connection error
host1 | UNREACHABLE! => {
“changed”: false,
“msg“: “Failed to connect to the host via ssh.”,
“unreachable”: true
}
Let’s specifically tell Ansible that it should connect to servers in the “servers” group with the nick user. Create a directory in the Ansible configuration structure called group_vars.
Within this folder, we can create YAML-formatted files for each group we want to configure:
Add this code to the file:
/etc/ansible/group_vars/servers
—
ansible_ssh_user: ansiblenick
YAML files start with “—“, so make sure you don’t forget that part.
Save and close this file when you are finished. Now Ansible will always use the ansiblenick user for the servers group, regardless of the current user.
If you want to specify configuration details for every server, regardless of group association, you can put those details in a file at /etc/ansible/group_vars/all. Individual hosts can be configured by creating files under a directory at /etc/ansible/host_vars.
Step 3 — Using Simple Ansible Commands
Now that we have our hosts set up and enough configuration details to allow us to successfully connect to our hosts, we can try out our very first command.
Ping all of the servers you configured by typing:
Ansible will return output like this:
Output
host1 | SUCCESS => {
“changed”: false,
“ping”: “pong”
}
host3 | SUCCESS => {
“changed”: false,
“ping”: “pong”
}
host2 | SUCCESS => {
“changed”: false,
“ping”: “pong”
}
This is a basic test to make sure that Ansible has a connection to all of its hosts.
The -m ping portion of the command is an instruction to Ansible to use the “ping” module. These are basically commands that you can run on your remote hosts. The ping module operates in many ways like the normal ping utility in Linux, but instead it checks for Ansible connectivity.
The all portion means “all hosts.” You could just as easily specify a group:
You can also specify an individual host:
You can specify multiple hosts by separating them with colons:
The shell module lets us send a terminal command to the remote host and retrieve the results. For instance, to find out the memory usage on our host1 machine, we could use:
As you can see, you pass arguments into a script by using the -a switch. Here’s what the output might look like:
Output
host1 | SUCCESS | rc=0 >>
total used free shared buffers cached
Mem: 3954 227 3726 0 14 93
-/+ buffers/cache: 119 3834
Swap: 0 0 0
How to recover file system corruption on 4T LVM using DDrescue on a VM
How to recover file system corruption on 4T LVM on ubuntu using a VM
In this example we will be fixing a xfs filesystem that failed initial xfs_repair
If this happens don’t panic. We can fix most likely fix it.
Steps to do
Create new physical volume, volume group and logical volume
Now install ddrescue and make image of the corrupted file system on the new logical volume
Make swap size 30gigs – this is needed so when we repair the filesystem it doesn’t time out because it runs out of memory. Which tends to be the problem when trying to repair such large filesystems.
Sample outputs
Create rescue image on new logical volume
◦ ddrescue -d -r3 $oldfilesyetem imagefile.img loglocationpath.logfile
ddrescue -d -r3 /dev/recovery/data /mnt/recovery/recovery.img /mnt/recovery/recoverylog.logfile
Once the file is created we want to repair it using xfs_repair
– agno = 29
– agno = 9
– agno = 10
– agno = 11
– agno = 12
– agno = 13
– agno = 14
– 20:02:48: check for inodes claiming duplicate blocks – 88951488 of 88951488 inodes done
Phase 5 – rebuild AG headers and trees…
– 20:02:57: rebuild AG headers and trees – 41 of 41 allocation groups done
– reset superblock…
Phase 6 – check inode connectivity…
– resetting contents of realtime bitmap and summary inodes
– traversing filesystem …
– traversal finished …
– moving disconnected inodes to lost+found …
Phase 7 – verify and correct link counts…
Done
Written By Nick Tailor
How to add DNS entries from Linux to Windows DNS
If you already have a linux server that is already joined to the domain.
Its really simple to do, provided that you allow dynamic updates to your dns. If your server is not joined to the domain then please check out my how to add linux server to windows domain post.
Now if your deploying a server from a lab environment that isnt already joined to the domain, you can use this script to achieve it. Since you need DNS already created in windows DNS inorder to join a new server to your domain this helps automate that process.
What it will do is find the ip of the origin server, you can manually enter the hostname into the script or set it up as a argument to enter upon running the script. I just plug it in, and when its done running, it will have created the forward and reverse records for the new server by adding dns through a server that was already joined.
http://www.nicktailor.com/files/dnsaddwindowsscript (actual script)
#!/bin/sh
#This part will find the ip of the server
ADDR=`/sbin/ifconfig eth0 | grep ‘inet addr’ | awk ‘{print $2}’ | sed -e s/.*://`
#This part will provide the reverse arpa record based on the ip of the server grabbed from above.
rr=$(printf %s “$ADDR.” | tac -s.)in-addr.arpa
#This is just a hostname I plugged in because I was too lazy to have the server host itself. You can change this if you want.
HOST=`testnick.nicktailor.com`
#This portion of the script will connect to a server via ssh and run the dnsupdate through a server already joined to the domain, and add the records to the windows dns server.
ssh -qt SOMEHOST echo -e “server 192.168.1.10\nupdate add $HOST 600 A $ADDR\nsend\n” | nsupdate -v
ssh -qt SOMEHOST echo -e “server 192.168.1.10\nupdate add $rr 86400 PTR $HOST\nsend\n” | nsupdate -v
If all goes well you should be able to dig the results
dig any @nameserver testnick.nicktailor.com
Results:
; <<>> DiG 9.8.2rc1-RedHat-9.8.2-0.47.rc1.el6 <<>> any @192.168.1.10 testnick.nicktailor.com
; (1 server found)
;; global options: +cmd
;; Got answer:
;; ->>HEADER<<- opcode: QUERY, status: NOERROR, id: 51960
;; flags: qr aa rd ra; QUERY: 1, ANSWER: 1, AUTHORITY: 0, ADDITIONAL: 0
;; QUESTION SECTION:
;testnick.nicktailor.com. IN ANY
;; ANSWER SECTION:
testnick.nicktailor.com. 600 IN A 192.168.1.10
;; Query time: 0 msec
;; SERVER: 10.18.2.12#53(10.18.2.12)
;; WHEN: Fri Dec 2 13:51:13 2016
;; MSG SIZE rcvd: 61
dig any @nameserver 10.1.168.192.in-addr.arpa
Results:
; <<>> DiG 9.8.2rc1-RedHat-9.8.2-0.47.rc1.el6 <<>> any @10.1.168.192.in-addr.arpa
; (1 server found)
;; global options: +cmd
;; Got answer:
;; ->>HEADER<<- opcode: QUERY, status: NOERROR, id: 42354
;; flags: qr aa rd ra; QUERY: 1, ANSWER: 1, AUTHORITY: 0, ADDITIONAL: 0
;; QUESTION SECTION:
;10.1.168.192.in-addr.arpaa. IN ANY
;; ANSWER SECTION:
10.1.168.192.in-addr.arpa. 3600 IN PTR testnick.nicktailor.com.
;; Query time: 0 msec
;; SERVER: 10.18.2.12#53(10.18.2.12)
;; WHEN: Fri Dec 2 14:39:41 2016
;; MSG SIZE rcvd: 85
Written by Nick Tailor
How to automate your RedHat Satellite 5.x Channel Cloning
- In order for the scripts to work without sending your password to “ps” you will need to setup a config for spacecmd
Credential File
Spacecmd can be configured with a credentials file so you are not prompted for a username/password each time. This allows for easier scripting.
- Create a hidden spacecmd directory in your home. Lock down permissions.
mkdir ~/.spacecmd
chmod 700 ~/.spacecmd
- Create a config file in the directory and give proper permissions.
touch ~/.spacecmd/config
chmod 600 ~/.spacecmd/config
- Edit the config file and fill in the header, Spacewalk server fqdn, username, and password.
vim ~/.spacecmd/config

[spacecmd]
server=spacewalk.nicktailor.com
username=usernamehere
password=passwordhere
Clone scripts
http://www.nicktailor.com/files/clonechannel.redhat7.sh
http://www.nicktailor.com/files/clonechannel.redhat6.sh
http://www.nicktailor.com/files/clonechannel.redhat5.sh
REDHAT 7 (EXAMPLE)
#!/bin/bash
spacewalkServer=spacewalk.nicktailor.com
defaultOrgAdmin=USER
read -p “Enter to Continue”
How to RDP to VNC and authenticate using AD (OpenSuSe)
For this we will be setting up VNC server and XRDP which allow you to use windows remote desktop terminal services client to connect to your linux desktop as you would any windows machine with centralized authentication using Active directory.
XRDP is a wonderful Remote Desktop protocol application that allows you to RDP to your servers/workstations from any Windows machine, MAC running an RDP app or even Linux using an RDP app such as Remmina.
Virtual Network Computing (VNC) is a graphical desktop sharing system that uses the Remote Frame Buffer protocol (RFB) to remotely control another computer. Essentially the Linux version of windows RDP.
Now since there was no xrdp package in the opensuse repository it was a bit of dirty install to get it all working.
1. First you will need to install VNC Server using yast2
- Yast2 –I tigervnc
- Chkconfig vnc on
- Vncpasswd <enter>
- Type your vncpasswd twice
- systemctl start vnc (/usr/bin/vncserver)
Should like below
New ‘X’ desktop is bvanhm01:1
Starting applications specified in /root/.vnc/xstartup
Log file is /root/.vnc/nicktailor.1:1.log
Now we want to install xrdp. Since Opensuse doesn’t come with a built in repository or rpm that has xrdp lalready compiled to use. We will have to make this setup just a little dirty and compile our own xrdp and then configure it to work the VNC. Im not 100% sure if there is one, however when I looked for one I didn’t see one so I chose this route which worked out. However it is a bit of a dirty setup
First we need to download xrdp source
- Create a directory to store it the source files
- cp xrdp-v0.6.1.tar.gz /home/xrdp
- tar –zxvf /home/xrdp/xrdp-v0.6.1.tar.gz
- zypper install git autoconf automake libtool make gcc gcc-c++ libX11-devel libXfixes-devel libXrandr-devel fuse-devel patch flex bison intltool libxslt-tools perl-libxml-perl font-util libxml2-devel openssl-devel pam-devel python-libxml2 xorg-11
- You will also want to enable remote desktop services inside opensuse
- Now you want to install xrdp
- change to the xrdp directory and run
- ./bootstrap
- ./configure
- make
- then as root
- make install
2. Once the application is installed you will need to add the library files so the system can read it
- vi /etc/ld.so.conf
- add the following lines(32bit & 64bit):
- /usr/local/lib64/xrdp
- /usr/local/lib/xrdp
- save the file
- next run ldconfig so the system pick the libraries directories up.
- Make sure your /etc/xrdp/xrdp.ini has the following
[globals]
bitmap_cache=yes
bitmap_compression=yes
port=3389
crypt_level=high
channel_code=1
[xrdp1]
name=sesman-Xvnc
lib=libvnc.so
username=ask
password=ask
ip=127.0.0.1
port=-1
- Your start up script for xrdp lives inside /home/xrdp/xrdp-v0.6.1/instfiles/xrdp.sh
- cd in /etc/init.d/
- You can create a symlink inside /etc/init.d/
- ln -s /home/xrdp/xrdp-v0.6.1/instfiles/xrdp.sh xrdp.sh
- Now I added the start up script to /etc/rc.d/boot.local so that it would start up on reboots
- Add this line
- /home/xrdp/xrdp-v0.6.1/instfiles/xrdp.sh start
- Add this line
For the next portion please ensure you opensuse is already added to AD and authenticating against AD. If not please refer to my earlier blog post on how to add opensuse to Active Directory. If you did everything correctly your pam.d authentication will be using pam_winbind to authenticate against AD and the following includes will use that authentication process for xrdp to get to VNC
- Now in order to get xrdp to use AD authentication you will need to update the /etc/pam.d/xrdp-sesman
#%PAM-1.0
auth include common-auth
account include common-account
password include common-password
session include common-session
ISSUES YOU CAN RUN INTO WITH GNOME
- So now you should be in theory be able to use remote desktop provided there is no firewall preventing you from connecting to the machine, connect using your AD credentials through rdp from a windows desktop. There is small catch. If your using gnome it MAY not work. What might happen is you will initially connect and then as soon as you get a screen lock, the login screen will be hammering away with you unable to type your password in to gain access to your session again
- You might see something like this in your /var/log/messages
2015-08-27T14:15:44.341964-07:00 nicktailor01 gnome-session[10533]: ShellUserVerifier<._userVerifierGot@/usr/share/gnome-
shell/js/gdm/util.js:350
2015-08-27T14:15:44.342139-07:00 nicktailor01 gnome-session[10533]: wrapper@/usr/share/gjs-1.0/lang.js:213
2015-08-27T14:15:44.721076-07:00 bvanhm01 gnome-session[10533]: (gnome-shell:10609): Gjs-WARNING **: JS ERROR: Failed to obtain user
verifier: Gio.DBusError: GDBus.Error:org.freedesktop.DBus.Error.AccessDenied: No session available
2015-08-27T14:15:44.721381-07:00 nicktailor01 gnome-session[10533]: ShellUserVerifier<._userVerifierGot@/usr/share/gnome-
shell/js/gdm/util.js:350
2015-08-27T14:15:44.721553-07:00 nicktailor01 gnome-session[10533]: wrapper@/usr/share/gjs-1.0/lang.js:213
2015-08-27T14:15:45.100944-07:00 nicktailor01 gnome-session[10533]: (gnome-shell:10609): Gjs-WARNING **: JS ERROR: Failed to obtain user
verifier: Gio.DBusError: GDBus.Error:org.freedesktop.DBus.Error.AccessDenied: No session available
- The reason for this appears to be related to a bug with systemd and gnome-shell. I reviewed several online forum cases regarding it, however there was no solid resolution other than downgrading system. Even later updates caused similar issues. Fear not..there is a solution. I found we can simply change the desktop from gnome to a more stable one like XFCE. How do we do this I will show you 🙂
- First install XFCE
- zypper install -t pattern xfce
- Next you want to remove gnome
- zypper rm $(rpm -qa | grep gnome)
Now reboot your machine and you should be able to remote desktop via rdp to your linux machine with no issues from opensusu. I realize this is bit dirty, but it was fun wasn’t it??? 🙂
If you have any questions email nick@nicktailor.com